


Buy anything from 5,000+ international stores. One checkout price. No surprise fees. Join 2M+ shoppers on Desertcart.
Desertcart purchases this item on your behalf and handles shipping, customs, and support to KUWAIT.
🚀 Upgrade your desktop’s USB game — speed, power, and simplicity in one sleek red card!
The Inateck PCI-e to USB 3.0 expansion card adds four SuperSpeed USB 3.0 ports to your desktop, delivering up to 5Gbps transfer rates. Featuring a 15-pin SATA power connector, it ensures stable power delivery to connected devices. Compatible with Windows XP through Windows 8 and Mac OS 10.8+, this plug-and-play PCIe card includes all necessary cables for quick installation, making it an essential upgrade for professionals seeking faster data transfer and expanded connectivity.


| ASIN | B00B6ZCNGM |
| Best Sellers Rank | #156 in Internal USB Port Cards |
| Brand | Inateck |
| Built-In Media | 1x 15pin to 2x 15pin SATA Y-cable, 1x 4pin to 2x15pin cable, 1x CD Driver, 1x Mounting screw, 1x USB3.0 PCI-E expansion card, 1x User Manual |
| Compatible Devices | Desktop |
| Customer Reviews | 4.3 out of 5 stars 4,447 Reviews |
| Global Trade Identification Number | 06957599305020, 06957599311274 |
| Hardware Interface | PCI Express x4 |
| Item Type Name | USB 3.0 PCIe Card |
| Item Weight | 0.11 Pounds |
| Manufacturer | Inateck |
| Mfr Part Number | KT4001 |
| Model Number | KTU3FR-4P |
| Number of Items | 1 |
| Operating System | Windows 7, Windows 8 |
| Style | With Power |
| Style Name | With Power |
| Warranty Description | 1 year warranty |
A**S
Works Great on a Mac Pro
I purchased the Inateck 4-Port USB 3.0 PCIe card for my Mac Pro. Yes, for a Mac. Nothing on the product description indicated that it would work on a Mac but I had seen a YouTube video using the Inateck card on a Mac Pro and figured it was the same and would work. The Inateck card was cheaper than some of the other options (which had more reviews) and what convinced me to get the Inateck was the fact that it CAME WITH CABLES. No need to purchase additional cables since they're provided in the box. Unlike the YouTube video, Inateck listened to the reviewers comments and provided 2 separate, short cables, that don't have all the clunky extra connectors on them. (For the record, you don't actually NEED to connect this card to a Power Source in the computer ... technically it needs it to be able to provide power the specified power to the USB device, however, most USB devices that you're connecting this to will have their OWN power source (like a Powered Hub or a Powered External USB hard-drive). So for those of you nervous about connecting the card to a power source, don't worry. Installation in the Mac Pro was a breeze. I had an open SATA hard-drive bay inside my Mac Pro and an open PCIe port. Inateck included 2 cables with the USB card ... a SATA to 4-pin Molex connector (the "old school" connectors that go to a power supply ... or to a DVD bay) and SATA "Y-cable" (SATA to SATA). For the Mac Pro I used the Y-cable. Note that you will need to connect this SATA cable to an open SATA port on the motherboard. The Mac Pro has 4 easy to install Hard-Drive bays. Normally you'd slide a hard-drive into the bay and it would mate with the SATA connector but for this installation you'll need to use one of these open SATA ports. I plugged the Inateck card into an open SATA port in my 4th hard-drive bay. Note that the SATA connector for a hard-drive is basically broken into 2 sections: POWER and DATA. The only part of the connector you need here is the 15-pin POWER section. Inateck provided a cable with the POWER section. *However*, you need to know that the cable provided by Inateck will NOT fit properly out of the package. You need to modify the cable slightly. I was a bit apprehensive to do this at first but once I did it, I laughed at how simple it is. The Y cable with SATA on all ends will need to be modified. Take the end of it that has only 1 connector, this is the side that goes onto the motherboard (either one of the "Y" ends will plug into the Inateck card). The connector has a plastic nub on either end, so it would fit in a normal SATA Power connector, however you'll have to cut one of these ends off to fit on the Mac Pro. You're not cutting the connector, its pins, or its wires, you're simple cutting off the plastic nub so the connector will fit onto the Mac Pro's motherboard. First, make note of which orientation the connector must mate. You'll see that one side of the connector meets the edge of the connector in your computer. The other end would normally have the DATA section of the cable but the Inateck cable doesn't have the data section and instead it has a square end of plastic. You need to cut this part of plastic off so that the SATA cable will mate on the motherboard of the Mac Pro. I used a pair of scissors and a file to get the plastic end cut off. Once you've done this simple modification you can use the cable for installation. To install in the Mac Pro: 1) Unplug the computer and touch something metal to ground yourself. 2) Unlock the case and take off the side door. 3) Lay the computer down. 4) There are 2 spring-loaded finger screws covering the available PCIe slots. Remove the 2 screws and take off the lock holding down the open PCIe cards. 5) Insert the Inateck USB card into an available PCIe slot (I used slot 3, for example). Make sure it's nice and snug in the PCIe slot NOTE 1: The Inateck card doesn't use the entire length of the PCIe connector. Don't worry, it still fits. NOTE 2: For some reason the 4th PCIe slot on the Mac Pro won't work. The computer will recognize the card but no power will be provided to your devices. This is a known issue and I found multiple references online to this. DON'T plug the card into the 4th PCIe slot. 6) Take one end of the SATA "Y-Connector", the side that has the "Y" with 2 of the same connector, and plug one of those into the Inateck card. 7) Take the other end of the SATA connector, the side that you cut the plastic off, and connect it to an available SATA POWER port in your Mac Pro (available hard-drive bay). 8) Put the PCIe cover back up using the spring-loaded finger screws. 9) Close up your computer 10) Power on and Enjoy. I ran a speed test using a Seagate 3 TB drive I picked up at Costco and was very impressed with the speeds. The "Disk Speed Test" I ran (by Blackmagicdesign) clocked read and write speeds in the 150-170mb/sec range (averaged around 160mb/sec). Pretty impressive! Glad it works on the mac, even if it's not advertised to. I did NOT need any drivers to make this work on the Mac. I'm using Mac OS X 10.9.1 (Mavericks) and the drivers are built into the computer. USB 3.0 drivers are included in Mac OS X 10.8.2+.
B**N
great reliability
this product has lasted me nearly a decade. zero issues. in fact the ports ore more reliable than the ports on my motherboard. would buy again.
H**R
it worked great immediately after boot up
After reading in other reviews that this works well with older Mac Pros, I purchased one to install in my 2008 Mac Pro. Installing the KT4001 in my computer was difficult because I had to take out my fan unit and run some molex extension cables from the DVD drive in order to provide power to this card. In hindsight, I wish I purchased the KT4004 model which doesn't require power. I didn't know about the KT4004 at the time of purchase. If you're getting one of these for an older Mac Pro, you might want to take my advice and just get the KT4004 instead! Despite the installation difficulties, it worked great immediately after boot up. There was no need for any driver installation. I should add, I'm using an older operating system, Mountain Lion, due to having old software which requires it. I was happy to find out that this card works even with the old OS. After a week of use, my computer stopped recognizing the card. I contacted Inateck support who had me do some troubleshooting and determined that the card was at fault. Their support team was very understanding and shipped me a new card free of charge and didn't require that I ship the broken card back to them. The replacement has been working fine for a few days now. If there is any trouble with it I will be sure to update my review. For now, it's working great and this was a quick and easy way to add USB 3.0 to my older computer. I'm enjoying the fast speed for doing backups and transferring large files.
R**T
Great product to get your CPU up to date
I received this expansion card 3 days ago for install in a ten year old Gateway CPU still running Windows XP. I considered the model with the two internal 3.0 ports, but was unable to find any 3.0 ports to replace the existing 2.0 ports on the front of my tower. Radio Shack may have the ports but their prices are a little high, so I bought this model, plus two one meter extension cables. This setup will work for now, I can always buy a 3.0 hub at a later date. Install was very easy for this card, it took more time to disconnect and reconnect all cables running to the CPU than it did to install the card. My CPU is tens years old and I was able to use the supplied 1x15 Pin to 2x15 Pin SATA Power Cable, so I think that everyone would be able to use the same power connector. Do not install the card in the case first. You should connect the cards power cable to your CPU power supply cable first, than connect the SATA/Power to the card, than install the card. This order of install will prevent you from trying to connect the cables in tight quarters. Youtube has videos of UK reviewers running speed test programs to show how fast the cards 3.0 ports are. This means nothing to me because it does not tell me how long it would take to transfer big files. I installed the drivers and ran real world tests. I copied six files with a total size of 5.54 GB from a USB 2.0 to a 2.0 drive, with a 23:17 min. transfer time. I copied the same files from the cards 3.0 port with a one meter 3.0 extension cable to a 3.0 drive, with a 2:10 min. transfer time. I transferred a 97.1 GB file with the same 3.0 setup with a 47:37 min. transfer time. This was in preparation for moving from Windows XP to Windows 7, which I did the following day. The card does have one problem. It did not show that my new 3.0 drive was connected, so I plugged the drive into a 2.0 port and it was now listed on my computer as being drive J. I then plugged back into the 3.0 port and the portable drive was now on my computer but listed as being the 2.0 drive J. I can not power down the drive to properly disconnect the drive, I have to shut down the computer first and then remove the drive. I hoped that this was just a quirk with XP, but it is still a problem after I installed Windows 7 with the most current drivers. I will contact Inateck support to see if they have a solution for this problem and post an update. I am very pleased with this cards performance and suggest that everyone make the 3.0 upgrade, this is the system that current products are using and it will make your life easier. March 17, 2014 update What I thought was a problem is not really a problem. My computer still lists the 3.0 ports as being drive J, but after clicking Safely Remove Hardware and eject media at the lower right part of the task bar, you are given the option to disable the drive even if it is labeled incorrectly. Clicking the listed drive seems to disable the drive, it is no longer listed as an available drive and a message tells you that you can safely remove the drive now. It does not shut off the power light on the drive like it did in XP and this still gives me some concern. I did like the added reassurance of the power light going out to let me know that I could remove the drive.
K**E
Perfect for older Mac Pros
Worked perfectly in my 2012 Mac Pro running macOS sequoia with opencore legacy patcher. As another reviewer mentioned you can use the included sata power cable to power the card from one of the drive bays, you just have to break off a piece of plastic on the connector attached to the cable.
E**S
A Solid Performer with Some Longevity Concerns
A Solid Performer with Some Longevity Concerns I installed this Inateck PCI-e card into my older desktop to add some much-needed USB 3.0 ports. The installation process was straightforward. The card slid easily into an available PCI Express x1 slot, and I appreciated that the package included both a SATA power cable and a Molex-to-SATA adapter, which covered all the bases for my power supply setup. On my Windows 10 system, it was recognized immediately without any need to hunt down drivers, which is always a huge plus. The performance, when it works, is exactly as advertised. I’ve been using it to transfer large video files to an external SSD, and the speed is a night-and-day difference compared to the old USB 2.0 ports on my case. All four ports functioned correctly, providing stable connections for my devices. However, the reason for my middling score is a concern over long-term durability. After a period of consistent use, the card began to exhibit intermittent connectivity issues. One of the ports will occasionally disconnect and reconnect a device without warning. This isn't a constant problem, but it's frequent enough to be concerning and makes me hesitant to trust it with critical transfers or connected storage. I've reseated the card and ensured the power connection is secure, but the issue persists, pointing toward a potential flaw in the card's build or components. **Bottom Line:** This card does its job well initially and is a budget-friendly way to add fast USB 3.0 ports. For light, occasional use, it might be perfectly fine. But based on my experience, I have reservations about its reliability over time. If you need a set-it-and-forget-it solution for important peripherals or constant data transfer, you might want to consider investing in a model with a more robust reputation for durability.
N**S
Superspeed Indeed
I backed up a Norton backup from my secondary 1TB internal hard drive onto an external Seagate GoFlex 3TB hard drive. It took 11 hours and 38 minutes. That is a loooonnnngggg time. My backup HDD was almost full and that was with only two backup file/folders, so I decided to store the older file that I had started in 2011, that included pictures and music and took up a lot of memory. I recently decided to start a new backup; September 2015, which sucked up about 250GB, but archived the older 735GB folder. I have an older EVGA X58 SLI x3 motherboard that I bought in April 2009. It has the Intel i7 920 Nehalem 2.66GHz quad processor with 12 GB DDR3 1600 mamory. My backup HDD is a WD 1TB, but it is not the black. I must have just missed the newer X58 motherboard (MB) that came with USB 3.0 and only so I only have USB 2.0. No, I never got around to doing any over-clocking with this MB or adding more graphics cards to the SLI 2 or 3 slots. I don't do any gaming to speak of or any graphic arts that require that kind of fun. I decided it was time to upgrade my USB as I don't have the necessity to build a new computer, so I got this USB 3.0 card and installed it in the available secondary x16/x8 PCI Express 2 slot. I thought about trying it in the third x8 slot, but I read it needed to be in the x16, if not in the x1 slot, and I had other chores to perform. Unfortunately, this motherboard only has one PCI express x1 slot and it is covered by my GTX 285 video card. Anyway, I used the 4 pin to SATA power adapter cable, loaded the drivers from the CD and everything worked great. While I had hoped for a bit more speed, with the USB 3, the transfer to the Seagate went from 11+ hours to 4 hours and 15 minutes for the same file, which I deleted afterwards; only need 1. Anyway, I'll take the 2.5x faster speed. I'll update if I have any issues.
C**R
Disappointing Experience
____ U P D A T E D ____ R E V I E W: The card installed fine, including the separate power port. The 4 ports on this expansion card do function. The speed of these ports should be as much as 10 times (1,000%) higher real-world throughput (400 MB/sec) compared with a USB 2.0 port (35-40 MB/sec), yet there was very little greater bandwidth than with USB 2. I performed tests using USB 3.0 thumbdrives which are rated at twice the speed of USB 2 and yet they performed barely higher on this USB 3 card (36 MB/sec) than on a USB 2 port (24 MB/sec) in the same machine. I tried the test using 2 different thumbdrives. The card does work but provides only 33% higher throughput compared with USB 2 ports when it should provide up to 1,000% higher throughput. The manufacturer of this card wants you to know that only the most recent operating systems from Microsoft will allow this card to reach speeds meaningfully-greater than a USB 2 port would provide. My computer uses Windows VISTA and the mfr says that that explains why this card could not perform anywhere nearly at USB 3 speed. That would mean that this card is of effectively no value or worth to most users of older PCs. Significantly-greater throughput is the primary likely reason to buy such a card - but they don't explain that only newer PCs which likely already have USB 3 ports would allow this card to perform like a USB 3 product. So, there is very little purpose in buying this product. Any newer PC will likely already have USB 3 ports. Instead of just very bad performance it means that this mfr is providing false hope to the millions who are using older operating systems. The fact that this card will act nearly the same as the older USB version 2 ports should be spelled out for everybody who reads this item's product description on Amazon or anywhere else. Not only will this card NOT provide USB 3 speed except on the newest of operating systems but it wastes money and it wastes a slot in your PC. This is unnecessary and also irresponsible marketing. The manufacturer says that they will try to update this product description so that it will tell you not to expect USB 3 performance from this product unless you have a very recent operating system on your PC. I hope that Amazon is apprised of this fact and takes appropriate action.
L**O
Prima USB3.0 Interface Karte mit guter Ausstattung und kompatibel zur Oculus Rift CV!
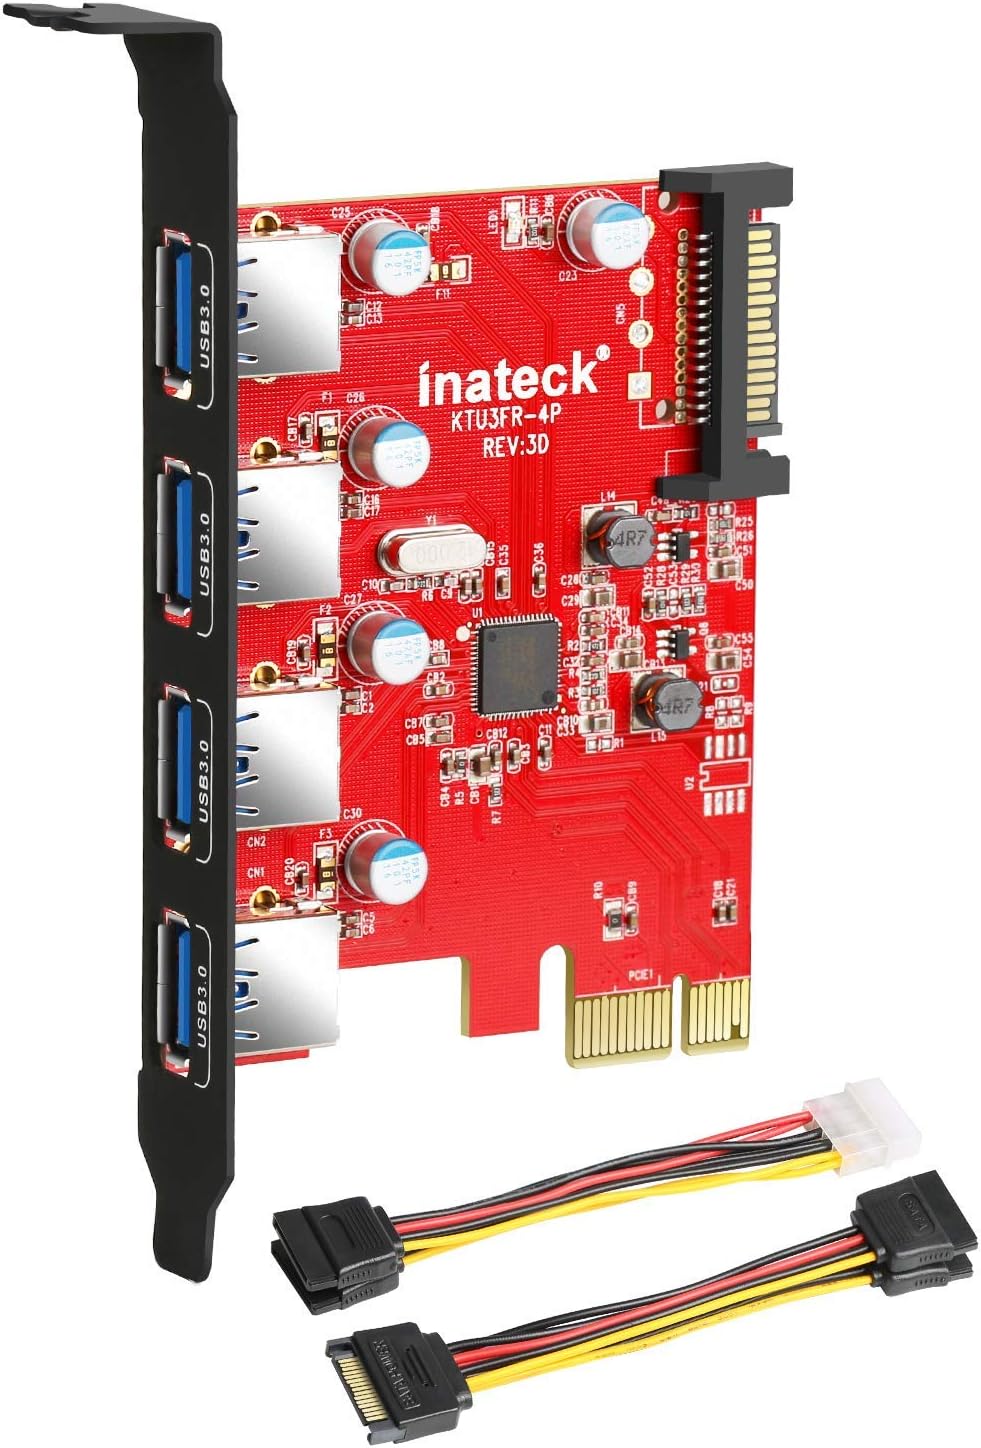
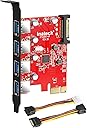
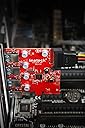
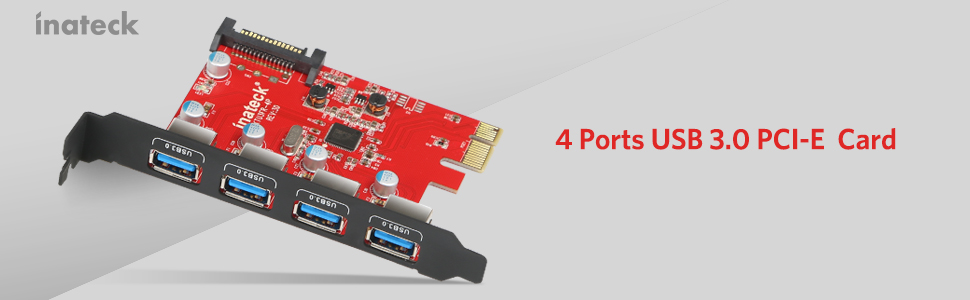
Ausgangslage: Ich besitze einen Rechner (Windows 10) der zwar von seiner Rechenleistung her noch up to date ist, aufgrund eines älteren Motherboards jedoch leider keine USB3.0 Unterstützung bietet. Da ich mir gerade eine Oculus Rift VR Brille geholt habe und diese mindestens 2 USB 3.0 Anschlüsse benötigt, habe ich mich nach geeigneten Erweiterungskarten für meinen Rechner umgeschaut. Diese Karte hier habe ich leider erst in zweiter Instanz entdeckt, zuerst hatte ich mein Problem durch den Kauf zweier!!! USB3.0 Karten der Firma Logilink (Typ PC0054A) geglaubt gelöst zu haben. Grundsätzlich funktionierten auch die Logilink Karten problemlos im Betrieb mit normalen USB 3.0 Geräten. Trotzdem erzählte jedoch die Konfigurationssoftware der Rift mir das die USB Anschlüsse nicht kompatibel seien, bzw. ggf. nicht die maximale Leistung und Geschwindigkeit bereitstellen könnten. Da habe ich dann mal ein wenig genauer nachgeforscht und herausgefunden das die Sensoren der Rift ein spezielles Feature der USB 3.0 Schnittstelle nutzen um Latenzzeiten in der Signalübertragung zu reduzieren. Dieses Feature nennt sich Multiple Transaction Translation(MTT). Der Chipsatz auf der Inateck Karte (Fresco Logic FL1100EX) unterstützt nämlich genau dieses Feature und bietet nebenbei noch einige andere Funktionen die "State of the Art" sind. Lieferumfang: Die Ausstattung ist reichlich, ich würde Sie als vollständig beschreiben. Für den aktuellen Preis der Karte hier auf Amazon (reduziert von 29 auf 19 Euro) ist sie sogar super und über dem Durchschnitt der anderen USB Karten. Lieferumfang: 1 * -Eine Erweiterungskarte PCI-E auf 4 x USB3.0 1 * Treiber-CD, 2* Montageschraube, 1 * Anleitung, 1 * 4pin auf 2x15pin Kabel, 1 * SATA Strom-Y-Kabel SATA Buchse an 2x SATA Stecker Einbau: Der EInbau an sich ging völlig unproblematisch. Die Karte belegt einen freien PCI-E Steckplatz. Der muss natürlich mindestens im Rechner vorhanden sein. Die beiden Logilink Karten mit je 2 USB 3.0 Anschlüssen raus, die Inateck Karte rein. An dieser Stelle seien noch lobend die beiden Adapter und Befestigungsschrauben erwähnt die sich im Lieferumfang befinden. Der der Inateck Adapter unter anderem auch die Battery Charging (BC) Specification Revision 1.2 (Charging Downstream Port (CDP)), und China Charging YD/T 1591-2009 Standards unterstützt, bietet er auf seiner Platinen einen zusätzlichen SATA Powerconnector um die USB Anschlüsse beim LAden von Smartphones, Tablets etc. entsprechend mit Leistung zu unterstützen. Dazu schließt man entweder direkt einen freien SATA Power Connector von seinem Netzteil an die Adapterkarte an. Hat man keinen freien SATA Power Connector mehr, oder nur noch einen, so kann man den entsprechenden, mitgelieferten Y Connector nutzen, der aus einem Anschluss 2 macht. Für die, die nur einen der älteren 4 pol Power-Anschlüsse haben, liegt ein zweiter Adapter bei, der diesen auf 2 x SATA Power konvertiert. Das fidne ich sehr lobenswert,d a viele Installationen manchmal an solchen Kinigkeiten wie fehlenden Adapterkabeln etc, scheitert, die man dann mit viel Geld und Glück einzeln irgendwo nachkaufen muss. Also noch den internen Powerstecker draufgesteckt und fertig ! Die Karte wurde automatisch erkannt und eingerichtet. Die Treiber CD wurde zunächst nicht benötigt. Test: Der Gerätemanager (siehe Fotos) zeigte den Controller an, der zunächst scheinbar mit Microsoft Standardtreibern installiert wurde. Es gab keine unbekannten Geräte mehr im Gerätemanager. Ein erster Test mit externen USB Festplatten und Sticks zeigt auch das der Controller funktionell zur Verfügung stand. Geschwindigkeitstests ergaben das prinzipiell auch normale USB3.0 Übertragungsgeschwindigkeiten für die besagten Geräte zur Verfügung stand. Leider meldete die Geräteverwaltung des Oculus Setups für das Headset und den Camerasensor immer noch ein Problem mit den neuen USB 3.0 Anschlüssen. Diesmal jedoch mit dem interessanten Hinweis das man ggf. mit geupdateten Treiber von Fresco Logic ggf. eine bessere Performance errechen könnte. (Zuerst schaute ich auf der mitgelieferten Treiber CD nach, diese beinhaltete jedoch leider nur Treiber bis maximal Windows 7 64 bit. Schade, und das obwohl Win10 ja nun doch schon einige Tage auf dem Markt ist. Also ab auf die Herstellerseite und nach Windows 10 Treibern gesucht. Ich bin statt auf die Website von Inateck direkt auf die Website des Controllerchipherstellers (Fresco Logic) gegangen, da man dort oft die aktuelleren Treiber bekommt. In diesem Fall war es aber das selbe Treiberpaket in der Revision 3-0.3.6.8.0 welches auch Inateck auf seiner Website anbot: Hier der Downloadlink (Wählt des Paket des USB 3.0 Hostcontrollers) https://support.zoho.com/portal/frescologic/helpcenter/articles/latest-drivers Schritte: 1. Ladet das o.a. Treiberpaket runter und installiert es 2. Entfernt danach die USB 3.0 Controllerkarte aus dem Gerätemanager 3. Startet die neue Hardwareerkennung neu, oder startet alternativ den Rechner neu Dann wird der Controller nämlich mit den Herstellertreibern installiert und kann dann scheinbar mit allen Features arbeiten. Daraufhin gab es keine Meldungen mehr im Oculus Device Center. Alles prima. Als weiteren Test habe ich versucht mein Samsung S6 Edge an einem der USB 3.0 Ports zu laden, gleichzeitig mit einem IPAD2. Funktioniert absolut problemlos und exakt so schnell wie es mit den Ladegeräten ebenfalls dauert. Fast Charge / Quickcharge 2.0/3.0 werden jedoch nicht unterstützt. Das wäre wohl auch zuviel des Guten. Weitere Performancetests und Benchmarkorgien des Controllers möchte ich euch ersparen, da ich nicht weiß ob meine Festplatten/Sticks hier überhaupt das aktuelle Maximum bringen (könnten) oder nicht. Jedenfalls liefen auch meine USB2.0 Geräte problemlos, sogar eine steinalte Hewlett Packard Digitalkamera mit USB 1.0 wurde ohne Mucken erkannt. Fazit: Ein prima Möglichkeit seinen älteren Rechner (Freien PCI-Express Bus vorausgesetzt) um (weitere) 4 USB 3.0 Ports zu erweitern. Der Lieferumfang mit den beiden Powerdapatern, Treiber CD, Anleitung und zweier Schrauben für die Befestigung ist als sehr gut zu bezeichnen. Im Verhältnis zu dem aktuellen Preis von 19 Euro (29 Euro vorher) ist sie mit 4 Ports sogar verhältnismäßig günstiger als einige anderen Karten. Der verwendete Chipsatz unterstützt die maximale Performance und alle Features der USB 3.0 Spezifikation, unter anderem auch das Multiple Transaction Translation(MTT) das die VR-Brille Oculus Rift für eine optimale Performace der Tracking-Sensoren und der Erfassungskamera benötigt. Alles in allem ein prima Dapter zu einem guten Preis. Leider befanden sich auf der mitgelieferten Treiber CD keine Windows 10 Treiber, die sich aber im Paket über die Inateck/Fresco Logic Seiten problemlos herunterladen ließen. Von einer automatischen Installation von Windows 10 mit Windows Standard Treibern sollte man sich nicht täuschen lassen (siehe Bilder), danach stehen nicht alle Features wie Multiple Transaction Translation(MTT) zur Verfügung. Treiber direkt vom Hersteller besorgen und nachinstallieren !
J**S
Très bien !
Fonctionne parfaitement, branché sur slots d'extension PCI-E x 16 (celui pour une deuxième carte graphique) reconnue immédiatement avec Windows 11, pas besoin du CD d'installation, prévoir une alimentation, branché sur câble d'alimentation 15 Pin SATA , câbles fournis
D**N
Top.
Fait bien le job. Marque connue qui propose en général de bons produits.
T**N
supports PCI passthrough in VMware ESXi
works fine. supports PCI passthrough in VMware ESXi (DELL) server
A**O
Prodotto di qualità
Ho comprato questo prodotto per avere usb 3.0 su un pc vecchiotto (2011), ma ancora molto performante. Ho acquistato infatti alcune componenti nuove (tra cui questo prodotto) e sono stato molto contento. Infatti, il pc ad oggi è ancora più prestante. La velocità ovviamente è raddoppiata nel trasferimento dei file, ma rimane comunque bassa per gli standard di oggi. Ma dal trasferire 15gb in due minuti anziché in 10 mi sembra un bel passo in avanti. Consigliato!
Trustpilot
1 month ago
3 days ago