

Buy anything from 5,000+ international stores. One checkout price. No surprise fees. Join 2M+ shoppers on Desertcart.
Desertcart purchases this item on your behalf and handles shipping, customs, and support to KUWAIT.
🌟 Drive smarter, not harder — see the night like never before!
The Gentex 50-GENK2AM Auto-Dimming Rear View Mirror is a sleek, windshield-mounted mirror that automatically dims to reduce headlight glare from vehicles behind you. Measuring 12 x 6.5 x 4.75 inches, it features advanced sensor technology for adaptive dimming, enhancing nighttime driving safety and reducing eye strain. Designed for universal fit and easy installation, it comes with all necessary hardware, making it ideal for both DIYers and professional installers.
| ASIN | B00PHLM3EI |
| Auto Part Position | Left |
| Automotive Fit Type | Universal Fit |
| Best Sellers Rank | #181,079 in Automotive ( See Top 100 in Automotive ) #505 in Automotive Interior Mirrors |
| Brand | Gentex |
| Brand Name | Gentex |
| Color | Black |
| Compatible with Vehicle Type | Car |
| Customer Reviews | 4.5 out of 5 stars 306 Reviews |
| Fit Type | Universal Fit |
| Item Weight | 0.63 Kilograms |
| Lens Curvature Description | Convex |
| Manufacturer | Gentex |
| Manufacturer Part Number | 50-GENK2AM |
| Material | Glass |
| Material Type | Glass |
| Model Number | 50-GENK2AM |
| Mounting Type | Windshield Mount |
| OEM Equivalent Part Number | 50-GENK2AM |
| Operation Mode | Manual |
| Other Special Features of the Product | Auto-Dimming |
| Shape | Rectangular |
| Size | 12 x 6.5 x 4.75 in. |
| UPC | 718196965538 826003002120 |
| Unit Count | 1.0 Count |
| Vehicle Service Type | Car |
C**2
Easy Installation. Works GREAT!
I installed this in my 2015 Fusion and it is really high quality and a lot nicer than the piece of crap flippy style mirrors or whatever they are called. I used a Bussmann fuse tap and it took just a few minutes to have it all hooked up and installed. My car had an empty fuse slot for an auto dimming mirror (since obviously it didn't come with one standard for some silly reason) so it functions like it would it would if it came from the factory. The only issue is that they don't include the wire concealer but it's well worth the extra few bucks if you want to make it look good. I will probably never buy another car without an auto-dimming mirror but if I do I'll definitely get another one of these.
J**S
Works for 2012 Toyota Prius
I recently bought a 2012 Toyota Prius that was missing it's mirror but still had the mount glued to the windshield. This mirror worked perfectly with the existing mount, all that is required is a Torx bit to secure a set screw. This also upgraded the vehicle to have auto-dimming, so I had to install the wiring. Luckily it is as simple as buying a Low-Profile Mini Fuse tap, crimping it to the 12V power line for the mirror, plugging the tap into the cigarette lighter outlet in the fuse panel, and running the wire up the A-pillar underneath the plastic trim. I had it completely installed in less than an hour.
A**R
Great Product. Read here for helpful installation hints!
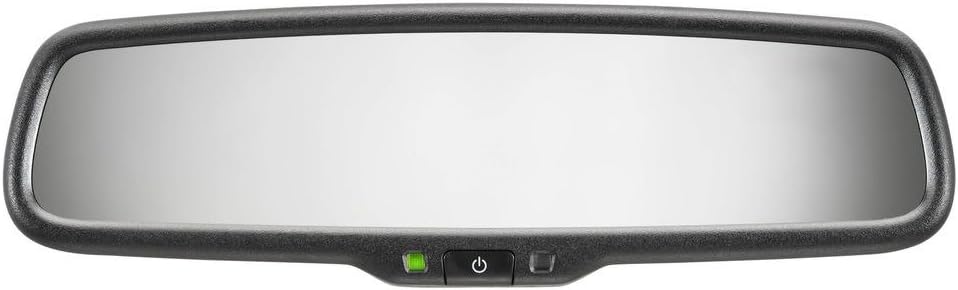
First off, the actual product. I'm a hard critic when it comes to aftermarket products. I want the best for the return. Not cheap, but 'what you pay is what you get'. This is worth the $$. Found myself playing around while driving enjoying the difference and how much it helps. I live in Brooklyn and driving the BQE every night, its gets exhausting flipping my mirror to see traffic and then flipping again to tone it down. Installation. Okay for me, it was a process. I own a 2000 Honda CRV, so the OEM mirror mount is in the roof, not the windshield Mount: I had to mount a new metal bracket on the glass to hold the mirror. First off, buy the 3 pack of metal mounts. DO NOT USE plastic. It's not easy to mount to glass. I ended up making my own (work in a fabrication shop) to save time waiting for the mount. In terms of glue, stay away from epoxys, caulk, 5-minute adhesives, yada yada yada! It all takes time to cure only to find out it might not hold. You want UV Glue! It dries fast, and holds strong! I work with NYC Museums, Calvin Klein Fashion Exhibits, so trust me. If it holds for them, it'll hold for you! This stuff is great; https://www.amazon.com/CRL-UV702-High-Viscosity-Adhesive/dp/B006JFKP3W. It has a shelf life of 18 months after production. It's toxic, so wear a respirator. Don't forget the UV Light source, amazon has a bunch of flashlights, again need glasses, or just don't stare directly at it. Mark your window from the outside where you want the mount. Wipe the inside window and your mount down with any kind of stripper like acetone, denatured, rubbing alcohol. Apply a thin amount of UV Glue to your mount. Press it against the window. Tape it into place. Look outside and make sure the glue covered the whole area between the window and mount. Put the light source right on outside and shine down on your glue for a minimum 5 minutes, at most 10 minutes. Once hardened, its not going anywhere! Wiring: Okay this was a bit of a challenge, I could tap into my radio, but it's a headache getting it out. The easiest thing to tap into for me was the window adjustment control. It normally just pops out! Disconnect the harness and feed that down to below your steering wheel. You'll need a multimeter, wire strippers (at least 20 gauge) , crimps and crimpers. Don't use the splice connects they give you. Not safe and will fail eventually. Could buy this set, https://www.amazon.com/EL-SKY-Terminal-Connectors-Assorted-Electrical/dp/B01LA82M8S. It'll last you awhile. Use the red butt crimps. Check the wires until you find a 12v source. Should only be one. Clip, strip, crimp, plug it back again. Done.
T**G
2019 Base XLT Explorer- how to install
For those installing this to replace a standard mirror and they own a 2019 XLT base Explorer, read on. First, the mirror looks good and I doubt most will be able to tell it's not stock. Second, installation is easy, if you know the color codes on your wires of the map lights. I didnt. O.o I finally got it, but let's just say just because a wire has green on it, does not necessarily make it a ground. Last, instructions. 1) Use a flat head screwdriver and insert at the base of the old mirror where it mates to the window. Pry out as you pull up on the mirror. If in doubt, google it. There are plenty of videos showing you how to do this. 2) Pull down on the sunglass/map light assembly gently. It will pull right out and unplug the wire from the lights. Set the assembly aside. 3) Get a machine screw with a head big enough to not pass thru the ground wire loop on the wiring for the new mirror. This will be your ground. 4) Get a drill and drill bit for drilling a hole for the ground screw. Use the minor diameter size for your drill bit for the screw size you are using. 5) Drill into the metal plate attached to the roof in the sunglass/map light cavity. Making sure it is NOT the roof of the car. Double check the distance between the plate and the roof. I had about two inches. Make sure your ground screw is not too long to inadvertently pierce the roof. That would be bad. 6) Install ground screw and wire. 7) Attach the red IDC clip to the yellow and green wire. 8) Push the clip of the other wire for the mirror into the back of the IDC clip. 9) Feed wires thru opening in cavity against windshield. 10) Zip tie excess neatly. Or cut and splice. 11) Plug wires into back of mirror. 12) Slide mirror into position on windshield and tighten the torx set screw. 13) Start car. Green light should be on in the front of the mirror. 14) Test by covering the sensor on the back of the mirror. It should dim. 15) Reinstall the sunglass/map light assembly. Make sure you plug the lights in. You should be done
R**U
Packaging damaged
To understand why a low review please read on. This is the second of these mirrors I have bought in the last few months. The 1st one was perfect. This one came in a very badly damaged box, maybe water damage, Wiring loom loose, no instruction card. Gentex Customer service had a test sequence but I could not tell if the unit worked on the bench when 12v was applied. I wrote to Gentex customer service and they took two days to get back to me. They recommended that I return the item through Amazon as they feared water damage. However while waiting for this response I installed the mirror in my new Subaru. Worked perfectly!
A**A
Easy Install on 2015 Chevrolet Sonic
While the mirror doesn’t come with instructions, I bought a fuse tap and crumpets too. This is how I installed it for a Chevrolet Sonic: 1. Purchase a fuse tap, electrical tape, and crimps. 2. Connect the fuse tap to the red wire and crimp it. I had to remove the head of the red wire in order to crimp it to the fuse tap. 3. Open the fuse box which is to your lower left below the steering wheel. 4. I added the fuse tap and ran the wire out of the fuse box below the port and inserted it into the weather stripping all the way up to the rear view mirror. 5. The fuse tap was inserted into the onstar fuse opening since I already had installed a CarPlay radio and removed all the onstar functionality from the car. 6. The mirror worked great and turns on normally. Great for driving at night.
E**O
Good OEM quality replacement in a 2023 Sierra
The mirror fit well in a 2023 GMC Sierra 1500. GENTEX is supped to be an OEM supplier, so this mirror looks OEM. Install of the mirror itself was pretty straight forward. You remove the forward camera surround and unscrew the old mirror, then slide this new mirror in and tighten the screw. The hard part, at least for the Sierra, was finding a switched power source. The USB fuse is switched, but it's a triple fuse and I didn't have a tap for that. So ended up running a wire from the 12V outlet, routing behind the glovebox and ending in the passenger fuse area.
T**A
Works great, with some annoyances
Once this mirror is installed properly it's great. It dims quickly when needed, but not so quickly that it's jarring, and the green power LED is dim enough to not distract you while driving, though it would be nice if you could turn off just the LED altogether. However, I have two main complaints related to installation: 1) They don't include a wire cover. It's a tiny piece of plastic that goes a long way toward making the install look professional, but instead of including it they'd rather sell it separately for another $11. 2) The wires that come with it are just a bit too short to reach the stereo head unit, which would probably be the simplest place for most people to find a hot accessory wire to splice into. Instead I had to go probing factory harnesses in the passenger-side A-pillar for a suitable connection.
M**.
Excelente espejo.
Excelente producto y excelente precio. Me gustó bastante.
蟻**也
夜間のドライブが快適。
純正ミラーから交換。 これを装着するだけで、クルマの室内の高級感が増しますし、実際の性能としても、夜間の高速走行が楽になりました。 自動車メーカーは、これを全車種に装着すべきでは? 事故も減るはずです。
D**U
Rapport qualité prix
Belle qualité mais le bras articulé est trop court
A**N
Cheaper than Aussie products
The mirror was a good buy, did exactly what it’s supposed too.
S**E
Great
Works exactly as described. Just needed to order the proper piece to attach it to the windshield.
Trustpilot
2 weeks ago
3 weeks ago