Deliver to KUWAIT
IFor best experience Get the App
معلومات عنا
دعم العملاء
احصل على التطبيق

قم بتوجيه الكاميرا لتنزيل التطبيق
حقوق الطبع والنشر © 2024 Desertcart Holdings Limited


✨ Elevate Your Privacy Game! ✨
The DKTIE Static Cling Decorative Window Film is a non-adhesive privacy solution measuring 17.7 x 78.7 inches, designed to enhance your home’s aesthetic while providing UV protection, glare reduction, and energy efficiency. Its easy installation process and stylish designs make it a practical alternative to traditional window coverings.
E**Y
10000% recommend
this stuff is literally perfect. let’s so much light in but no one can see in. I’m half tempted to do all the windows in my house now. I ordered more to do my front door. It’s easy to do and just looks so nice
S**H
Wow, worth the wait!
The color and size I chose took a little longer to arrive than the typical Amazon package but it was well worth the wait because it’s beautiful and easy to install. Can’t wait to pick a matching paint color!
T**D
Very pretty
I was pretty pleased with these, very pretty. Not see thru at all. Still allows light in. Easy to apply, sticks well. The hard part is cutting them. The utility knife tool they give you is garbage. It ripped and tore. I used a mat and roller cutter instead. Worked better.
K**Y
Looks great, renter friendly!
We have a huge south-ish facing window that the sun shines through so brightly we have to keep the blinds closed like vampires. We also live on the bottom floor, and this window gives a great opportunity to see exactly what we're watching on TV. We also have a cat with OCD, whos entire day is absolutely ruined if the sun shines in too well.I ended up having to purchase 2 rolls, equalling nearly 200ft of this stuff and I still just barely had enough! Matching up the design was quite the puzzle, but overall the instillation was fairly easy. It's nice they include a squeegee and spray bottle, but for the love of everything use a standard sized spray bottle for the water. I didn't find it necessary to use soapy water, and a larger bottle made it easier to slide the film around before the static took hold.I'm overall very pleased with this purchase! My windows are also clean for the first time since I've moved in, so that's a great bonus.
M**Y
Stunning
Renovating our 119 yr old house, original glass that had paint on the edges. and the transoms are painted shut. this was easy to install, i had read the reviews, cleaned window with windex, the spray bottle with water we sprayed directly on the window til it was wet, and placed the piece we cut (used my wifes sewing square and rolling cutter not scissors for perfectly straight even cut) have a small amount of overage and sliced it off once it dried with an exacto knife. tool i used is the same tool for peel and stick wallpaper. took maybe 10 mins start to finish.
L**Y
DKTIE Frosted Window Film Beautiful, but a Bit of a Hassle
I purchased the DKTIE frosted window film approximately a year ago with high hopes of enhancing the privacy and aesthetics of my windows. After a year of use, here's my honest review.First and foremost, the DKTIE frosted window film is undeniably pretty. It added a touch of elegance and privacy to my windows, making the space feel more cozy and inviting. Its frosty appearance created a pleasant diffusion of natural light, without sacrificing my privacy. So, in terms of aesthetics, it gets a solid thumbs up.However, my enthusiasm for this product was dampened by the installation process. Cutting the film to fit my windows was a frustrating endeavor, even with a brand new blade. The film seemed to resist my attempts to get clean, straight lines, often resulting in jagged edges. This made the installation process longer and more cumbersome than I had anticipated.The real struggle, though, came when trying to peel off the backing and apply the film to the window. It was almost impossible to get a clean separation between the film and the backing. This caused a lot of frustration, as I had to continuously reposition and adjust the film, leading to air bubbles and wrinkles. It took multiple attempts to get it right, and even then, it wasn't perfect.In conclusion, the DKTIE frosted window film is undoubtedly visually appealing and has held up well over the past year. However, the challenging installation process, especially when it comes to cutting and peeling, has left me with mixed feelings. If I ever need a similar product in the future, I'll likely explore other options that offer a smoother and more user-friendly installation process.
M**.
LOVE it!
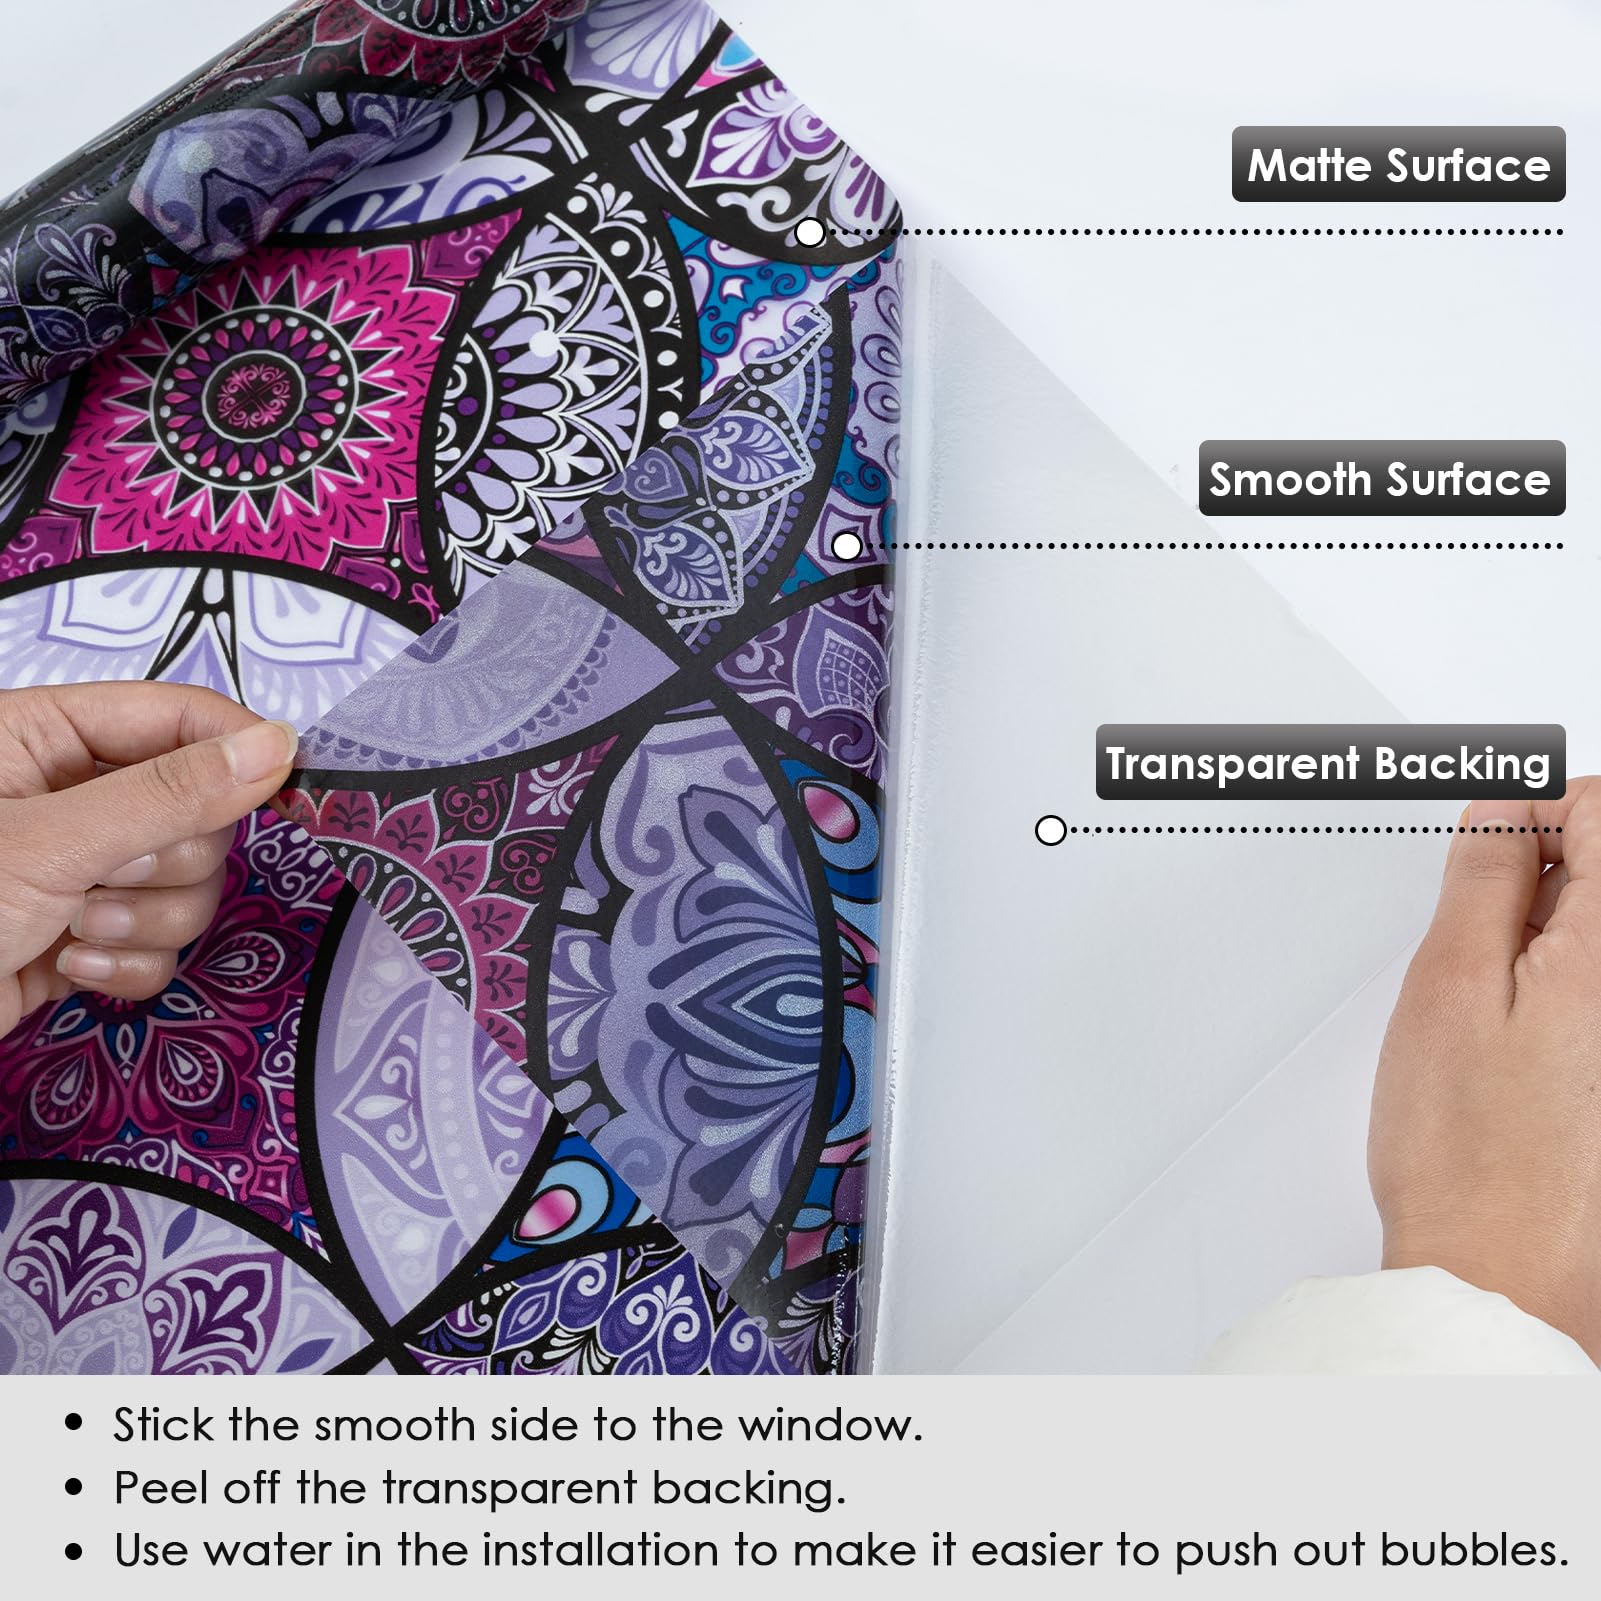
I am extremely happy with this product. I got it to cover a whole wall of mirrored closet doors in a new place that I just rented, so that movement in my reflection isn't constantly catching my eye whenever I'm in my bedroom. Since I put it onto mirrored doors instead of windows I can't review the sheerness, but on a mirror reflection & movement in the reflection is completely gone, which is what I wanted. Unfortunately for me the widest roll leaves a few inches of mirror reflection on either side of each door, so I'll have to buy some glass pens and fill in with those. We'll see how that goes.Regarding installation I can see that my many years of scrapbooking made the installation much easier for me than it would have been for my husband or some other members of my family, so I'll mention a few tips here, for the non-crafters who may need to install this stuff.Tools - A few extra tools I found critical to ease of installation were;1- A pair of scissors2- A straight edge for cutting off the excess film. I used a yardstick. A ruler would also work.3- CLEAR scotch tape (gift wrap tape.) NOT the kind that you can't see through, which has removable qualities for wrapping gifts. You need sticky tape of some kind, not removable tape.4- All the tools that came with the film are in the middle of the tube. There are two pieces for the squeegie, a spray bottle, and a blade knife.Techniques -1- Gather your tools and put them right next to the glass where you want to install the decorative-film.2- Clean the glass or mirror surface that you want to put it on with soapy water and a scratchy scrubber to remove EVERYTHING that may be stuck to the glass. Every tiny little thing.3- It can be difficult to initially separate the protective backing-film layer from the decorative-film layer. Use the tape to do this. Stick the tape to the back corner (on the backing-film side) rubbing hard to make the tape really stick to the backing-film, and then pull on the tape like a tab-pull. You may need to get it started by also using your fingernail to pick at & lift the edge of the decorative film, which is a tad bit thicker than the backing-film.3- Once you've lifted the backing-film from the decorative film, cut a 2-4 inch strip of the backing-film off at the edge all the way across. Cut off the backing film on the edge that you want to install at the top of your window or mirror. If you peel off the entire backing it will be very difficult to get it aligned correctly when you go to stick it to the window, because it will grab & stick to the glass all over the place instead of just at the top.4- Spray the exposed decorative film strip and the top 10-12 inches of the glass that you want to stick it to. Not light spray, you want it moderately wet. You don't need water to pour down the glass, but you do want more than just a light mist.5- Let the film unroll from the top edge and hang down while you stick the 2-4 inches of exposed wet decorative-film edge to the glass. I did it with my hand, but if it's having trouble sticking you may need to use the squeegie that came with the film. When you are done sticking the top strip to the glass the rest should hang. Step back and make sure you aligned the top the way you want it, so that when you're done it's not installed slightly tilted.6- Once you see that the top is aligned correctly, you can peel off the back layer all the way down. Once you've peeled off the backing you should work from the top down, and from the middle outward. Do about 10 inches at a time and make sure you've removed all the bubbles before you move down to the next section, and just work your way down to the bottom.7- Once the decorative-film is installed all the way down to the bottom, get a straight edge and use that to evenly cut the bottom off with the blade knife that came with the kit.Done! Hope this helps someone. :)
M**H
Excellent
Colors patterns quality
M**C
Bueno, fáciles colocar
Sencillo de colocar y de buen tamaño, alcanza para 2 ventanas medianas
D**X
Centre the geometric design.
In terms of size... make sure you allow for the trimming all sides in order to centre the geometric design. Good product, applied quite easily.
D**R
I’m in love!
This window stuff is amazing. Excellent quality, easy to install. Awesome! Highly recommend.First photo: inside at night2nd: outside at night3rd: inside at night (different time)4th: inside during the day (with a little bit of sunshine that came out)
A**
Lindos patrones
Se ve hermosa y súper privacidad , fácil de poner
ترست بايلوت
منذ أسبوع
منذ 5 أيام