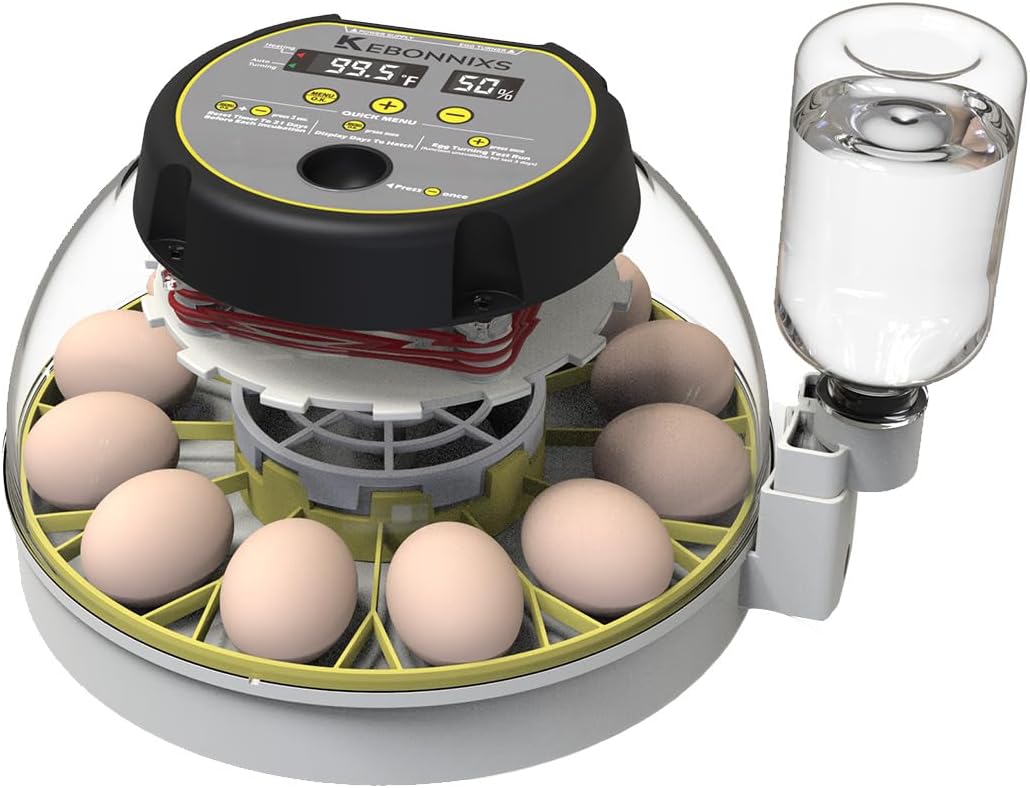


🐣 Hatch like a pro—watch life unfold with precision and ease!
The Kebonnixs 12 Egg Incubator combines advanced airflow technology, a built-in humidity display, and an automatic egg turner to deliver a stable, user-friendly hatching environment. Designed for small-scale poultry enthusiasts and backyard farmers, it features an integrated egg candler and external water top-up system, ensuring optimal conditions without disrupting the incubation process. Trusted by thousands with a 4.4-star rating, this incubator makes hatching chicks a seamless, rewarding experience.

| Customer Reviews | 4.4 out of 5 stars 5,408 Reviews |
B**Y
Amazing incubator!
UPDATE (March 2025): I have consistently used this incubator for numerous hatches and it works beautifully every time. I haven’t had a single issue with it and I’ve successfully incubated dozens of baby chicks and grown my flock of yard birds. I took extra care with my last batch of eggs, ensuring that I selected only the most healthy eggs (instead of selecting a dozen without candling them) and all TWELVE babies hatched and were healthy. My favorite feature is the clear lid that allows you to watch the entire hatching process. When days 20-21 comes around, my kids and I gather around and watch as the babies pip and eventually find their way out of their shells. It’s such an amazing experience. If you’re looking for an excellent incubator for an excellent cost, buy this one. It doesn’t disappoint. Original Review: This wasn’t my first time hatching eggs, but it was my first time using the Kebonnixs incubator. I was very pleased with the results. I found it was easy to operate, kept both the temperature and humidity stable, and it reliably turned the eggs each day. All around it turned out to be a great product for hatching a small batch of chicks. I started with a dozen eggs, two of which had to be pulled before hatch day (one was infertile; the other had an embryo that failed to develop). Out of the ten that we had left, nine of them have successfully hatched. We’re giving the last chick a little more time to make a late appearance, but even nine out of ten chicks is a very satisfactory hatch. If you’re looking for an affordable, small, easy-to-use incubator…this is a great option! I’m very happy with my purchase and look forward to using it again to hatch another batch of baby chicks.
G**E
Beginner friendly and works!
It works and it’s easy peasy! I used them for quail eggs. I was able to easily adjust the incubation time from 21 to 18 (21 days is typically for chickens a d 18 days is for quail). So far I have 4 out of 16 that hatched and several others with pips in them. I’m just happy that any hatched lol! If any don’t hatch, I would blame that on the shipping conditions being below zero temps and having to double up eggs in 4 spots to fit them all. Humidity was very easy to adjust and I never had to open the incubator for any reason.
C**7
Great little incubator
10 of 12 eggs hatched. All 12 had a live embryo day 18. It seems to do the job of keeping the temperature right. I had to sometimes run a vaporizer when my house got too dry. I also had to run a dehumifier one week because it's the middle of winter but got up in the 60s and rainy. Depending on where you live and time of year, it might be good to have access to ways to change the environment if needed. I kept the incubator humidity around 50% days 1-18, then tried for 70% for lockdown but ended up at 68% mostly. While the eggs were hatching, I had huge spikes in humidity...in the 90% + range. They all had good air sacs going into lockdown. Like others have suggested, I made a mat from grippy shelf liner for hatching from the dollar store prior to placing the eggs in the beginning. Use the turning piece as a template (I included a picture of the mat I made). When it was time for lockdown on day 18, I was able to take the turning piece out, put the mat in, and then re-place the eggs quickly. All chicks that hatched were healthy with no leg issues. It is pretty crowded in there if 12 eggs take. I think the two that didn't hatch were at the mercy of the early / on time hatchers punting them around in there. The seller is pretty thorough with their instructions. Overall, I'm happy with this unit as 83% hatch rate isn't too shabby. I'm running another incubator right now and I think this one holds conditions steady better. As others have said, be sure that the little tabs on the lid are properly lined up or you will notice a temperature and humidity drop.
L**E
Most of my eggs hatched
I had some bantam eggs to hatch and the last incubator I had used is an old manual one. I was ready for an upgrade but didn't want to spend a lot. After reading the reviews I decided to try this one. I was a bit apprehensive about the temperature and humidity sensors due some of the reviews. A digital thermometer placed in the bottom read 96.2 and a mercury thermometer read 98.4. I took a leap of faith since Kebbonixs went to such pains to explain why their temperature sensor is accurate. I really fretted about the humidity because my digital hygrometer and one made for a reptile tank both read 6 to 8 percentage points lower than what the incubator sensor read. It seems to be very sensitive to outside humidity levels. I have an evaporative cooler and when it was on the difference between the hygrometer in the bottom and the built in sensor was greater. I kept the humidity reading on the incubator as close to 55 as I could. It's nice to be able to adjust it some with the vent. During the last three days when the egg turner was removed the built in hygrometer reading was only one percentage point higher than the one I placed in the bottom. Of course the humidity level in the incubator was higher and maybe this counteracted the tendency for the sensor to be influenced by outside humidity. The egg candler works pretty well in a dark room. At day 15 I was able to identify 8 out of 11 eggs with normal development. Two had died in the embryo stage. I had already removed one rotten one. The night of day 16 the lid was not locked in somehow and the next morning I noticed it because the humidity was low. The house was pretty cool but the incubator compensated and I did not lose any eggs. I did not want the chicks hatching on that slick plastic. That would have been a mess so I ordered hatching mats made for the Brinsea Minni II incubator. The Amazon description said they were 9 inches so I thought I could modify them pretty easily. They turned out to be only 8 inches in diameter so I had to cut up two of them and was able to nearly cover all of the floor of the incubator. Hey Kebbonixs, why don't you make hatching mats for your incubator? When I got up on day 21 one chick had already hatched and the other 7 hatched the same day. I left them in until the next day but took most of the shells out because it was crowded and I didn't even have a full dozen. When I cleaned the incubator there was an accumulation of small black fibers in the water vat and on the floor. Also, down from the chicks had got caught up in the fan and accumulated around the elements. What were the black fibers from? They were very fine and would not be good for a chick to inhale. I cleaned the fan and elements with an air can. I can say the incubator performed as advertised. I fiddled with the humidity a lot but at least it is set up so that can easily be fiddled with. It would be nice if it had a little cap to keep bugs and debris out of the outside water filler. I'm giving it a 4 on accuracy because I still have my doubts about the humidity sensor. What they explain about temperature appears to be true because my chicks did not hatch late, although I lost two fertile eggs for some reason but it may not have been the incubator. There were a couple of hickups and I emailed Kebbonixs and they responded promptly. They appear to have very good customer service and they stand behind their product.
J**S
works easy to use
really great ive had 100% hatch rate, easy to clean easy to use over all really great product.
S**S
Easy-Quiet-Even Temps works well with a full view
Arrived fast-set it up plugged it in and had even temps and good humidity within an hour. It’s so quiet can hardly hear it! Placed in eggs we had gathered for the past 10 days in the Kebonnixs 12 egg incubator within 2 hours of setting it up. Keeps even 99.5 temp (in the recommended temp range for forced air incubators). Humidity stays in recommended range also in the high 40’s to 50’s with vent halfway open (halfway is the knob in the middle) keeping water full daily below the notches or it will overfill into the second chamber (which is only for last few days). Photos of grouped eggs are candled at 3.5 days. There’s a quitter in the lighter group of 7 eggs second egg on left row down (the one with a red ring) this egg had an air sack on the opposite end at beginning of incubation-no fault of incubator. We removed this egg. We also candled all of our eggs the first evening after beginning and noticed a hairline crack in a porous elongated egg that had been gathered 10 days prior to incubation -repaired it with super glue about 16 hours later-kept in there as an experiment as we had room for it- note: this egg is still surviving as of day 4. Orange/brown colored wyandotte eggs group are showing spider veins at 3.5 days. The eggs are rotating gently full circle every 12 hours with the auto turner. Have it in kitchen so we can watch the whole process. The candler is like having an ultra sound at our fingertips to see the progress and works great. Candle at beginning to check for defects and mark air pocket. We do not remove the lid to candle we tilt it up a bit and take out a few eggs and close it back. We also close the vent when we candle to allow the humidity to elevate back up faster. The best dates to candle are days 7, 14 and 18. The earliest day you may see life is between day 3-7. (Sometimes we can’t help ourself and candle on day 3 to see if there’s a spider shape showing up and check for quitters.) This is a great little incubator has all the eggs at even temps. We don’t have to raise the lid unless want to candle. We are enjoying the auto turner as we don’t have to worry that the eggs are not turned enough. Our hens are older and are not ones to go broody we wanted to get some more chickens from our flock. This Kebonnixs incubator is the closest thing to having broody hen and we get to watch it all take place. (Of course hatching them is the fun easy part the hard part comes afterward). Will update as incubation progresses.
U**K
The automated features make this great for worried beginners.
I noticed my chickens were making a massive clutch of eggs, but hadn't decided who should sit on them yet. I bought this to ensure that I had some hatchlings, while my new mothers took some time for their instincts to set in. All in all, I just let-'er rip and put some distilled water in the water hole when the humidity dropped below 50% (about every day in my dry house). The machine took care of the rest, and gives live readings on the temp and humidity inside. The buttons are clearly labeled, so you don't have to search for the manual to figure out what multi-function button turns the Candling Light on and off, or informs you of how many days remain until chicks start hatching. I'm not sure what all conditions will activate the beeper, besides pressing buttons, but if there is a beep for any kind of error, you will certainly hear that thing throughout a house. That could be nice, if you have someone that may explore the features without permission. I like that there's a little, protected fan in there to keep the air fresh and blow-dry the newborn chicks. A couple minor imperfections I noticed are: - I wanted to hatch a couple of jumbo eggs that came from my ISA Brown chicken, but there were some rare eggs that were just too big to roll freely and couldn't be used in this machine. - Once chicks begin hatching, there is very little room for them to move, though I suspect it isn't that much different from mom being parked on top of them. The time between hatch and transfer to a brooder is only a day or two anyhow, so as long as there's not so much light that they try to move too much, it's probably fine. My first two chicks had to wait overnight for their siblings to hatch, so I replaced their empty shells with a couple tops that came from empty spice shakers (the red ones with the flip-up tops). I filled one lid with water and the other with their starter kibble. To my surprise, they started eating and drinking immediately, but they couldn't fit past eachother to go back and forth to the dishes. This resulted in some rivalry, but turning off all the lights got them to snooze peacefully. All in all, I'd say it's pretty effective and troubble-free , with my only suggestions being a slightly larger egg-turning grid for jumbo eggs, and possibly a means to subdue the ambient light when you're not staring at the eggs and cheering them on.
R**N
Simple and successful!
*** UPDATE Last year was my first experience using this incubator. 8 out of 12 shipped eggs hatched. I used it again just last month and 6 hatched. I’m on my third round and on lockdown and as of today, all 12 are looking great. I tried two other incubators because I originally needed a larger one. Neither one had accurate humidity readings and one had ZERO way to adjust the humidity- no holes or window whatsoever to change air flow. This incubator is really the best I’ve tried. It’s a good size, works well, cleans up easily and has good results. I haven’t found unhatched eggs to be due to the incubator function- for whatever reason, they just weren’t good eggs to begin with, or just were quitters. If all the eggs are put in at the same time and they all experience the same temperature and humidity, and only some hatch- I think logically the problem lies with the eggs that didn’t hatch. They’re the only variable. I hatched chicks for the first time in my life with this. Out of 12 eggs, 2 didn’t make it past ten days, and 2 never hatched. 8 chicks hatched and it was a beautiful thing to watch. My kindergarteners loved it! It was very simple to use and my only recommendation would be to keep the incubator with you unless you can guarantee humidity where you keep it. I tried keeping it in my classroom the first 2 days and each day I arrived, the humidity was way too low so I was frantically putting in a damp sponge square to raise the levels asap. After this happening, I just took it home with me where someone was always around to check the humidity level. I don’t know if this was a flaw with the incubator, but I had to regulate it often. The temperature was always spot on but the humidity varied greatly. Just an fyi.
ترست بايلوت
منذ شهر
منذ 3 أسابيع