

🔧 Fuse your filament, fuel your creativity!
The VIT SPORT Filament Connector is a compact, easy-to-use filament welder designed for 1.75mm and 2.85mm PLA, ABS, PC, PETG, and TPU filaments. It enables seamless, durable filament splicing that reduces waste and enhances print continuity. Ideal for professionals and enthusiasts alike, it comes with a complete kit and a year of customer support, making filament recycling effortless and eco-conscious.


| ASIN | B091Y9WSH6 |
| Best Sellers Rank | #70,225 in Industrial & Scientific ( See Top 100 in Industrial & Scientific ) #931 in 3D Printing Filament |
| Brand | VIT SPORT |
| Color | Red |
| Customer Reviews | 4.0 4.0 out of 5 stars (819) |
| Date First Available | April 7, 2021 |
| Item Weight | 5.3 ounces |
| Item model number | 5267 |
| Manufacturer | VIT SPORT |
| Manufacturer Part Number | 5267 |
| Material Type | Polyethylene Terephthalate Glycol, Polylactic Acid, Thermoplastic Polyurethane |
| Number of Items | 50 |
| Package Dimensions | 6.14 x 4.13 x 3.5 inches |
T**.
I'm glad I got this - it's not that hard to use and works really well if you do it right.
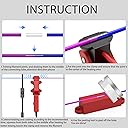
I own a 3D Printing business running 30 printers pretty much non stop 24/7. I've been wasting a TON of filament as most of the products I sell use more than 50g of filament. So when a roll get's low I just chuck it. while I do have a lot of prints that use less, it's just too big a hassle to swap out a running roll for a roll that is low for a short and quick print. Over the last month I've been setting aside the low rolls with the intention of figuring out a way to reuse them. In the last day I was able to take the scraps and turn them into 2 full rolls ready to go. This was the solution. Not only does this save some money, but it's sooo much better for the environment. I've tried other DYI methods of splicing filament and am a bit familiar with how it works so I knew what I was getting into with this. I was pleasantly surprised with how well and easy this worked. I'm using mostly Duramic PLA Pro that prints well at 215-220C, and that's what my experience is based on so far, but I suspect my method will work for any filament that prints between 200-220. Here's how I do it: Turn on the splicer and let it warm up for 3 minutes. while it's warming up, cut both ends of the filament to be spliced nice and square and straighten out the ends of the filament with about 1" straight on both. Once 3 minutes is up, turn off the splicer and immediately open the clamp and put one end of the filament in the middle of the clamp (in the center of the metal heating part). Close the clamp and then push the other filament end into the other end of the clamp till you feel it touch the clamped filament. With both hands push both ends of the filament together about 1mm, you'll feel them mushing together, you don't need to push mush, just making sure they're well contacted. Now let everything rest and cool. Be sure the clamp doesn't move around (I just use a vicegrips on the base to weight it down and position the rolls so they're not pulling on it, this takes a little fiddling but isn't hard). Cooling is the key, let it cool for like 8-10 minutes. Then just open the clamp, pop out the line and you can tear off the little wings that might be there with your fingernails. Then a little sanding (I use 220 grit) and you're good to go. So far this has worked great for me. I'm hoping the splicer holds up, and will update the review if it doesn't.
J**.
A bit fiddley, but does a great job.
I saw the reviews of this device that weren't exactly stellar, and decided that it was still the best game in town and bought it anyway. I'm glad that I did, my first try looked like something that came out of Kindergarten art class, but the next ones were perfect. It would be nice to have this device available in a fixture form that could be clamped to a workbench and didn't require the use of a third hand. But as is, it really isn't that bad. A timer that cut the power off to the heaters would make it so the operation was more or less automatic once the filament was put into the fixture. But for $50 what do you want?
S**S
A little janky to use, but good otherwise
Does it's job, and does it pretty okay for the price. The filament does come out a lil weird, but given the other option is to scrap it I consider that a win. I recommend, but expect what you pay for.
L**F
Good
Works as it should, no issues, quality is good and priduct has held up thus far.
L**H
Did not work for me fusing pla filament
It's a nice concept but it did not work for me. I am not very pleased with the performance of this product. I followed the instructions carefully. When the device fuses the pla filament it appears well fused and a fused area looks nice and even. I used it to fuse a 60 ft section of pla filament to a new spool. As it ran through the machine it broke at the fused point. Wasted 60 ft of pla filament. I would not buy this device again nor recommend it to anyone.
C**R
Works okay in a pinch, but other options are easier
I've successfully fused filament with this device about 50% of the time. Unfortunately, if you don't get a really clean joint, it will jam somewhere in the filament path. The trick to getting it to come out clean is to make sure you give it at least 5 minutes after you turn the clamp off before you remove the filament from it, and then use a blade to shave off the flash on the sides followed by some light sanding to get a really smooth joint. I've personally found it easier to switch filament "on the run" by feeding in the new filament while the printer is running. It's probably not the BEST way to handle the need to change filaments, but with an open frame printer it's fairly easy to do as long as your print speed isn't crazy high.
F**L
Este empalmador funciona excelente, uní dos filamentos y con la herramienta de lijado queda bien unida y al grosor estandar del filamento. Estoy muy satisfecho con este empalmador
A**Y
There's a learning curve to every filament splicer I've ever touch. It always takes a while to get the process down. I've got it working really well for me. If you get this, follow the instructions, and practice a bunch of times. I've finally got it making splices that are almost perfect every time.
A**ー
中途半端に残ってしまったフィラメントを溶接する為に四苦八苦してほぼ失敗していました。 この溶接機を使っ見たら簡単に失敗せずに溶接ができました。 中途半端なフィラメントが無駄にならずにすみます。
A**F
The instructions are pretty thin but it's pretty obvious how it works. The first splice I made worked out perfect. The second splice bombed out, had to do it again. Now I've done about thirty splices without anymore failures. What I found made the difference was how I cut the filament ends for splicing. The instructions don't tell you how to cut but I followed the general rule for inserting it into the printer, cut them to a 45° angle then insert them. Great tool for what it does. Sure cleaned up all those leftover rolls of filament I had cluttering my shop area.
S**E
フィラメントが中途半端に余ってしまうのが悩みでした。その様な悩みを解決できるものがないか探したところこちらの商品を見つけました。まさに理想的! フィラメントの重なりを維持しながら挟むのに少しコツと経験が必要ですが、ニコイチにできるようになってからは余ったフィラメントをいつまでも保管しなくてもいいので最高です。物自体は軽いので、もっとテープカッター並みの重量感があってもいいとは思います。
ترست بايلوت
منذ شهر
منذ شهر