
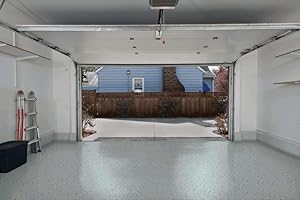
🚗 Transform your garage into a showroom-worthy space—durability and style that’s ready when you are!
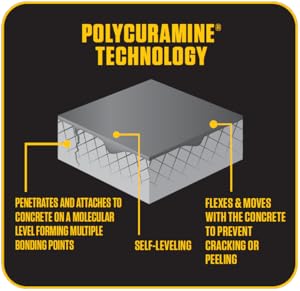
Rust-Oleum 293515 RockSolid Polycuramine Garage Floor Coating is a high-performance, fast-curing concrete coating kit designed for interior floors including garages and workshops. Its patented polycuramine formula is 20 times stronger than epoxy, offering superior resistance to chemicals, cracking, and hot tire pickup. The kit covers up to 500 sq. ft. with a high-gloss tan finish that delivers a sleek terrazzo look. Low odor and low VOC make it user-friendly, while quick curing times mean your floor is walk-on ready in 8-10 hours and vehicle-ready within 24 hours.


| ASIN | B06XHN1CHT |
| ASIN | B06XHN1CHT |
| Batteries Included? | No |
| Batteries Required? | No |
| Color | Tan |
| Coverage | 35 square feet |
| Customer Reviews | 3.8 3.8 out of 5 stars (259) |
| Customer reviews | 3.8 3.8 out of 5 stars (259) |
| Date First Available | 6 July 2017 |
| Date First Available | 6 July 2017 |
| Finish | Matte |
| Included components | (2) Pre-Tinted Polycuramine Burst Pouch, (2) Foam Rollers, Concrete Etch, Decorative Chips, Instructions |
| Is Discontinued By Manufacturer | No |
| Item Package Quantity | 1 |
| Item Weight | 7.17 Kilograms |
| Item model number | 293515 |
| Item model number | 293515 |
| Manufacturer | Rust-Oleum |
| Manufacturer | Rust-Oleum |
| Part number | 293515 |
| Product Dimensions | 21.29 x 33.66 x 23.83 cm; 7.17 kg |
| Product Dimensions | 21.29 x 33.66 x 23.83 cm; 7.17 kg |
| Size | 1.41 Gallon (Pack of 1) |
| Special Features | Washable |
| Specific uses | Interior/Exterior |
| Style | 2.5 Car Kit |
K**E
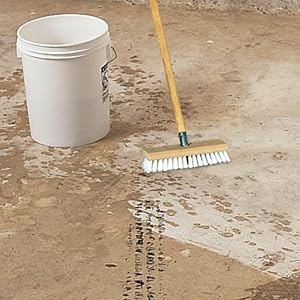
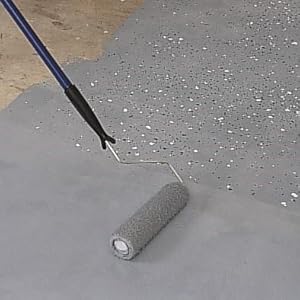
I have a 2 Car Garage that is 20X20. Purchased the Tan 2.5 car kit and the Clear Top Coat kit. I had no issue with covering my 2 car garage with this amount of product. I am very happy with the finished project. But requires pre-planning and time to do it right. Advise: Labor: use 2 people to apply the paint and chips and the clear coat. You have about 45 minutes of pot life to get the paint down then it will start getting hard and difficult to apply. 2 people working together will reduce the (Monkey on your back) stress out of the application. On the paint one person painted and one person did the chips. On the Clear Coat we put the clear coat in a paint tray, put in middle of us and used 2 brushes to apply the product. We split the garage and each took half and worked back to front on the garage. Rollers: I did not use the cheap foam rollers that are provided in the kit. Like other reviews they do not last. I learned this 20 years ago on the original job. I purchased 6 Purdy 3/8 nap rollers and used 4 of them to apply both the Poly and the Clear Coat with it. Do not go cheap on your rollers…. On the Tan paint I used one roller per bag of paint. Also buy some small 3 inch disposable brushes to use to cut in the edges. Then throw them away at the end of the job. Also buy some Nitrile disposable gloves to use during the application. Chips: I did not use the provided chips as there is only enough for a light dusting of chips. I would recommend buying flakes online by the pound for the project. I purchased pre-mixed “Dark Earth Tone” chips and did a Medium to Heavy flake. Sure I had flakes left over but was not worried about being short on chips. Prep: The prep is the key to this project and takes time! I had put the RockSolid Epoxy Garage covering on the garage floor 20 years ago. I wanted to remove that covering before this project. I rented a floor polisher from Home Depot and a Diamabrush Coating removal tool. (Polisher was $46 for 24 hours and $75 for Diamabrush removal tool) Note: There are 2 Diamabrush available. One for prep and one for removal and prep. I spent 10 hours grinding the floor to get original paint off of it. I then used a 4 ½ inch double row diamond cup grinding wheel (Amazon $17) with angle grinder for edges and low spots. NOTE: this product WILL NOT fill in cracks!! If you don’t want cracks to show then you have to spend the time to fix them before applying the product. I had a number of small cracks and also wanted to fill in the expansion joints. I simply purchased Premixed Concrete Patch from Home Depot. Fill crack with putty knife, roughly smooth it out, let dry and then grind with angle grinder smooth. I even filled in the expansion joints this way. Last step was to pressure wash out the garage before painting. (PS. I painted the garage before the applying the garage floor paint) Application: The trick to this project is putting the right amount of paint down for coverage. You have to put down a small ribbon of paint on the floor. I put the ribbon of paint down in a straight line. When you start rolling first pull the paint towards you then start your rolling. I had a small amount of paint left over and on the Top Coat we ran out exactly at the end of the application. I did not use the Anti-skid in the Top Coat. So I cannot offer any advice on that. We started the job early in the morning. My garage faces East so the sun was going to be an issue so I had to drape a tarp over the front of the garage to keep the sun off. We put the paint down in the morning and we finished at 9:00. We then applied the top coat on the floor that afternoon around 6:30. Remember to do something to the garage door (lock it and put painter’s blue tape across the door) to keep anyone from walking out the garage door while the paint is curing. Also remember to put something on the garage door track to keep it elevated off the floor while it is curing. I pulled the emergency release on my garage door before we started the job and put a clamp on the track so I could pull the door down manually and have it rest on the clamp. Is the paint coverage perfect? No. If you look you can see some light color changes in the paint. But it is a garage after all and I am happy with the result. If you want a consistent coverage with no color changes then I would recommend putting down 2 coats of the paint. Paint one coverage with no chips then paint again with chips. But that will obviously increase your project cost. Added some pictures, hope this review helps.
M**G
First off look at the Youtube videos on how to install this. I looked at like 20 before doing anything. It is all in the prep-work. I spent 3 weeks prepping and getting the 225 sf., concrete floor in my wife's gardening shed clean and allowing to fully dry. I followed the instruction to a T. I degreased 3 times with Rustoleum degreaser, then etched. I followed up with Rustoleum crack sealer and again vacuumed prior to using this product. Posted pic of the floor prepped and ready for coating. I did use colored flakes that were not Rustoleum and they worked well. Based on other reviews I was worried about having enough product for the coverage but actually had just a bit left over. the outcome was ok but not great. See pic showing the floor with reflection of 6 lights. I was really torn on do I give it 3 stars or only 2. In the end I settled on 2 stars for the following reason: 1. The product coating goes on very thin. I had to in some cases even go back over (before applying flakes) and do a second coating. Secondly, In the places I used the crack sealer you can see from the photo's that the product did not cover the sealed area. It also sort of had areas it would not cover even with 2nd coat where the Rustoleum crack sealer was used. Not sure if this is a problem with the coating or a reaction to the crack sealer. Luckily this is just a gardening shed and it looks much better than what it did before coating. I would note that if it is your first time put down a wet floor and get an extra bag of flakes to practice how best to distribute them. The instructions are not great and don't work well when followed. Also get a better roller as the one they sent me came apart before completion of the job. I am not sold that I would actually use this in a garage and will post an update on how it holds up.
J**M
I paint-removed, degreased, pressure washed, and etched the floor and rinsed it three times afterwards. I let it dry for 36 hours before beginning to apply the epoxy. I believe the product performance will be good. Looking at the image on the box regarding self-leveling, I felt like tiny little hairline cracks would fill up but they didn't. They all showed through regardless of how minute. Every single tiny one showed through. The product was barely enough to cover a two-car garage. There are thin spots and I'm glad I didn't apply any thicker or I could not have finished without running out. Garage floor measured 390 square feet (19.75 square). After seeing the hairline cracks come through it would have obviously been better to seal every single crack no matter how insignificant. Also I believe the etching made the concrete more porous, and even though it wasn't noted as being required on a bare concrete floor, priming in the floor would have let the product spread out better. Using lots of color flakes helps to hide some of the imperfections. If I had another one to do, I would buy the same product but seal every crack and prime the whole thing first. Then I think it would come out perfectly.
R**A
This is an excellent product that dries to a glossy finish. But there are a few provisos in my opinion: 1. Prepare the floor carefully. Use the etch and rinse thoroughly; fill any cracks or floor defects with a proper concrete filler because you will see those defects through the finish; where you notice the rinse water beading up it is strongly suggested you sand that area. I did not sand those areas on the first half of my garage (I painted my two car garage one bay at a time) and the finish has a “beaded” appearance there - I sanded those areas on the second bay and there is no beading. I used a medium grit but it is suggested you use a grit level appropriate to your floor. 2. The foam rollers supplied. Since I live in a warm climate and the garage and paint were about 80 degrees the paint began to cure quickly. While I finished both sides in under 40 minutes toward the completion of the job my rollers began to fray a bit. I attribute that to the temperature and the fact that you must roller the paint on thinly if you want to complete your two car garage (see below). 3. Coverage. In my opinion the amount of paint supplied will not cover a two and 1/2 car garage as advertised - it does cover a two car garage with an already finished floor ( my garage floor had 12 year old paint/epoxy the builder supplied - the finish was in good condition); I am not sure there is enough paint to cover an unfinished floor so I would recommend buying two kits. 4. Finish. If you would like an almost glass like finish I recommend buying two kits for a two car garage and applying the product very heavily- where thickly applied, the finish is just amazing. 5. Time. Plan how you will paint and where you will start and finish. If you are working in warm conditions plan to be finished in under 45 minutes; I presume cooler conditions will give you a bit more time. Overall my wife and I love the way garage came out. It is also easy to clean and doesn’t appear to stain easily. Hope this helps. Enjoy and good luck.
A**R
Be careful if you’re adding anti slip additive. It does not stay in suspension with the epoxy and regardless if you keep stirring it you will get a mixed result. The concrete will be sealed and impervious to oil and gas spills as advertised, but don’t expect a consistent finish. And why they advertise one kit as 2.5 garage space is beyond me, I needed two kits to cover 625 square feet. For $460, results should have been better. I followed the directions exactly
ترست بايلوت
منذ شهرين
منذ شهرين


