معلومات عنا
دعم العملاء
احصل على التطبيق

قم بتوجيه الكاميرا لتنزيل التطبيق
حقوق الطبع والنشر © 2024 Desertcart Holdings Limited


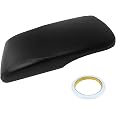
🖤 Upgrade Your Comfort, Elevate Your Style!
The AUTOKAY Center Console Lid Armrest Cover is a high-quality synthetic leather accessory designed specifically for Toyota Avalon models from 2013 to 2018. This easy-to-install cover replaces the old upholstery without the need for drilling, providing a perfect fit and a stylish upgrade to your vehicle's interior.
| Manufacturer | AUTOKAY |
| Brand | AUTOKAY |
| Item Weight | 3.84 ounces |
| Package Dimensions | 6.77 x 6.54 x 1.38 inches |
| Item model number | D7401BL |
| Manufacturer Part Number | D7401BL |
D**L
Sometimes you get something that just works
Perfect fit! I’ve read the other reviews and I want to give my advice, wish I had made a video.We just bought a 2015 Avalon XLE and as you can see in the photos the OEM leather was damaged and not in such good shape overall.Don’t worry about any under padding, the console has built in foam. It’s easier to remove the top than you think and reupholstering isn’t that difficult.Toss the tape that it comes with (seller just stop including this!) get yourself any old staple gun, not an office stapler although I suppose some of them might work. You need a lot of force to get through the plastic.What you will need1. The new upholstery2. Small Phillips head screw driver3. Staple gun with no more than 1/4 6mm staples (smaller is actually better)4. Flat head screw driver5. Pliars6. Cleaning supplies because you will want to clean the plastic once you have the upholstery offStep 1. Open the lid and remove the four screws from the undercarriage (two at the top and two at the middle). Do not try to remove the two at the very bottom there’s no need and it’s nearly impossible.There are four parts; ONE the lid top that you will reupholster, TWO plastic part the full size of the lid which is fastened with six screws total and sandwiched between the lid and the THIRD part which latches into the center console when closed this part is only about half the length of the lid and the FOURTH part which is basically the henge/slider mechanism all in one. There is no need to remove the henge at all and no need to remove the back panel that covers the rear AC vents.Step 2. You can now pry the part THREE from the assembly. Don’t apply too much force as you don’t want to break the plastic, but it should be fairly easy.STEP 3. With the undercarriage removed you can now access the lever on the henge that allows the lid to slide forward and backward, push the lever and slide the lid up, you will notice two “stoppers” that don’t allow you to go any further, simply push those in and continue sliding the lid up.Step 4. You may need to play with the angle and nude the lid while pressing in the lever, it may seem stuck but don’t worry you’ll get it eventually and the lid will slid up and off!Step 5. Relocate the lid to wherever you will be doing the reupholstering. Don’t try to do this in the car!Step 6. Unscrew the final two screws.Step 7. Might be a good idea to take photos of where the seems sit so you put it back on just right.Step 8. With a small flat head screwdriver start prying away at each of the staples holding on the old upholstery. You’ll probably only get one end of each staple out and then you can grab the staples with a set of pliers to remove them entirely.Step 9. Remove the old upholstery and clean everythingStep 10. Place the new upholstery on. Move it around and you should find it fits like a glove! Be careful because it almost looks like it should go on backwards.Step 11. I started by stapling a couple staples to the front to hold it in place since that’s the most important to get the fit just right. Pull the upholstery taught and then staple the opposite end. You might see creases from the folding during shipping but they will go away. Pull the sides taught and add a few staples. On each to get started.-hint- it’s best to staple into the thicker part on the sides and most staples (the 1/4 6mm staples I used) will go all the way through the thinner part.-hint- you’ll likely need to cut away little pockets of the upholstery to make room for the screw locations.Step 12. Always be adjusting the upholstery to make sure it is positioned properly. Once you have a few staples on all four sides you can go back and add as many staples as you want to finish the job.Step 13. Reassemble - screw in only the two “bottom” screws you took out last.Step 14. Return to the vehicleStep 15. Slide the lid back onto the henge mechanism until it all “clicks” back into place.Step 16. Screw the undercarriage (mechanism that latches when the lid is closed) back on with the four screws.Step 17. Have a beverage of your choice!
H**N
Mejora tu auto
Me encanto cambio mi auto, buen material y muy fácil de poner
J**R
Arrived in poor condition
The cover arrived with an asymmetric cut done to it. There a complete chunk missing from the center. It's as if it left manufacturing that way.I exchanged for a replacement and the second has the exact same asymmetric cut out of it. Very disappointed.
R**D
Great replacement for 2018 Toyota Avalon
Perfect to replace my worn out center console on my 2018 Toyota Avalon. Better than the substandard, cheap piece of garbage that it came with. Toyota, by the way used to mean quality but now it means trash!
W**S
Be sure
Get correct size.
A**R
Corolla Center Console
Perfect replacement for my moms center console. Fit was good and seems to be a well made material not a thin fabric. Has been on for a year now with no issues. Color was a perfect match
L**L
Toyota Avalon armrest 2017
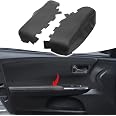
As promised easy to install not much to it found this diagram for the Toyota Avalon 2017 just remove the console by carefully pulling it out of their clips then is one metal clip that has two small rings that need to be removed only one will do then pull the pin out and juggle the arm rest out after that just remove the clips holding the armrest skin and put the new one, I found it easy to stem the new skin a bit to soften and put it on I used 3M spray glue and put all back together The only thing i wish this new cover had is a bit more cushion but easy fix if u find one and add it before installing it other then that all great.
H**Y
Not what I was looking for...
When I received it, it came as a piece of leather and some 2-sided tape. I had to cut it to fit my arm rest, then had to tape it down. Kind of not what I was looking for but i made it fit.
ترست بايلوت
منذ شهرين
منذ أسبوع