🐱 Elevate Playtime: Where Adventure Meets Comfort!
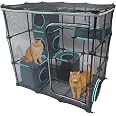
The Kitty City Outdoor Catio Furniture and Play Kits for Cats, Outdoor Mega Kit, is a versatile and durable playset designed for energetic cats. Made from high-quality nylon mesh, it allows for fresh air circulation while providing a safe environment for your pets. With rearrangeable cubby cubes, easy access via a zip door, and the ability to expand with additional kits, this playset is perfect for multi-cat households looking to enhance their pets' playtime experience.


| Item Weight | 11.8 Pounds |
| Item Dimensions D x W x H | 33"D x 47.25"W x 46.75"H |
| Style | Outdoor Mega Kit |
| Color | Black |
| Is Assembly Required | No |
| Dog Breed Size | Small |
| Target Species | Cat |
| Material Type | Nylon |
N**N
It IS easy to assemble!
The media could not be loaded. THE NEED:We are renters in need of a catio solution that is easily transportable, lightweight, and that will allow our cats to spend time outdoors in a safe and secure environment. Most solutions I looked at weighed between 50-100 lbs while this one weighs less than 12.THE SET UP:There was a fear that this would be a rage inducing assembly resulting in a flimsy catio solution. I was wrong.It will take you about an hour to an hour and a half to assemble. Find yourself a nice big space to work with. I did mine outside in the yard, and was able to fit it through the door with no problem once completed.There are 45 cams and 89 rods plus the accessories inside; there is no difference in size between the cams and the rods so don’t worry about separating them based on any numbers or markings that you might see on the items. The biggest challenge is the instructions because they just aren’t very clear.There are an equal number of cams and rods on the TOP, the BOTTOM and the BACK. The interior is a little more tricky because there are spaces that DO NOT use cams and bars so use that picture on back to follow instructions.Altogether they’re 18 cubes comprising columns and rows. Total number of columns=6 (3 sets with one front and one back.) Total number of rows=6 (3 sets-top, middle and bottom)Follow step one and step two then flip to the back page to see the full set up. I found the picture instruction after step 1 & 2 difficult to understand. The picture on back will help you visualize those places in the interior that don’t have cams and rods which are primarily at the front where the door opening is.For the three accessories, which are the vinyl cubes the cats climb in and out of, there is a flap the rods must slide through before inserting into the cam.Facing the front of the catio, in the left most column (front row), the accessory cube with 2 holes and no mesh goes on the bottom row with one hole facing right and the other facing back. In the column immediately behind it, mount the double cube accessory on the very top row with the holes facing front.In the middle column (back column) mount the accessory cube with two holes and mesh on the lowest row. The mesh should be facing front. One hole faces left and one hole is on the top.In the 3rd column which on the farthest right, in the back column, mount the cat bed MESH SIDE UP in the MIDDLE row. This one has two different types of flaps the rods must go in. Place the vertical flaps down over the rods before placing the horizontal flaps in their corresponding rods, and set the pillow on top.Keep referring to the picture continually to see those spaces that do not have cams and rods. This is what took me longest. I went cube by cube in the picture to figure out those spaces that don’t use bars/cams.In the front columns and rows, there are many sections that do not have bars/cams. In the back set of columns, both the middle and right groups, each have sections without bars/cams. The picture on the back is your best friend figuring out which doesn’t have these.After you have the frame assembled, go back and tighten the rods inside the cams because they loosen as you work with the opposing tension.Now you’re ready to put on the mesh cover. The cover zips at the top, so look for the gray material that runs the entire length of the mesh and place it on the ground with the rest of the fabric UNDERNEATH it. The curving zipper also in gray fabric should be oriented towards the front.Unzip the long zipper with gray fabric flipping the flap backwards. Pick up the catio and place on top of the fabric bundle. Set the bottom inside the fabric bundle and slide the fabric up a little bit.Now pick up the whole thing and flip it over, meaning the top of the catio should be on the ground. Slowly work the fabric bundle down the frame, making sure to fit the corners properly over each corner cam at what will be the bottom of the catio once you right side it.Once you have most of the fabric fitted over the frame, pick the whole thing up again and flip it over so that the top is again at the top. Keep fitting the fabric to the top working opposite corners at a time. The hardest part will be getting the fabric edge over the last cam, then zip the whole thing up.The door should be at the front and should have no bars or accessories in front of it. The blue zipper hole should be on the right side of the frame.USING THE PRODUCT:One of the reasons I chose this item is because it is so light. This product slides easily wherever you want whether inside or outside. If you want to put it outside, it comes with for stake down bars.To use, unzip the front door and put the kitties in. The cube accessories inside support my 16 pound cat with no problem.THE RESULT:Day one of using the product has been very successful. The cats are really enjoying it and I am comfortable they are secure inside. Always keep the zippers at the top so kitties can’t fiddle around and open the product; there is no way they can get to the zippers in this position. The cats seem very happy and this item solved many problems for me, most especially they can’t get to the plants on the porch and possibly ingest something poisonous. At the same time, the product allows them to enjoy family time together on the patio, and I don’t have to see them glaring at me through windows longing to be outside.RECOMMENDATION:I will update this review in six months to discuss any changes however, at the onset, I’m very pleased with this product, am confident in its security to protect my precious kitties, but most importantly, they are very happy, and that was the goal. Thus, I am able to recommend this product and believe it is a perfect solution for many people, seeking a safe, secure catio solution.WRAP UP: I don’t know if these instructions will help you but I’ve tried to give some clarification for a product which could be difficult for some to assemble. Have patience and just go slow. It really is a great solution for many of us.
S**E
Spacious, Sturdy, and a Feline Paradise!
I recently purchased the Kitty City Outdoor Catio Mega Kit, and it has absolutely transformed the outdoor experience for my indoor cats. If you’re looking for a secure way to let your cats enjoy the outdoors without risk, this setup is a fantastic option.Pros:✅ Massive Play Space: The "Mega Kit" name is no joke — this setup offers tons of space for cats to move around, climb, lounge, and play. It's great for multi-cat households and especially satisfying for high-energy cats.✅ Expandable & Modular Design: One of the best features is its flexibility. You can add tunnels or other Kitty City components as needed, or rearrange the structure to fit different yard or patio layouts.✅ Weather-Resistant Materials: The mesh and frame feel durable and are built to handle outdoor conditions like light rain and sun. We’ve had ours out for weeks, and it still looks new.✅ Secure and Safe: The enclosure keeps cats safely contained while allowing them to enjoy fresh air and sunshine. I feel confident letting them roam in it without constant supervision.✅ Easy to Assemble (with Patience): While it’s a large structure, the instructions are clear, and all pieces snap together without tools. It took a little time, but the end result is very stable.Cons:➖ Assembly Takes Time: Given the size of the Mega Kit, assembly can take a couple of hours, especially if you're doing it alone. Expect a bit of trial and error during the first build.➖ Not Ideal for Harsh Weather: While fine for regular use, it’s best to bring the enclosure in or reinforce it during storms or strong winds.
S**D
DON'T BUY UNTIL YOU READ THIS
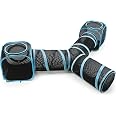
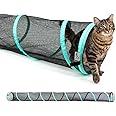
PLEASE NOTE: THE ONLY PARTS THAT WORK AS 'CONNECTORS' TO CONNECT ADDITIONAL PIECES TOGETHER, SUCH AS THE INDIVIDUAL TUBES, ARE THE SQUARE 'BOXES' THAT COME ONLY WITH THE Y-SHAPED PARTS (NOT THE SAME AS THE KENNELS). In other words, EVERYTHING HAS ZIPPERS EXCEPT THE SQUARE THAT COME WITH THE Y-TUBES. It's like buying a bunch of jackets that you can't zip unless you have both sides. .if you want to be able to connect two or more 10' tubes together, so the cats can have a longer linear run, you have to buy the Y- shaped parts, just so you can get the square connectors to connect the tunnels.The catio section, alone, would not have allowed our cats to run around much. We also wanted to be able to extend one of the tunnels through our exterior cat door, to enable the cats to come and go safely, in and out of the house, during the day, without our having to carry them out the door and into the catio. There's a danger of the cats jumping out of your arms, especially when you are trying to get them in and out of the house into the catio or various parts.Buy some bungee cords to help keep the tunnels from moving around, instead of using the stakes that come with the tunnels, assuming you want to run a tunnel onto a deck where you have nowhere to insert a stake. The netting has held up pretty well, but we are going to have to use duct tape to re-attach one of the tube wires.The size is great for kittens and juniors, sufficient for adults, but definitely not for Maine Coons.The pictures hopefully show how we have run the tunnels onto the deck to create a loop 'run' connected to the catio. If the square connectors came with the tunnels, it would make MUCH more sense, because one end of the 'Y' sections becomes useless and in the way. We spent $80 on two Y-sections, just to get the square sections that come with that.
ترست بايلوت
منذ 3 أسابيع
منذ شهرين