We remain fully operational. Our teams are working around the clock to ensure your deliveries continue safely.

قم بتنزيل التطبيق


معلومات عنا
حقوق الطبع والنشر © 2024 Desertcart Holdings Limited
قم بتنزيل التطبيق


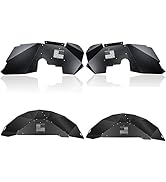
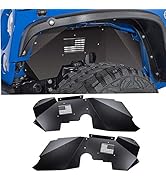
🛻 Armor up your Wrangler with precision-fit protection!
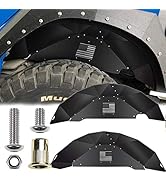
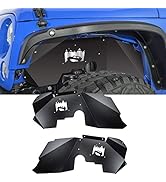
The SMALLFATW Front and Rear Inner Fender Liner Set is a custom-designed aluminum upgrade for 2007-2018 Wrangler JK/JKU models. Featuring corrosion-resistant black coating and a perfect vehicle-specific fit, it blocks debris and mud to protect your engine bay. Easy to install with included hardware, this set enhances both durability and style for Jeep enthusiasts seeking reliable off-road defense.


| ASIN | B09J4QYKJX |
| Auto Part Position | Front |
| Best Sellers Rank | #94,312 in Automotive ( See Top 100 in Automotive ) #714 in Wheel & Tire Mud Flaps & Splash Guards |
| Brand Name | SMALLFATW |
| Color | Black |
| Compatible with Vehicle Type | SUV |
| Customer Reviews | 4.2 4.2 out of 5 stars (448) |
| Exterior Finish | Aluminum |
| Fit Type | Vehicle Specific Fit |
| Included Components | Comes with housing |
| Item Type Name | Inner Fender |
| Manufacturer | SMALLFATW |
| Manufacturer Warranty Description | 1 Year |
| Material Type | Aluminum |
| Style Name | Modern |
D**N
Perfect!
Perfect fit, super easy to install even for a novice
J**R
Functional and look great too
Works great I have had them on for 6 months and they have done their job well very satisfied
J**O
PITA to install.
I purchased the rear fender wells back in Dec of '23. They were a pain in the a$$ to install. If you don't have time, patience, and decent mechanical skills you should look elsewhere. The pre-drilled holes did not line up, and the holes for mounting did not line up with the Jeep's. I got them installed with a bit of drilling and some muscle. Since they have been installed, I like the way they look, and I have received several compliments. I would not purchase these again, but they are good quality and they look good.
E**L
Great fit and very durable and affordable liners
Came a day early which was cool. I immediately put the pieces together. It’s very easy. Use the small screws to put the three pieces together for each side. Holes all line up as long as you don’t tighten each screw and nut immediately. Then you can put the rubber trim on. Placing the liners in was quite easy. The driver side was a super great fit. Take the 4 longer screws to fasten the liner to the wheel well. Use a small wrench with tape to secure the nut from behind the wheel well and then tighten the screw in with the Allen key from the front. It’s just the two screws and nuts on the bottom two holes of each liner and wheel well. The top piece fits in and is held in by the lip of the wheel well (very snug). Can’t even pull it out after install is complete. The passenger side was the same but I had to really push the liner in and up into the wheel well with my body weight. (I’m 6’2 195lbs) Don’t worry about the nut-sert and drilling unless you really enjoy extra work. Not worth it in my opinion. I would have done it if needed but I tried the simple way first and it’s very durable and flush. I love the look of the liners. They are strong and decently thick. The flags look awesome and they are meant to be mirrored. American military uniforms feature the U.S. flag, which is worn facing backward. The rule is that the blue field of stars should always be in the highest position of honor on the uniform. That position has always been the right shoulder with the flag's blue stars facing forward. ...So don’t order this and give it a bad review because you wanted two flags with the stars in the upper left corner.
J**S
This is going to take a little time to sort out several issues
Beware that for the front part, you will need the original fender bolts! If you happened to have replaced your front fenders with something else, and no longer have all of the original bolts in place, you will need to find some new ones because they are not included in the kit. I ended up with three missing bolts on either side. I managed to have four (two for the top on each side), but I am still trying to get one more bolt (which is a different size) for each side. I have not located the size and thread needed yet. For the two on each side that I had, they were scavenged from elsewhere in the vehicle where I had installed entry handles (apparently same threading!) Also, you will have to drill two guide holes for each side in the front to use the self-tapping screws on the far ends as there are no preexisting holes in the vehicle at the two locations on each side. For the rear, beware that it the lengths of the parts are not cut the same and have one hole in different position!! I initially assembled the two sides with one piece unknowingly swapped between the sides, and one hole did not line up at all (off by at least an inch), and the parts were cut to slightly different sizes. The two sides are not perfectly mirrored! I initially attributed this to crappy manufacturing. But when I had both pieces somewhat assembled I realized that the holes were off in opposite directions for either side. So I guessed that maybe I had the wrong piece in each side, which turned out to be true. I had to disassemble and swap the piece of the "eyelid" which belonged on opposite sides. This was not at all apparent or expected in the beginning. Once you have the right pieces on the right sides, the holes line up fine. Instructions would have been appreciated to avoid this. I did not get the assembled rear covers installed yet, but it looks like attaching them is going to be another chore. There are no predrilled holes in the vehicle, and there are four locations at which to attach the covers on each side. So more drilling will be needed. Rivnuts are provided for the bottom two locations (a tool that I don't have yet). The top two holes look like they will need rivnuts as well, and I don't have enough from the kit. So with that and the tool not here, putting the rear half on will have to wait until another weekend. Also, it looks like I will need to get some flat washers as the bolt heads are almost the same size as the holes drilled in the covers. I think it will look decent and be solid when it is done, but I had hopes that this was not going to be as much effort as it has been. I have not seen good instructions anywhere (YouTube, etc.) on how to assemble all of this, so I suggest planning for enough time to sit down and figure out this assembly puzzle - and think carefully about it as you go. You'll probably need some tools you don't already have, and possibly bolts and washers that aren't included in the kit (as in my case). And with all those bolts holding the covers together, a bit of Loctite is probably a good idea. I can imagine some of those vibrating loose over time.
H**N
Sturdy
Looks like the photo when it came in the mail. Very durable.
A**R
Fender
Easy install took about an hour for both sides they look great
F**1
regret buying.. updated review.
OK, after having these for a few months I am rerouting buying these, they are rattling like crazy, the thinner gauge metal weakens with heat (Florida + engine heat) and even with routine tightening its driving me nuts. Will be replacing them. ** update** @6000 miles since installing these, I still like the look of the liners but I bought a different pair for my wife's JK, they are a heavier gauge and Im noticing a big difference in the way that these liners are noisy, especially at highway speeds or in high wind, my wife's are installed in the exact same mounting points and are quiet. SO, yes they still do the job of keeping crap out of the engine bay, yes they still look good and yes they have performed as described so I won't lower my rating but I would not buy them again. *Update, a little over a week since installing, the liners are rubbing on the spring towers, will probably have to take them off and modify them a little, small cut or bend.*Great product for the money.. take the “QR” code card and toss it in the garbage, it’s worthless. YouTube any fender liner video and you will get the idea. I took the stock side marker light and after some modifications and spacers, I sandwiched it in between the plate and the flag.. idk I like it lol as far as the direction of the flag comments..the stars are always charging forward.
ترست بايلوت
منذ شهرين
منذ شهر