


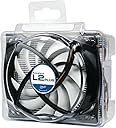


Accelero L2 Plus
Product ID: 49906869
Details
- BrandARCTIC
- Compatible devicesDesktop Gaming
- Cooling methodFan
- Global Trade Identification Number
- MaterialRubber
- Noise level0.4 Decibels
🔇Ultra-quiet PWM fan
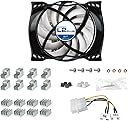
🧊31 RAM & VRM heatsinks
❄️120W cooling power
Buy anything from 5,000+ international stores. One checkout price. No surprise fees. Join 2M+ shoppers on Desertcart.
Desertcart purchases this item on your behalf and handles shipping, customs, and support to KUWAIT.
❄️ Stay cool, stay ahead — the silent power your GPU deserves!
The Accelero L2 Plus by ARCTIC is a high-performance GPU cooler featuring a 92mm PWM fan with a 120W cooling capacity, enhanced by 31 RAM and VRM heatsinks and pre-applied MX-4 thermal compound. Designed for ultra-quiet operation and broad compatibility, it significantly lowers GPU temperatures and noise levels, making it a top choice for gamers and professionals seeking reliable, silent cooling.


| ASIN | B005I9IM4E |
| Are Batteries Included | No |
| Brand | ARCTIC |
| Colour | Black, Grey, White |
| Customer Reviews | 4.1 4.1 out of 5 stars (596) |
| Date First Available | 5 Nov. 2011 |
| Guaranteed software updates until | unknown |
| Item Weight | 250 g |
| Item model number | DCACO-V300101-BL |
| Manufacturer | ARCTIC |
| Product Dimensions | 11.91 x 9.4 x 5.08 cm; 250 g |
| Series | DCACOV300101BL |
| Voltage | 12 Volts |
| Wattage | 120 watts |
B**.
Can be made to fit GTX 1060, works well
1060 isn't supported out of the box, but I took a punt, guessing that it wouldn't be hard to adapt it to fit with a little ingenuity, and I was right. There are four holes that are in a square which is about 3mm too small. Widened these with a drill (used a metal drill bit, though aluminium fitting plate is thin enough that you could probably get through with a regular bit). Then attached it using four M3 12mm machine screws (nut loosely glued to fitting plate, screw end goes through underside of card). Tightened (usual X pattern, a bit at a time) until the fitting plate showed a tiny bit of bending. Doesn't even look jerry-rigged. Given that my card has a decent overclock and that the cooler is rated for 120W and the card is 125W, I wasn't sure whether I'd see much improvement in temperature/noise, but for a dirt cheap cooler it's doing a pretty good job. Under heavy load (Unigine Superposition benchmark), with fan curve set to max out at 75%, getting temperature of 75-76C and a rock-steady 2012MHz. With stock cooler I was getting 82C and a clock which fluctuated wildly, mostly between 1961 and 1999 MHz. That was with fan at a steady 65%, but the noise of the L2 at 75% is a fair bit quieter than the stock at 65%. Without any overclock and with fan speed capped at 55% the cooler is very quiet. As I have it, it's certainly not silent, but definitely not loud - about the same level as my PSU, which is a decent PSU. Even at 100%, it's not terrible (if you value temps/performance over quietness, go for it). NB, I used a premium thermal paste (Mastergel Maker) to get those results. I'm going to try Coollaboratory Liquid MetalPad - the only pure metal TIM I know of which can be applied to aluminium - hoping to knock a few more degrees of it and/or to be able to lower the fan speed a little more. [Edit] I've now tried it with the Coollaboratory Liquid Metalpad as TIM. I was a success, though to be honest probably not quite worth the considerable expense of the MetalPad.The clock has gone up, it almost never drops below 2025MHz and often goes into 2050-2075 territory. But MetalPad is a really, really expensive bit of kit, so sticking with high-end non-metal paste is probably a good idea. [Second edit!] Several reviewers mentioned that they found it hard to get the heatsinks to stay stuck using the supplied adhesive. I'd just like to mention that I didn't experience that at all. I have a feeling that arctic have probably reformulated their adhesive since those reviews were written, because the stuff I got worked like a dream.
K**E
Top bit of kit
I bought this for my HIS 5770 card as the stock cooler was a little on the noisy side when gaming. As with the other reviewers and also various forums online I agree that the instalation of this cooler is a little tricky. The cooler itself is quite large so please bear in mind as you need to make sure you have plenty of room. My original cooler didn't actively cool the vram or the power regulators, so the smaller heatsinks were not used and only four of the eight vram heatsinks were used. The thermal adhesive is straight forward to mix and apply, however DO NOT scrimp on the five hour curing time. I left mine overnight and found that it still hadn't set properly. I guess the heat when the card is reinstalled will fully cure it. The instructions are ok, but could be better, finding out how to orientate the cooler take a few attempts. The little adhesive discs for the spacers might as well not be there as they are really sticky which means they stick to you and the screws. I ended up using a set of needle nose tweezers to place them while threading the screw through the hole. The cooler itself is pretty impressive, my idle temps dropped from around 60c (told you the OE cooler was poor) to around 45c, in game it dropped from 90c to around 70c. The fan is nearly impossible to hear even with heavy gaming. The only drawback is the fan connector. It comes with a 3 or 4 pin connector which probably won't be compatible with your cards fan connector. I managed to prise off the white connector off the board leaving just the pins onto which I pushed the fan connector. So in all, apart from the tricky installation this is a top notch cooler. I really recommend Arctic cooling stuff as I have it on my cpu and two of my three case fans are AC, the other is to be changed soon.
G**O
Super replacement for stock mid range GPU fans
OK in summary the fan is great , if you have a noisy GPU, you will not go wrong with this card at the price. Review is with unit fitted to HD6850 Performance, slightly better than stock cooler still early to tell (3/5) Noise level vastly superior, though at full speed still audible fitting (5/5) Fitting On my unit I could only connect the fan to the PSU supply making the fan run at top speed, I had to re-use the old fan connector. I think for a product clearly marked suitable for HD6850 , an adapter would have been nice. Heatsinks These were quite easy to put on. The trick is not to put too much paste on them. (4/5) Comparison with the accelero extreme IV I use the accelero on a HD6950 and it is far superior when it comes to cooling. However it comes with a high price and more importantly its very large so only usable in small cases. This L2 plus, may not have the high end cooling but for non gaming its perfect and very quite (5/5)
D**L
Cross check with Arctic product website for compatible cards. Just follow the provided instruction sheet and you are good to go. Otherwise you will mess up. Definitely and upgrade over stock small fans and coolers for low - mid end cards. No noise even at full speed. People who don't want attach the fan directly to SMPS, can just remove the plastic socket for 2 pin fan header on card. Plug in the 3 pin header so that the Red wire is + and black wire is - . It will work like normal graphics card fan. If you are going to attach the VRAM and VR heatsinks be extremely careful so that the heatsink does not touch each other or any other components. Use the provided insulation strip as well as additional insulation tape on bottom side of heatsink for extra precaution. Double, triple check the mounting positions before turning anything on. My card is Powercolor R7 250X which has a poorly designed heatsink and fan. Temps now don't go beyond 80 under full load.
A**.
Bonjour, Ma carte vidéo Radeon HD 5770 commençais à trop chauffer et à faire du bruit. N'ayant pas le budget pour changer de carte, j'ai opté pour cette option peu chère. Résultat parfait, j'ai gagné + 10° en refroidissement et surtout plus de bruits. Pour le montage, relativement simple et pas trop long, on dévisse le vieux, on mets en place les cales et les rondelles, puis on revisse le neuf. Le ventilateur est déjà prêt à encoller, pas de pâte à joint a acheter. Je n'ai pas collé les alu fournis avec le ventilateurs. Petit soucis avec l'alimentation du ventilateur, la broche ne correspondait pas a celle de ma carte vidéo, mais je l'ai brancher en direct avec l'adaptateur fourni. Petit prix et grande performance. Je ne peu que recommandé pour redonner une fraicheur a votre carte graphique !
J**N
The value is awesome, and the kit fits a wide range of cards. the sink knocked 20’C off my temps. I used this on a visiontek 7750 6M card with six outputs. I didn’t use the included fan, I just used the heat sink, above a fan I already had in there as seen in the photo. installation is not ‘easy’ it’s just time consuming and takes some careful work. Instructions are not great, But they are complete. I would read through them a couple times and be sure to follow every step. Just take your time and go slow and make sure to follow the instructions and wait a solid two hours after you glue down the smaller heat sinks. I could not be happier with the performance though, the temps are way way down from where they were before and the stock fan was super loud and annoying. The kit comes with thermal paste already applied, but I removed it and used some high-end stuff I had left over. Use the adhesive very sparingly, it spreads out quite a bit. Also I deviated from the instructions and used the 4.5 mm spacers even though it said to use the 4 mm. I checked carefully and the 4 mm was clamping the card down too much. When you first go to mount it and make contact with your chip just check your spacing. Either way, not a big deal. I would highly recommend this kit.
C**W
I purchased this to replace the fan/heatsink on a Sapphire Radeon R7 260x for a 'silent' PC build that'd be used both for audio/music production and moderate gaming. At idle, it is near inaudible, and at load it is still quiet. Temperatures are slightly lower than stock. The included installation manual was a little bit confusing but it ultimately wasn't that difficult to figure it out. I did end up having to remount the L2 rotated 180 degrees from what I did initially, as it interfered with a PCI slot in the other orientation. This resulted in only being able to have the RAM heatsinks half on the chips, but the card still seems to operate well and cool. As this is a universally designed heatsink I expected some compromise.
C**E
J'ai changé mon ventilateur par cet Artic; et j'ai gagné 17 degrés en moyenne.Le pc ne s'en porte que mieux. Avec la pâte thermique j'ai pu changé celle qui était sur mon processeur. Bref gros coup d'entretien sur mon pc; avec juste 17 € de dépensé. Rapport qualité prix imbattable surtout que garantie 6 ans
Trustpilot
1 month ago
2 weeks ago