


Buy anything from 5,000+ international stores. One checkout price. No surprise fees. Join 2M+ shoppers on Desertcart.
Desertcart purchases this item on your behalf and handles shipping, customs, and support to KUWAIT.
🚀 Elevate your maker game with precision and power that won’t quit!
The Official Creality Ender 3 is a high-precision DIY 3D printer featuring a ±0.1mm nozzle accuracy, a spacious 220x220x250mm build volume, and a rapid-heating bed that reaches 110°C in 5 minutes. Its resume printing function safeguards your projects against power outages, while an upgraded extruder ensures smooth, clog-free operation. Compatible with multiple filament types and designed for easy assembly, it’s the go-to choice for professionals and enthusiasts aiming to create detailed, reliable prints.


| Best Sellers Rank | #63,863 in Industrial & Scientific ( See Top 100 in Industrial & Scientific ) #85 in 3D Printers |
| Brand | Creality |
| Color | Black |
| Compatible Devices | Personal Computer |
| Customer Reviews | 4.2 out of 5 stars 3,062 Reviews |
| Item Weight | 7 Kilograms |
| Material | Acrylic |
| Product Dimensions | 10"D x 10"W x 10"H |
P**E
perfect for beginners and for printing soft materials
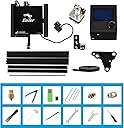
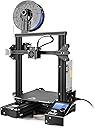
If you’ve been on the fence about diving into 3D printing—or if you're looking to upgrade from a finicky, bare-bones starter machine—the Creality Ender 3 S1 is an absolute home run. Creality took everything that made the original Ender 3 a community favorite and added the exact premium upgrades users used to spend hundreds of dollars modifying themselves. Out of the box, this machine feels like a refined, modern workhorse. Key Highlights The "Sprite" Direct Drive Extruder: This is the star of the show. Unlike older Bowden tube setups, the direct drive extruder handles flexible filaments like TPU with absolute ease. It offers incredibly precise extrusion, meaning fewer clogs, better retraction, and crisp print details. CR Touch Auto Bed Leveling: If you've ever owned an older 3D printer, you know that manual bed leveling can be a frustrating chore. The built-in CR Touch system takes a 16-point measurement of the bed before printing, automatically compensating for any microscopic unevenness. It saves time and guarantees a perfect first layer almost every time. Dual Z-Axis Leadscrews: Creality didn't skimp on stability here. Powered by dual synchronized motors, the dual Z-axis ensures the x-gantry moves perfectly level. This drastically reduces "Z-wobble" and gives tall prints an incredibly smooth, professional surface finish. Quick Assembly: You don't need an engineering degree to set this up. The printer arrives 96% pre-assembled. You can realistically have it unboxed, put together in about six easy steps, and printing your first test model in under 30 minutes. The Printing Experience Using the Ender 3 S1 is a joy compared to its predecessors. The removable PC spring steel magnetic build plate offers fantastic adhesion while printing, and once the bed cools down, you can simply pop the plate off, flex it, and your prints snap right off. No more dangerous scraping with putty knives. It is also remarkably quiet, thanks to the 32-bit silent mainboard. You can easily have this running on a desk next to you while you work without being distracted by the typical electronic whining of older machines. The Verdict Rating: 4.5/5 The Creality Ender 3 S1 bridges the gap between budget hobbyist machines and high-end plug-and-play printers. With the Sprite direct drive, CR Touch leveling, and rock-solid dual Z-axis stability, it eliminates the most common headaches of 3D printing. It’s an exceptional investment for beginners who want a smooth start, and a powerful tool for veterans who just want a machine that works. Highly recommended!
A**S
Reasonable speeds print accurately. Good 1st Printer
Not the fastest, but print quality is just fine inside a heated enclosure so cool air drafts don't mess up prints. Exactly as I expected after seeing my friend's more expensive version did better prints from inside an enclosure. I bought PLA and ABS filament, and the PLA is good without needing the enclosure, in a warm room, but an enclosure does help it do better. ABS requires a heated enclosure unless you live in a hot desert, as expected. Very reliable and easy to use. No clogging. Prints come out accurate, with a nice finish. Can't speak of durability this soon, but I would bet money that I will find it durable eventually.
B**S
Amazing value 3d printer
Super amazing value and super easy operation (I recommend Ultimaker Cura slicer it's way better than their own slicer) print quality is great and I love how upgradeable it is. I used an ender 3 for 4 years (using it pretty consistently for my 3d printing business I run selling 3d artwork and pushed it pretty hard at times and it made the whole cost of the printer back) before I ended up replacing it with an ender 3 s1 pro because I love the ender series so much and wanted an upgrade plus it had some parts needing replacement (I could have replaced the parts for cheep but it was an excuse to upgrade) If you're looking for a basic 3d printer to get started this one is perfect for you
M**B
If I'd Known What I Was Getting Into...
First a warning to newbies who think this will work like your HP Inkjet printer but for plastic. It won't. The learning curve is steep and frustrating. Don't buy this if you don't like to fiddle and don't have nerdy tendencies. The less you pay for a 3D printer the more time you spend making it work properly and the more money you spend on upgrades. If the concept of editing, compiling and updating firmware, doing dozens of test prints, and fiddling with sheets of paper and diddling plastic knobs constantly makes you want to vomit, look elsewhere. That said, this is "the" entry level machine for 3D printing. Unfortunately quality can be hit or miss. The first month I owned the printer, I had to replace the hot end fans because the bearings went bad after only a few hours making the machine rumble like your Grandmother's 12 year old desktop that's full of cat hair dust bunnies. I also had to replace the extruder with an all metal one because I couldn't get the thing to print without it skipping constantly and the stock one is cheap plastic that everyone knows fails quickly. The stepper motor drivers if you're sensitive to high pitched noises will have you running to upgrade the motherboard immediately. Stock it sounds like three cheap inkjet printers having marital relations the entire time it prints due to the cheap stepper motor drivers. The noise reduction alone is worth the $40 or so to change out the motherboard for one with better drivers and 32bit support. While you're at it upgrade the screen to a touch screen so you don't have to control it like a Pong game from 1983... $$$ On mine the bed leveling doesn't stay put for more than a couple of days of heavy printing, despite upgrading the springs to stiffer ones. So next I get to buy a BLtouch as I'm going through sticky notes at a prodigious pace. More $$$ and more editing firmware. Want to print something other than PLA? The stock PTFE bowden tube is cheap and degrades and offgasses deadly fumes and kills your pet birds at much more than 235C. I printed some PETG at 240C and the tube end looked like a hot dog someone left on the BBQ for an hour. Better upgrade to some capricorn tubing or better yet an all metal hot end... more $$$. If you go all metal hot end and want to print over 260C, better be prepared to install Visual Studio and edit your firmware, compile it and upload it to the printer as that's the only way to change the maximum temperature. I like the machine... now that I've spent at least the equivalent of it's purchase price over again on upgrades and many hours of my free time. If all you want is some Yoda figurines in PLA, enjoy playing Pong and are deaf, this may be fine out of the box, but bet on spending a bunch of money and your time if you want anything decent beyond that.
N**K
Apparent Inconsistent Quality
This was my first 3d printer that I decided to go with due to reviews and successful builds. I was excited to give it a try since I have been using laser and cnc machines for years, it seemed like the obvious next step. While many seem to have luck and positive things to say about this printer, I do not. I settled on this printer due to a bunch of research and forum surfing, to make sure I wasn’t going to buy some piece of garbage. While reviews are helpful, some don’t do things justice. Upon opening the printer and working through the parts, it seemed very straight forward and everything seemed to be of good quality. I had watched and read numerous sources for the assembly so it went quickly and was only a few steps. After getting everything set up, according to multiple sources and Creality, I was excited to get my first print going so I leveled the bed meticulously, got my settings all together, and went to test print a factory provided print. Nothing. Reset settings, trouble shooting from Creality, forum checking. Nothing. I spent two weeks trying to get this printer to work. Not one print the whole time. The printer would not recognize the z axis and would fail to print, even after bed leveling, pre heating and using factory prints. I even disassembled the unit and went through each step again to make sure I didn’t miss anything. Bubkis. I eventually gave up on it and returned it. I bought my runner up on my list of printers, the Flashforge 5m and had it assembled and printing in half an hour with no problems. 20+ prints later and still going. Don’t waste your time with this printer. Go with another brand and save yourself the headache. There are so many out there, I’m sure you will have better luck with a different system.
T**N
Good price!
Great entry level printer..
M**X
Easy to build, not for begineers though
Before starting your first print Level the bed (it comes slightly unleveled) Measure the correct amount of Esteps for the extruder. Mine was slightly under-extruding. (Calipers are recommended) After watching plenty of videos on the Ender 3's print quality, I decided to buy one. Out of the box the bed comes a little unleveled so leveling is required (no matter just release steppers, take a piece of a paper and raise/lower the bed until paper catches). My machine came with the newer with the 32 bit board and comes with a bootloader for easy firmware flashing, no Arduino needed just load .bin onto SD and turn on the machine and flash. The first thing you should do upon receiving the printer is checking the bed is level. A nice way of simplifying this process is to flash a brand new Marlin firmware with manual mesh bed leveling enabled (which is a great option if your bed came warped. The wonderful thing about the ender 3 is that it is so common, there are plenty of modifications that can be made since the community for it is huge. A BLtouch is a mod that people put to automate the bed leveling process. Once you get this printer you're gonna feel like purchasing many upgrades for it. The printer does come with a loud stepper driver so if you don't want to hear whirring and beeping for hours on end place the printer into a room or buy Creality's 4.2.7 board with silent stepper drivers or SKR Mini E3. As for overall print quality, it takes a couple of prints to tune in the settings making this printer a great first printer for starters however it does take a decent amount of time to level the bed and get settings right. Finally, buy a raspberry Pi 3 or better and webcam for OctoPrint. Essentially, it allows your printer to have WiFi printing capability among other tools like WiFi monitoring. notifications via Discord and timelapse snapshots. Octoprint is truly an amazing piece of software and if you have this printer, use it!
J**.
Watch YouTube On-line Beginner Videos BEFORE Building - Assembly Sheet Is VERY Confusing
Watch the third-party free YouTube on-line beginner videos BEFORE building. The included assembly sheet is VERY confusing … and I’m an engineer! The videos make good points about how extremely important it is to make sure the printer’s frame is absolutely square in all three dimensions. Just gradually tightening the bolts in a rotation (like when tightening the bolts/nuts on a vehicle wheel) isn’t good enough. The Z limit switch mounting bracket has a nub on the left front corner (looking from the front of the printer). Some videos say to clip it off (e.g., with diagonal wire cutters or heavy-duty shears), which is the only way that I could get to perform the bed “leveling” process. The process actually positions the bed parallel to the X-Y plane of the printer’s frame (left-to-right, and front-to-back). Some people mistakenly try to use a carpenter’s level to “level” the bed, but if the printer isn’t sitting on a perfectly level table/bench surface, and the bottom of the printer frame isn’t exactly parallel to the supporting table/bench surface (not likely), a carpenter’s level won’t be of any use. Threading the printing filament past the gripping feed rollers and into the white feed tube to the print head is very tricky. Some videos show that it helps to unscrew the brass fitting attached to the feed tube and get the filament to protrude out of the right side of the feed mechanism about an inch (25 mm), then screw the brass fitting back into the mechanism after pushing the fitting over the protruding filament. That makes it possible to get the filament into the feed tube - I couldn’t have accomplished that step without that hint. Getting the end of the filament into the hole beyond the gripping feed rollers was extremely frustrating, as the hole is impossible to see, even with bright lighting, as the hole passes through a black plastic housing behind the very close rollers. The menu items are somewhat different on my printer from any of the manual versions (included on the USB thumb drive, on the Creality.com site, elsewhere on-line, or what’s shown in the videos. I was able to guess that the Motion menu item was what had to be selected from the main menu in order to get to the Auto Home and Disable Steppers menu items, needed to perform the “leveling” steps. Once I had stumbled through the assembly sheet, then discovered the YouTube videos and done things right, printing was pretty straightforward using the built-in micro-SD card reader. I haven’t been able to scale a model down in the included Creality subset of the free, open-source Cura “slicing” software. The provided gcode files print just fine, but not the .stl files after scaling and saving as gcode files. The printer only displays and prints from gcode files that the slicing software generates from .stl (3D Object) files. I’m trying to resolve this issue via on-line searches and forums.
S**E
Excelente relación precio/calidad.
Excelente equipo. El ensamble es bastante intuitivo y con ayuda del manual lo llevas bien. Desde la primera impresión salió excelente.
P**M
A better 3D printer - even though the price is extremely affordable
I bought this printer as well as the Prusa Mini+. Surprisingly, this printer turns out to be easier to manage and comes up with better and nicer prints. The Prusa Mini+ had some initial teething problems - particularly pertaining to prints being dislodged as it was not sticking to the print plate. I used glue-stick and finally decided to use 90% IPA alcohol solutions, which eventually worked. During this time, the Creality became my most reliable 3D printer! This printer was certainly worth more than the price I had paid and I would recommend anyone who is interested in 3D printing to get one! I absolutely didn't regret making the jump - even though I heard horrible stories about support for this printer.
N**E
Bem prática de usar
Cumpre seu papel! Ótima!
A**ー
非常に高いクオリティです。購入してよかったです。
価格に比べて非常にクオリティが高いので満足です。梱包も完璧で開封時に何の心配もありませんでした。組み立てに必要な工具はすべて同梱されていました。テスト印刷用のフィラーも少しだけ同梱されていてありがたいです。 microSDカード(説明書とスライスソフト、ドライバ入り)がUSBアダプタにセットされた状態で同梱されているので、同封されている紙の説明書ではなくまずはmicroSDの中のPDFの説明書を読みましょう。こちらに組み立ての詳細説明が日本語で書かれています。 組み立てと調整が少し必要なので初心者よりは中級者向けなのかもしれません。テーブルのレベル調整の方法は説明書に詳しく書かれています。上部で平らな台の上で作業すると組み立て精度が出しやすいです。ベースのフレームはモータドライバとテーブルのスライドが組み立てられた状態で梱包されていますが、足部分の部品をいったん緩めて平らな台の上で締めなおすと良いです。結束バンドが同梱されていますが、ケーブル類のどの部分をどうやって固定するかは書かれていないですが工夫して固定しました。 スライスソフト(日本語対応)の設定項目はとても細かく、上級者でも様々な材料のための条件出しの研究が十分できます。印刷時の騒音はとても小さいです。自分で調整した設定はすべて名前を付けて登録できるのでとても便利です。スライスソフトからはgcodeが出力されます。設定でフレーバが選べるので他のプリンタ用にも使えると思います。Ender3はMarlinフレーバのようです。ソフトからはプリンタを選択するだけで必要な情報(機械の寸法情報、gcodeヘッダフッタなど)がすべて自動で入力されます。完全にカスタム値を入力することもできるのでプリンタを改造したり自作したものにも対応できそうです。私はマイクロSDカードにgcodeを保存してプリンタ正面のmicroSDスロットに挿入して、カードから印刷しています。 ステッピングモータの動作も滑らかで速いです。標準設定でABS,PLAが問題なく印刷できました。TPUは少し調整が必要でしたが押し出し量120%に修正したら層間剥離なく密着されて良好な印刷ができました。印刷中にパネルでベッド・ホットエンド温度を変更できるのが便利です。
S**T
組立が少々難しいです
基本的にはマニュアル通りに組み立てればよいのですが、ケーブルなどの引き回しで試行錯誤する箇所があり少々悩みました。最終的には何度かやり直して組み立てることが出来ました。 もう一点困った点は、ステッピングモーターをステーに固定するブラケットが直角が出ていない事。 付属のブラケットを使用すると、Z軸のボールねじが鉛直にならずモーターに不要な負荷がかかり、最悪脱調してしまいました。ブラケットを若干加工し、直角を出すとスムーズに動作しました。 また、付属のSDカードの耐久性が悪いようなので、到着したら内容をPCなどにコピーしておくと良いと思います。 総合的には、安価でそこそこの精度でプリントできたので、満足です。
Trustpilot
2 weeks ago
1 month ago