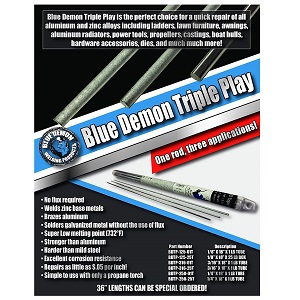
🔥 Triple the power, zero the hassle—weld like a pro with Blue Demon!
The Blue Demon BDTP-125-01T is a premium low-temperature aluminum-zinc brazing rod designed for professional-grade welding. It offers triple application versatility, requires only a propane torch, and delivers superior strength and corrosion resistance without the need for flux. Each 1 lb tube contains approximately 22 sticks, making it an efficient and reliable choice for durable metal joining.


| Manufacturer | Welding Material Sales |
| Part Number | BDTP-125-01T |
| Item Weight | 1 pounds |
| Product Dimensions | 38 x 1 x 1 inches |
| Item model number | BDTP-125-01T |
| Is Discontinued By Manufacturer | No |
| Style | Welding wire |
| Material | Aluminum |
| Power Source | Fuel Powered |
| Item Package Quantity | 1 |
| Measurement System | Metric |
| Included Components | BDTP-125-01T |
| Batteries Included? | No |
| Batteries Required? | No |
O**S
Better Late Than Never
Better late than never, right? Here's the deal.. I saw this stuff advertised somewhere. Maybe on YouTube? Anyway it caught my eye and I had a project I was looking at that could probably make use of something like this. Well, that project never developed and this tube of material (rods) hung on my spare parts rack for 5 years (2020 to 2025). These days I also do YouTube videos.. and a current project involves an old Harbor Freight 63cc generator restoration. (Why.. you ask? Because it's a hobby and I enjoy working on them.. I've bought, restored, and either sold or given away a half dozen of these things in the last couple of years.) So anyway, the current project is another of these little 2-cycle beauties that had one of the feet broken off. The bolt hole was still there that holds the recoil/air shroud in place but someone had gerry-rigged a piece of rusty angle iron as a foot. It worked, I guess but didn't please me. SO I fabricated a 1/2" thick piece of aluminum in the basic shape of the missing casting. So finally to the point.. I used some of this stuff to braze the fabricated part onto the existing casting. You'd have to look up Old Geek With Tools on YouTube to find the video (hint.. I haven't posted that one yet but will some time in the next couple of weeks). Anyway, this stuff is awesome. It worked perfectly for the entire repair process.
R**.
Copiously follow the instructions!
This low-temperature aluminum brazing rod is economical, easy to use, and effective (IF you follow the directions). I used this rod to seam braze 75 aluminum joints (300 total brazes) that had broken on an aluminum pontoon boat canopy frame that had collapsed during a storm. Most of the joints were 1" x 1" aluminum square tube" with heavier duty/guage rectangular aluminum at the base of the frame. This fluxless aluminum rod worked well for this purpose, but only when the instructions were copiously followed, which, in essence, are: 1) Secure your joint (vice grips, clamps, etc.) and copiously clean all aluminum surfaces to be brazed with a large new stainless steel ("SS") brush (buy one large brush and 2 or 3 small brushes), 2) get a good "handheld" torch (I tried several and found "Mag – Torch" the best) with a hose (sold separately from the torch for about $20) that connects the torch to a "map gas" cylinder (hotter than propane and available in all home improvement stores), 3) frequently use your small stainless steel brush on the area to be brazed during the heating and brazing process to remove impurities ("oxides"). if you don't brush, your braze will be significantly weakened or may not adhere at all. 4) frequently test the heat of your metal by running the aluminum rod over the joint area. When the rod begins to easily melt (from the heat of the rod against the hot metal only- absolutely not from the direct heat of the torch) deflect the torch flame away from the joint and begin "tinning" the joint ( tinning = applying a light coat of melted aluminum from the rod to the surfaces you abraded with your small stainless steel brush). 5) Put the flame back on the joint for 3 to 5 seconds to be sure that the tinning adheres, then remove the torch to let the tinning coo/solidify for 5 to 10 seconds. 6) Use your stainless steel brush again to clean the oxides from the tinned area, 7) reheat the joint to where your aluminum will again melt the rod and apply a generous coat of melted aluminum to the tinned area of your joint, 8) finish the joint braze with about 4 or 5 seconds more heat from the torch to increase final adherence of the melted aluminum to the joint. 9) If you see impurities (oxides) in your braze, don't be afraid to run your small brush through your braze to clean out the impurities to strengthen your joint. This "brush through" may require you to melt a little more aluminum on your joint but the joint will be stronger for it. In sum, secure the work, use new stainless steel brushes to frequently clean work, metal not torch must melt aluminum brazing rod, "tin" all brushed areas, apply final braze coat, and always finish with more heat for adherence.Practice on a few joints before doing your finish work. Everything will seem very awkward at first as you juggle the torch, the brush, the rod, and the correct heat. Within about 5 to 10 joints you will feel like a professional. If you cut corners though and don't get the work hot enough or don't frequently keep your joint clean of the oxides with the brush your brazes will look pretty but won't hold and your time will be wasted. Good luck!
T**Y
Tricky to use but works very well once you get the hang of it
I used these zinc-alluminum alloy brazing rods when I had to make my own flashing around a skylight. I used regular galvanized flashing, and these alloy brazing rods did the trick. They will braze both aluminum & zinc. But aluminum flashing is too thin & melts too easily. Galvanized flashing works OK.Here are a few tips:Flux is unnecessary, but If the surface is dull or dirty, brush clean with a STAINLESS STEEL wire brush. Regular wire brushes won't work.Prepare each surface by "tinning," which means to melt a thin coating of brazing alloy on the surfaces PRIOR to actual brazing. This is critical for a good strong joint.A regular propane torch is sufficiently hot, but a broader flame works better than a pencil-tip flame.Always heat the metal & let the metal melt the brazing rod. Don't melt the brazing rod with the flame itself.The trick is to keep the temperature around 750 F. Too hot and the metal can scorch & warp. Too cool & the brazing rod will not melt or bond.Use clamps to hold surfaces together. This alloy material will fill small gaps, but it works best if the gaps are tight.Don't be in a hurry. Practice on scraps first.
ترست بايلوت
منذ شهر
منذ شهرين