🌬️ Chill Out in Style!
The Mrcool DIY 12K BTU 4th Gen Energy Star Ductless Mini-Split Air Conditioner is a powerful and efficient climate control solution, boasting a 22 SEER rating and whisper-quiet operation at just 23.5 dB. Designed for spaces up to 500 sq ft, this versatile unit offers both heating and cooling functions, making it ideal for year-round comfort. With easy DIY installation and Energy Star certification, it's the perfect choice for eco-conscious consumers looking to enhance their living or working environment.


| Manufacturer | HVAC Distributing LLc |
| Part Number | DIY-12-HP-WM-115C25 |
| Item Weight | 100 pounds |
| Product Dimensions | 16 x 26 x 36 inches |
| Item model number | 4th gen |
| Size | 4th gen |
| Color | White |
| Style | 12K |
| Material | Plastic |
| Pattern | Split System |
| Power Source | Corded Electric |
| Voltage | 115 |
| Wattage | 25.0 |
| Installation Method | Split System |
| Item Package Quantity | 1 |
| Sound Level | 23.5 dB |
| Coverage | Up to 500 sq ft |
| Mounting Type | Wall |
| Certification | Energy Star |
| Special Features | Heating And Cooling Function |
| Usage | General Purpose |
| Included Components | Mrcool 4th gen Energy Star Ductless Mini-Split, White |
| Batteries Included? | No |
| Batteries Required? | No |
| Warranty Description | Warranty |
| Capacity | 1 Tons |
| Floor Area | 500 Square Feet |
R**
SUMMER TEMPS OVER 105°f? This is your unit.
It has been in service since I installed it almost 18 months ago. No issues whatsoever with the unit that is the18k model installed in a 24ft wide x 24ft long x 8ft tall (ceiling) garage in Glendale Arizona.I can confirm with this square footage having partially insulated walls and mostly insulated single garage door with a 2nd story above, the 18k unit is sized effectively. If you live in a lower temp environment you could get away with 12k but a hot vehicle pulled in to the garage. Will make the unit work for a few hours. In that scenario, this should be the proper size for most two car garages, regardless of the climate.Do your own research, of course. However, I did a great deal of research on mini split units all the way from Mitsubishi down to knock-off Chinese units. regardless of the manufacturer, most units are not rated for outside temperatures above 108°F, MrCool DIY’s are and they provide proof and testing on their site.So if you live in warmer climate, knock off Chinese units are not designed for high outside temperatures, and a majority of them will disable themselves when temperatures go above 105°f as they have an ambient temperature sensor on the outside unit that keeps them from overheating.I can confirm that this unit works effectively at Arizona desert temperatures over 120°f. Of course there is a large efficiency lost at that temperature but the ratings provided by the company prove this unit is more efficient than brands three times the cost.In fact, I can’t find a mini split unit on the market regardless of cost that has the same efficiency at temperatures over 115.°f.Yes, someone that is a home DIYer can install this unit themselves.However, I highly recommend you hire an electrician to run your disconnect.. everything else most DIYers should and can do. I know (and can look up) NEC and local codes. But if you cause an electrical fire by a faulty install, good luck getting a payout from your homeowners insurance. Same story if you sell your home with the unit attached and it wasn’t installed to code. And yes, running your disconnect could cost anywhere from $300-1200, but that’s life.Some have stated these units leak. My unit has not lost efficiency and I’ve monitored monthly kilowatt draw since last year and it’s pretty consistent.I did hook up a manifold gauge, and the pressure is low based manufacturer spec for target super heat.However, I assume that it was a loss in the hose or possibly initial seepage on the quick connect (I didn’t leak check after install).I read low pressure/charge as a common theme with these quick connects. I have been told the line set is charged with R410a and so is the unit. However, if this is incorrect or there was a slight seepage while in the box or during initial connect, that would explain the current levels. It’s fractionally low and probably losing 15% efficiency. You can buy small one time bottles on the Internet to charge mini splits that come with a gauge, you can pick one of these up and I recommend you do, no HVACR-EPA license needed. I haven’t charged mine since I need to move my main house split unit and I’ll wait till I buy a full R 410a tank.When the temp is below 90° outside, keeping my garage at 78°, I barely see much change in my kilowatt usage total for my home. Results may vary.. However this unit is hugely efficientI also feel keeping the garage below 100° keeps heat ingress out of my house, thereby raising the efficiency of my main unit.@@NOTE: I am also using MRCOOL’s wall mount for the unit. The unit will produce a low frequency vibration, though it comes with rubber feet, which help with mid frequency, if you will attach this to your house, you will hear the unit running when the home is quiet. For me it’s only noticeable when it’s dead quiet in the house and I’m on that side. My guess have never been able to hear it. So I’m probably neurotic. lol
A**R
Well engineered product for DIY
I thought the pre-charged refrigerant lines were well engineered. I was a little concerned about doing them without a torque wrench, but they pretty much have stoppers you can tighten to which makes it really nice. Be wary of buying the suggested amazon wall bracket as it doesn't give enough clearance to the back wall to bend the refrigerant lines in, you'll need a good 10-12" room to the wall you mount it to (the mr cool separately sold bracket give you plenty of room to work with). I'd say it took me about 15 hours (including taking time to go buy some parts/tools I didn't have), but I had a complicated line-set run than most people would. I think the unit iteslf and instructions were really good.
R**H
DIY Very Possible - Though Electrical Knowledge a Must
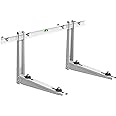
Bought this unit for a semi-finished garage (being used as a rec-room/home office) with the hopes of saving a few hundred bucks by doing it myself. I’m reasonably handy, but have no formal training in any specific field. Condenser is very heavy, so unless you’re reasonably strong, or just being smart, you’ll need someone to help move that around (or especially to help mount it if you’re going that route). Definitely a lot of specific steps to get this installed, but working at a reasonable pace, the whole project should only take a few hours. There are some great YouTube videos out there… overall I spent a few days prepping for the project… making sure I felt confident in each step.The pre-charged refrigerant lines are what make “DIY”. This unit does not simply plug into a typical outlet, however, so you will need to run specific electrical power for it, and buy those materials separately (for me, 15 ish feet of 12-2 romex, appropriate conduit, and a 20 amp breaker). If you have a breaker panel (or sub-panel) right where this is being installed, and have capacity to add a dedicated 20 amp breaker, great! I got lucky and the sub panel for my pool equipment was right where I needed it. Had a friend come by and give a quick electrical consult, make sure I wasn’t going to overload it, as I was fairly clueless and terrified this step. If you do not have easy access to this power supply, or do not feel comfy with moderate electrical work, you will need to hire an electrician to make sure this can go where you need it (and pay them something to hook up what you need). Otherwise this unit is GREAT, and can’t wait for it to heat up in LA so I can enjoy my nice cool garage!Also pictured (and purchased separately) is a mount for the exterior condenser, and a plastic channel to help protect/conceal/clean-up the exterior piping. I also needed to buy a couple “90mm hole-saws” to get the piping through my wall, and ultimately through stucco. Other major-ish tool needed was a hammer drill (for the stucco). Otherwise, all pretty common tools (drill, level, wrenches, etc).They also recommend a “torque wrench” when connecting the refrigerant lines… I just used 2 wrenches and tightened until I encountered resistance, then torqued it the tiniest bit beyond that, like the instructions say, and so far no gas leaks, and the unit is working well!
A**H
Great product
installed this unit in my 30X40 metal building with insulation. Here in south Texas it works great keeps it nice and cool in the hot summer.
ترست بايلوت
منذ أسبوعين
منذ 3 أيام