Desert Online General Trading LLC
Dubai, United Arab Emirates
Desert Online General Trading LLC
Dubai, United Arab Emirates


🔌 Cut the cords, not the convenience—wireless lighting redefined!
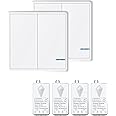
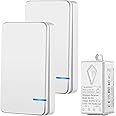
The NineLeaf Wireless Light Switch Kit offers a powerful 1000W load capacity with an impressive wireless range of up to 1300ft outdoors and 300ft indoors. Featuring IP66 waterproof and fireproof construction, this kit includes 2 switches and 1 receiver, enabling easy, no-wiring installation for LED lamps and various lighting fixtures. Designed for versatile use in homes, offices, and outdoor settings, it supports up to 8 sender panels per receiver and guarantees over 800,000 switch cycles backed by a lifetime warranty and responsive customer service.


| Manufacturer | NineLeaf Tech |
| Part number | Remote RF Switch |
| Item Weight | 220 g |
| Product Dimensions | 8.6 x 8.6 x 1.1 cm; 220 g |
| Item model number | NineLeaf light switch wire free |
| Size | 2 Switch and 1 Receiver |
| Style | RM Receiver |
| Wattage | 1000 watts |
| Item Package Quantity | 1 |
| Switch Type | 1-way |
| Batteries included? | No |
| Batteries Required? | No |
B**S
Work very well
I've installed a couple of sets of these now, and I'm very impressed with them. Ideal for situations where you need a handy light switch, but don't want to be chasing out plaster or drilling holes to run cable to them.The switches themselves will go anywhere that you have a few spare centimetres. Sticky fixing pads are included. The "fitting" part only involves the little receiver unit, which is the size of a couple of sugar cubes. You will need a modicum of electrical knowledge to do this. I'd say that if you understand the concept of "Live" and Neutral" and have the knowledge and ability of how to wire a three-pin plug safely, you should have no problems. But I can't stress enough: IF YOU DON'T HAVE THE KNOWLEDGE, CALL AN ELECTRICIAN.If you're looking to replace or augment an existing light switch in a normal UK domestic setting, then in all likelihood you will NOT be able to simply wire the receiver into the existing switch box at the wall. This is because the receiver requires both an un-switched Live (brown/red) and Neutral (blue) connection (to draw the power it needs to operate). The Neutral wire will not normally present at the switch. AFTER TURNING OFF THE CIRCUIT AT THE CONSUMER BOX, you'll need to expose the ceiling rose, and fit the receiver there. You should familiarise yourself with how the wiring in a typical ceiling rose is configured, and relate that to your own, before diving in.There are clear instructions included with the unit, and a couple of very handy little 'tool-free' junction blocks. Pairing the receiver with the switch(es) is very simple.
M**Y
Brilliant bit of Tech
Wow, the wireless light switch kit is a brilliant bit of modern technology. I has allowed me to control a light at the top and bottom of a stairway going up to an attic room that wasn't wired in when constructed. Found the instruction good and everything worked first time as it should. Yet to see how long the transmitter battery lasts but again instruction for this seem easy. Thanks
S**.
Very intuitive to connect
On the whole very pleased with my purchase. The switches look good and modern. You push them in to send a signal to the receiver. They don't toggle up and down like a normal light switch.The instructions aren't too clear, but it was very simple and intuitive to connect it. I live in the UK and fortunately my electrics were compatible where I needed to wire it in. This would not work in a switch with only a switch live - it needs both a live and neutral into the existing switch and back out.I can confirm you can wall mount these into a standard UK back box and managed to fit the receiver behind. To screw it into an existing back box you need to pop the switch part off the front - I did this by putting my screwdriver in through the screw holes from the back. When putting the face plate back on, it did get stuck in though - other reviews say this can happen if you have fixed the back part too tightly to the backbox. I eventually managed to sort it but was a bit tricky to get the plate off. It would be the same if the battery needed changing too in the light switch.
C**L
Excellent Wireless swith
Excellent two-switch kit. The switches were easy to pair with the receiver and the receiver is of a size that easily fits into a mounting box. Everything works well when installed. A good piece of kit at a good price. Highly recommended.
D**F
Useful and effective - hope they prove durable
As a concept these are very effective, you can put light switches wherever you want them without having to channel cables (the time saving probably justifies the cost).Installation was reasonably easy but not without issues.Pairing is done by pressing and holding a button on the receiver. What is not clear is that there is an indicator light under the surface of the receiver (not immediately obvious) that does the required flashing to tell you when it is in pairing mode.The instructions are not that clear. For instance the instructions indicate that pairing a second switch to an already paired switch & receiver can be done by pairing the two switches; in practice I found I had to pair the second switch to the receiver, which fortunately was accessible once I got the ladder out again. (If I had buried the receiver in the ceiling void, that would have been a major pain.)The switches can be stuck with adhesive strips to any flat wall (i.e. not to textured wall coverings). It is more effective to screw them either to the wall with a couple of rawl-plugs or to the electrical box to which the conventional switches had previously been fixed - the fixing holes in the back of the switches are the right distance apart.There are three cautions if screwing the switches to existing electrical boxes.1) To get at the screw holes you have to remove the surround using a screw driver and tiny slots on the bottom edge, then pop the actual switch pads off their mountings. With two (or three way) switches you worry a bit that you might snap the switch pads2) Once you have removed the switch pads the actual back - which you secure to the wall is much thinner than the conventional switch being replaced; therefore you have to either shorten the screws or take care not to trap the wires in the wall.3) Because the switch back is quite thin it is quite possible to warp it if the wall is not absolutely flat or the cables in the wall box are not lying flat. If it is even slightly warped the switch action might not work.However once fitted it all all seems to work well; I have replaced my hall light with a couple of wireless switches and the landing and corridor lights with three switches.There is a possible safety issue for those who may later maintain the system without any awareness. Normally when working on a lighting unit some people just ensure that they are "switched off". With these systems of course you have a permanently live feed into the receiver unit which will in most cases be in the lighting unit or close to the ceiling rose. Before working on them you need to remove the distribution fuse (as you should when installing).My only concerns are how long the switch batteries last and how durable they will prove to be. (Some alternative systems don't require cell batteries as they are powered by the switching action.)Given that these systems are proprietary, I might be sensible to buy some spare units. It would be a pity to have to replace the entire system because I cannot replace a single part should it fail.
ترست بايلوت
منذ يوم واحد
منذ 3 أيام