


Buy anything from 5,000+ international stores. One checkout price. No surprise fees. Join 2M+ shoppers on Desertcart.
Desertcart purchases this item on your behalf and handles shipping, customs, and support to KUWAIT.
🛠️ Cut like a pro, own the precision.
The JessEm 07150 Mite-R-Excel II is a premium precision miter gauge crafted from CNC-machined anodized aluminum and Sheffield steel. Featuring 34 Swiss-turned stainless steel parts, laser-engraved angle markings, and patented snugger pucks, it offers unparalleled accuracy and stability for professional-grade woodworking. Its adjustable flip stop and fence locating knob enable quick, repeatable setups, making it the go-to choice for millennial pros demanding flawless cuts and long-lasting performance.


| ASIN | B07SV4X2J8 |
| Best Sellers Rank | #419,887 in Tools & Home Improvement ( See Top 100 in Tools & Home Improvement ) #668 in Table Saw Accessories |
| Brand | JessEm |
| Brand Name | JessEm |
| Customer Reviews | 4.6 out of 5 stars 218 Reviews |
| Included Components | Miter Gauge |
| Item Dimensions | 21.7 x 7.9 x 4.4 inches |
| Item Type Name | Miter Gauge |
| Item Weight | 9 Pounds |
| Item dimensions L x W x H | 21.7 x 7.9 x 4.4 inches |
| Manufacturer | JessEm |
| Material | Aluminum |
| Material Type | Aluminum |
| Model | 07150 |
| Part Number | 07150 |
| UPC | 083861800842 |
| Unit Count | 1.0 Count |
H**K
Jessem quality again
It’s smooth and accurate. The material and workmanship is very nice and just what you would expect to see with the price tag. Setup for mine was minimal. I’m a sucker for Jessem equipment. Sometimes I feel like it is overpriced but when stop and think about it, I realize that quality isn’t cheap. That said, I feel they could have made this one better. They could have beefed up the extendable part and made the whole fence a tad bit longer. The stop on the extension however, is annoying. It is fine if you aren’t using a waste board but, if you are, it only sticks out 1/4”. I kinda shake my head every time. The rule attached to the top is adjustable, durable, and plenty accurate for most things but, the stop is made so you can’t line up the actual stop face with the rule. You have to use the body of the stop to set the length after adjusting the rule accordingly. Works fine but, took awhile to get comfortable with it. Maybe I missed something and don’t understand how to use those parts. No doubt, overall I enjoy using it and any happiness I can find at work adds up to a better day. I don’t regret laying out the money for it at all. I feel it was worth it.
M**H
Quality, quality, quality!
Beautiful piece of equipment; the quality of the materials, design, and build is just outstanding. There are several other premium miter gauges out there, but this Jessem Mite-R-Excel II is at the top of the list. If I had to pick just one (of several) features I love, it would be the flip stop. It is rock-solid, micro-adjustable, easy to set, and out of the way when not needed.
L**E
JessEm 07150 Mite-R-Excel II Miter Gauge is Excellent
I have used this miter gauge for over a year now and I am very pleased with it. It is extremely rigid and has eliminated my need for a cross-cut sled. It has sufficient adjustments to enable perpendicularity to the saw blade and table surface to a degree of precision limited only by setup equipment. I highly recommend it. The only possible negative to this miter gauge is that, as delivered, it is designed to be used only on the left side of the blade. It is possible to modify it for right hand side operation and preserve functionality of all original left hand side features, but it requires a bit of work. 1. Refer to Photos 1 and 2 for Steps 1 through 8. 2. Remove the Extendable Arm from the Main Arm. 3. The insert supporting the Extendable Stop must be moved from the left hand side to the right hand side of the Extendable Arm. a. Remove the 5 X 0.8mm set screw. b. Remove the ¼-20 flat head screw and Extendable Stop assembly from the insert. c. Remove the Dowel Pin securing the insert using a punch driving from the small end of the Dowel Pin. Place a socket under the big end of the Dowel Pin to prevent bending the arm. The insert can now be removed. d. Drill a ¼” hole through the top part of the channel on the right hand side of the Extendable Arm in the same relative location as already exists on the left hand side for the big end of the Dowel Pin. This is best accomplished with a drill press. After the ¼” hole is drilled in the top part of the channel, replace the ¼” bit with an 11/64” bit and drill through the bottom end of the channel to accommodate the small end of the Dowel Pin. e. Drill and tap for the 5 X 0.8mm set screw on the right hand side of the Extendable Arm in the same relative location as already exists on the left hand side. 4. Flip the Extendable Arm over. Drill and Tap for the 5 X 0.8mm hex head machine screw (which limits Extendable Arm maximum extension) on the left hand side in the same relative location as already exists on the right hand side. 5. Install the Extendable Stop insert on the right hand side of the Extendable Arm. Slide the insert into the Extendable Arm until the Dowel Pin holes align. Tap the Dowel Pin inward until it is flush with the top of the Extendable Arm. 6. Screw the ¼-20 flat head screw and Extendable Stop assembly into the insert. Tighten the ¼-20 flat head screw until the Extendable Stop is relatively tight but can still be slid back-and-forth along the insert. 7. Install the 5 X 0.8mm set screw in the new drilled and tapped hole near the big end of the Dowell Pin and tighten to prevent the ¼-20 flat head screw from moving. Modifications to the Extendable Arm are now completed. 8. Drill a ¼” hole in the Main Arm on the right hand side in the same relative location as already exists on the left hand side. This hole is to accommodate the locking assembly for the Extendable Arm. 9. A 9/32” X 5-1/8”slot must be machined in the bottom of the channel of the Main Arm on the left hand side to accommodate the Miter Head Indexing Pin Adjustable Slide which is originally located on the right hand side IF it is desired to retain the functionality of the Miter Head Indexing Pin. It may be possible to machine this slot using a drill press fitted with a 9/32” drill bit and drilling multiple holes along the length. Cleanup would be necessary with a file or a (Dremel) rotary tool. The drill must not protrude through the bottom wall of the channel because the set screws securing the location of the slide are tightened against that bottom wall (Photo 1). I had available a Mini Mill and I used it to machine the slot using a ¼” 4 flute end mill (Photos 3 and 4). 10. When all modifications are complete the Mite-R-Excel II Miter Gauge can reassembled for right hand side operation (Photo 5) with full functionality of all original features.
S**R
Exceptional design and construction.
You don’t need to spend this money if you’re building decks or a shed for the back yard. If you’re doing precision work this is the best miter gauge I have seen out there. It is rigid, tight in the slot, reliably zeroed, capable of very fine adjustment and the build is absolutely bombproof versus any of the high end competitors. It arrived well packaged, in perfect condition, had all of the listed parts and a bit of spare hardware as well. This one also included a micrometer adjustment for the length stop assembly on the fence. It took me just under an hour to assemble it and get it dialed in on my saw (JET Exacta Deluxe). The included manual was well written and walked me through step by step. The mechanisms for adjustment were well thought out and very robust. Once I was finished, I made 6 cuts: (1) at 90, (1) at 45 and (1) at 36.5 then repeated this once again. Accuracy and repeatability were astounding at less than .5 degrees! I build custom furniture, the good stuff. This allows me to make razor tight joints on my main working saw versus transitioning to the miter saw without sacrificing any precision. It’s nice to see that there are still precision toolmakers servicing the woodworking world versus mass producing companies whose main selling point is the elaborate multicolor anodizing they slap on their products. Well done JessEm.
J**L
A quality Jessem product, with some quirks.
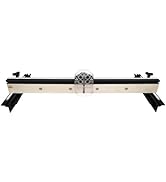
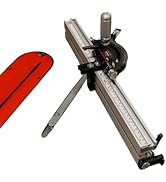
I went back and forth on many different miter gauges and settled on the Jessem having owned a few other Jessem products I'm happy with. After assembly, tune-up, and some testing, there are a few things worth noting. 1. The miter slot fit adjustment is honestly the best you'll find. Woodpeckers has leaf springs that automatically take up the slop in the miter slot, but it makes their gauges harder to push, and leaf springs will give if torque is applied to the gauge, reducing its accuracy. There are a few aftermarket miter bars that rely on similar compliance or flexure mechanisms that will not hold true unless you're cognizant of how you're running them through the slot. Jessem's adjustment uses a metal disk with an O-ring inside to act as a spring. It too auto-adjusts to the width of your slot, but then you can lock it down firmly into place. However, Jessem's instructions recommend using a piece of paper as a shim to give some clearance since the locked down metal disk is unforgiving against inconsistencies in the miter slot. This is far too much clearance and will allow the relatively short miter bar too much room to wiggle, especially before the rear disk has engaged. Instead, go to an automotive store and buy a set of feeler gauges, and use the 0.0015" feeler as a shim. Better yet, buy some 0.001" shim stock and then use that as a shim. Cellophane/cling wrap also works but is a bit finicky to use for shimming purposes. If your miter slot is particularly inconsistent, it would be worthwhile to file/stone the tight spots. 2. It was not accurately squared out of the box. Was off from my blade about half a degree. My miter track isn't perfectly parallel to my blade, but it's only off about 2 thousandths from front to back of the blade, so that would not account for it. 3. The squaring instructions are bad advice. Jessem says to take the fence off, and use a combo square or other square to reference off the miter bar and square up the fence attachment plate. This assumes your track is parallel to the blade. If you want to ensure things are square to the blade, the only correct way to do it is to square the miter fence against the blade itself. If you only use the miter gauge as its own reference for square, you may not get the results you want. 4. This leads me to the squaring mechanism itself - it's not great. You MUST take the fence off to access some grub screws that are used to push the fence's attachment plate into the desired orientation. So while you might be able to assume the fence and the attachment plate will always be parallel, it may not be the case. So to truly check for square, you have to take the fence off, tweak the plate, put the fence back on, and check. Moreover, the way the two grub screws work is odd. They push on either side, but there is no captured central position for them to pivot. If you accidentally push too far on one side, the only way to go back is to back off the grub screw and then give the plate a good whack with the palm of your hand, or push on the opposing side's grub screw, which will walk the plate forward from the body of the gauge. It's just a bit odd. It took me about 20 minutes of fiddling to get the miter truly square to the blade. The up side is that the screws used to hold the fence in place will hold it firmly once they are tightened down. Even when they're fully loosened, it's very hard to get the plate to move at all, hence why there are grub screws to provide the leverage necessary. 5. The micro adjust can only ride on the main bar. It cannot be added to the extension arm, which is an unfortunate limitation. 6. The sliding stop on the extension arm has some inherent play to it. Probably not an issue as long as you're always pressing stock against it, but the way it's designed isn't all that great. Again, not so good for precision work. 7. The locating pin mechanism to help you relocate the fence to its calibrated position is a neat idea but has about 1/32" slop to it that makes it kind of useless. Unlike the slop-free detents of the protractor, this locating pin allows enough wiggle room that you cannot reliably return to the correct position after moving the fence. Maybe if you calibrate it by deliberately pushing it to one side or the other of the locating pin and always do that every time you reset it, but it's unfortunate that locating pin wasn't tapered/conical to ensure it's always in the exact right spot. 8. The flip stop mechanism and the ruler cursor are attached to the same pivot point. When you flip the flip stop up, it slightly lifts the cursor, requiring you to push the cursor back down so you can get accurate readings. A bit annoying. 9. Something about the overall balance of this miter gauge makes it want to tip foward in the miter slot when you push it forward. Squaring up the fence vertically is all well and good, but the whole thing wants to kind of teeter and lean forward as you push it, so how square it is vertically depends a bit on technique. Overall it's a good gauge, and other expensive gauages have their quirks and limits too. It's just worth being aware of this one's.
K**S
Solid construction
This thing is solid, everything is exactly as described and will still impress once you take it out of the box. How solid is this? I joked to my wife that in a pinch, I just bought not just a tool, but something that in a pinch could be used for home defense against an intruder, lol.
P**N
Perfect
Amazing fit and finish. Perfect out of the box.
D**N
Very accurate and very durable
A lot of thought went into the design of this miter gauge. It is very well built with solid feature that make it very easy to use. It is adjustable to the point that there is no side to side movement. The handle for example is robust and knurled to make it easy to tighten down and comfortable to use. There are extra supports on the cross bar and head to keep the angles in place. The extension stops work extremely well and are accurate. The product is on the expensive side but I feel it is well worth it.
H**T
Gehrungslehre
Sehr gute Qualität .
R**N
Top quality item
Superb quality a must have item for all craftsman
R**R
Tolles präzises Werkzeug
L**Y
Super Teil
Dass Teil ist echt klasse, aber bei meiner Metabo passt es nicht in die Nut. Ich habe die 90°mit dem Woodpecker winkel nach gemessen und der pasteperfeckt. Also wenn ihr eine breitere Nut habt absolute Kaufempfehlung.
A**Z
Super Qualität
Teuer aber jeden Cent wert.
Trustpilot
3 weeks ago
1 day ago