Description
🚗 Brighten your drive, don’t replace it!
- FAST TRACK CLARITY - Transforms dull headlights in just 15 minutes—get road-ready instantly.
- SAVE BIG SHINE BRIGHT - Avoid costly lens replacements—restore like a pro for a fraction of the price.
- PRECISION ABRASIVE TECH - 3000 grit Trizact discs gently erase yellowing without scratching plastic lenses.
- TOOL FREE OR DRILL POWERED - Choose effortless hand use or speed it up with your household drill.
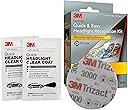
- PROTECTIVE CLEAR COAT FINISH - Includes quick-clear coat wipes that lock in shine and repel future grime.
The 3M Quick and Easy Headlight Restoration Kit uses advanced 3000 grit Trizact abrasive discs and clear coat wipes to remove yellowing and buildup from plastic vehicle lenses in just 15 minutes. Designed for easy use without tools or with a household drill, it restores clarity and protects headlights, saving you hundreds compared to replacements.