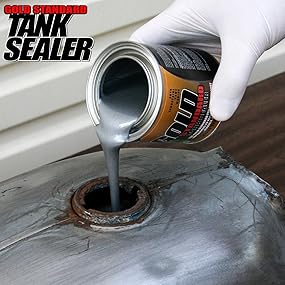
My bike is almost 40 years old and I'm at least the 3rd owner so I'm no stranger to finding and fixing "old bike problems." Last season the carbs started flooding intermittently. The bike would start to miss on one cylinder, and I'd look down to see fuel dripping out of one of the bowl vent hoses (which run to the underside of the bike). This usually happened when I started the bike to warm it up so I was able to shut it down with only a few drops of fuel on my garage floor, but it once happened while I was riding. I had to limp it home with fuel dripping past the exhaust under me. I got it home fine but I was sweating the entire time. Over the winter I pulled the fuel system apart. I found red rust particles everywhere, and the fuel filter hadn't caught them all. The tank had been lined by a previous owner and I couldn't see any rust-- until I turned it upside down. The coating on the top of the tank was delaminating, leaving behind a crusty, scaly mess that was running through the entire fuel system and causing the needle valves to bind up. Getting the old sealer out was a chore. I alternately filled the tank with boiling water and acetone until I could scrape or pull most of it out, then I filled the tank with wood screws and more acetone and shook it to loosen up what was left. I probably spent 2 weeks or more soaking and cleaning the tank to remove the old sealer, and I missed a couple of small spots. It would have to do. The KBS kit was simple to use. There's a degreaser, a rust converter that seems to be mostly phosphoric acid, and the actual coating, which is like a very thick silver paint. I cleaned and derusted the tank, then let it dry. As soon as it was dry, it began to flash rust again. I ended up derusting it 3 times, but no matter what, I would get a small amount of flash rust as the tank dried. Finally I decided that there was no good way to prevent it so when the tank was once again dry, I poured in the coating. Yes, I did this over a small amount of flash rust. Yes, this is risky. No, I don't recommend it. No, I haven't had any delamination or other problems. I spent the better part of 2 days rotating the tank to make sure all the surfaces were coated. I would change the orientation every 15 minutes, then every hour, then every few hours. I kept doing this until the coating fully solidified, which it did within 48 hours or so. Every time I repositioned the tank, I made sure to blow compressed air through the tank vent to make sure the coating didn't plug it. THIS IS IMPORTANT. Do not allow the tank vent to become clogged or you may have all sorts of fuel delivery problems later on, including fuel starvation and flooding. Assuming your tank hasn't been coated before, count on spending a full weekend doing this. I'd count on spending Saturday cleaning, derusting, and drying the tank, then wait until Sunday morning to pour in the sealant. That way you have a full day to rotate the tank around before the sealant starts to solidify. If your tank has been coated, removing it will be a chore. If I had to do it again, I would either sandblast the inside of the tank, or I would use an industrial paint stripper. I didn't do either because I wanted to save the paint on the outside of the tank, but I'm on the fence whether it was worth it. Because it was winter, the tank sat around curing for a few weeks before I was able to reassemble the bike and take it for a test ride. By that time, the coating had cured to a rock-hard, very durable finish. The coating covered bare steel, some light flash rust, and a couple of spots where the old coating refused to come off. I have now run a few tanks of fuel through the bike and so far the coating is holding strong. My bike is fully faired so it traps a lot of heat, and when the fuel level begins to drop the engine puts a lot of heat into the tank. So far, no delamination and no problems. We'll see what happens long-term but so far I'm pretty happy with this coating. The metallic silver gives the inside of the tank a clean, uniform look, so it's easy to spot any problems if you periodically shine a flashlight in there (which I do). Judging from the way a few drops of spilled coating adhered to the cardboard the tank was on, I won't have any problems with delamination-- it sticks TIGHT. This isn't the first gas tank that I've coated, but it's the first time I've used the kit from KBS. Last time I used POR15, which worked well on an automotive tank that I did for a friend. This stuff appears to be very similar and just as good for a less expensive price. Long-term durability is still unknown but looks promising. I wouldn't hesitate to recommend this kit to someone looking to refurbish their motorcycle tank.