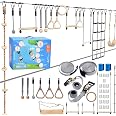
🚀 Zip into Adventure with Every Glide!
The Hyponix Zipline Kit offers a thrilling backyard experience for both kids and adults, featuring rustproof stainless steel components, a robust weight capacity of up to 350 lbs, and a quick setup process. With a focus on safety, it includes a fail-safe turnbuckle system and a smooth 7.5' spring brake. Plus, it comes with a 10-year promise, ensuring long-lasting fun for the whole family.
A**R
Enjoyable but GET THE EXTRA SPRING!!
Definitely buy the extra stopping spring! (Trsmima Heavy Duty Stainless... https://www.amazon.com/dp/B086GDDRL5?ref=ppx_pop_mob_ap_share based on another review)Fairly quick installment, about an hour for two adults. Very glad we listened to another review that said to buy an extra spring - kids would be running into the tree otherwise. Enjoying it so far!
R**L
Well put-together kit
The kit is well put together and the quality of the equipment used seems to be very good. I am happy with the purchase of this kit. The only thing is that they should list the assembly requirements (size and height of tree(s) needed and so forth) so that consumers can make an informed decision. The trees that I had initially intended to use do not meet the requirements they suggested.
K**R
East set up
Easy to put up
J**8
It's a lot of work to install, directions skip over a key part, good luck
Everyone who says this is easy to install is oversimplifying it. Or they already own a come along with a cable gripper which is an extra $50 at minimum for some people to use one time. They also must have installed a zip line before.What we did after many failures…..1. Attached the drop off cable on the end tree to the turnbuckle. We opened the turnbuckle up the whole way so we could tighten it up at the end. We also made sure we started as close as we could height wise as we needed it to be and secured it with a few temporary nails.2. Fed the looped end of the main cable thru the turnbuckle and secured it with the bolt/cotter pin provided3. Walked the cable to the tree we planned to attach it to and unwound the entire spool of wire4. We then put on the stopping/slow down killer spring first and fed it down the main wire a bit5. Next we put on the hand glider thingy that the kids hang onto for dear life6. Our tree was huge, way bigger than the tubing they provided, so I took an old garden hose and cut it to length of something that would fit around my tree and fed the cable through it7. At this point, the spring is on, glider thingy, and my tree protector tubing8. I pulled the cable around the tree and attached it to the other side of the cable with the clamps provided to hold it in placeAt this point, the drop off / end point is up high. Mine ended up being about 10 ft off the ground.So I start to push my starting point up my tree by grabbing my hose (that had the cable fed thru it) and slid it up the tree. I got it up to about 10 or so feet then I started to struggle keeping it in place. So I grabbed some nails and eye-balled how high I wanted to go with it and nailed 6 nails in the tree all the way around. I was aiming for a foot or two above where I was stopping. I then moved the hose/cable up until it got to the nails so it could rest on them.Now, how the hell do I tighten this thing? A few Youtube video searches, everyone just has a come along and cable gripper laying around and using that. I don’t have that….and if I bought one, I’d use it once and never again.I had a heavy-duty chain, and when I say heavy duty, I mean a chain that I can tow a car with. You could use a smaller type of chain. If you don’t have a chain, use a ratchet strap or tow strap. If you don’t have either, your going to have to buy at least a ratchet strap because the next step requires one. I wrapped my chain around the tree directly above my main cable and secured it in place so it wouldn’t move, and I could pull and put pressure on it and it wouldn’t fly offI took the extra spool of wire that they provide as a safety measure in case the turnbuckle breaks, created a small loop at the one end and clamped it down with the clamps provided. This gave me a loop to work with, be sure to tighten it!I took this to where my starting point is and about 10 ft from where I have my first clamp that is holding my loop around the tree, I attached the small cable that I created the loop with to my main cable. I took a couple of really bad pictures to try and show you.I then took my ratchet and hooked it to the loop that I had made on that small cable wire, and attached the other end of the ratchet to my chain that was wrapped around the tree and secure. I pulled the ratchet as hard as I could and then started hand cranking it to pull it tight, as tight as it could go.I then loosened the 1 clamp that was originally holding the main cable wire in place, since all of the tension is now on the ratchet and my little looped cable. With two people, we pulled the main cable as tight as we could and re-attached a clamp to the main cable. This isn’t hold as much tension as the ratchet cable, but it’s slowly progressing and holding the cable tight. I then let all the pressure off the ratchet cable, and your new clamp connection should then hold. You just keep repeating this until you get to a point where the cable is tight to your liking. We tested this by having our child go down it, cause why not.Now that you have the cable tight, pretty tight, and your child is most likely fine and doesn’t have seriously hurt feelings for wrecking their butts on the ground from testing – it’s time to tighten the turnbuckle up. If your child hurt their butts, tighten it a bit more with your ratchet strap.Turn your turnbuckle to tighten, use the nuts as a guide to know if you’re going the right direction. Don’t do what I did which was be excited cause we’re about to have a bunch of fun and think righty tighty left loosey works here cause you’ll be righty tightying your way back up to the main tree to start all over.I would tighten the turnbuckle slowly, depending on how tight you have the cable you may not have to tighten this to much.Add the remaining 2 clamps at the starting pointAdjust your seat height if necessaryHave fun!Time will tell if this thing lasts, if it will rust, or break....One of the horrible things about this unit is that the clamps that they give you start the break down using this method of tightening and untightening. It's because they are cheap, that tells me they probably won't last long and I'll have to buy new ones. I actually had to use bolt cutters to cut a pair because the nut/thread was stripped on the one when we were FINALLY done, I couldn't get the nut off. That's what she said
R**S
Awesome Zipline! Needs an additional spring.
The media could not be loaded. Awesome product!! I highly recommend this zipline if you buy an additional stopping spring (suggested for kids, necessary for adults). It’s so amazing to be able to set up a cost effective zipline fairly easy in your own backyard. I bought the 100ft zipline and it was perfect length for me! Video includes an additional stopping spring I purchased separately: Trsmima Heavy Duty Stainless Steel Zipline Spring Brake Extra Long 6.5 FT
K**R
Almost Two Years in and still a hit with the kids!!
I installed this zipline kit back in early July 2022, and I as well as my kids and their friends have absolutely enjoyed the snot out of this! First off, installation was a breeze. If you watch the installation video and pay special attention to the amount of sag in the line (very important if you don't want the kiddos flying off at the end), all will go well as it did for me. Once installed I swear it was like the pied piper for the neighborhood kids, as I often looked out the window to see my kids, their friends, and their friend's siblings on it taking turns and coming up with games to play on it! Durability has been excellent considering every single piece has remained outside during that time, through hot summers, rainy days and cold snowy Ohio winters. The only issue I have had only a few days ago is the stop spring finally broke, but fortunately I have a new one on the way from Hyponix for $20. For reference it is mainly 10-11 year olds and the occasional "big" kid (looking at you daddy) that use it a few times a week. Looking forward to the lasting til my youngest outgrows it!
G**Y
First try, perfectly secured and lots of fun!
The media could not be loaded. Kids and adults love it!
G**A
Solid. First timers beware!
I got the 200 feet line.Main components seem of good quality.If first time installing one of these it will take you a few hours to figure it out. Especially if you’re not clear on the heights of the start and end points. Spend some time on that.TIPS:1) People say to use a cable puller to make the live line taught. Maybe.A second ratchet strap (that I had laying around) worked better for me to make the line taught enough to connect the main ratchet and start cranking for tension on the line.Simply wrap the additional strap around the end tree and hook it to the shackle where the live zip line eye is hooked already.Crank this ratchet enough to attach the main ratchet now to the shackle. Works beautifully!2) The main ratchet included is heavy duty and seems appropriate for the tension.HOWEVER, once the tension was there it was impossible to release it to make adjustments. It simply would not unroll in the normal open position!A small application of white lithium grease on the friction points between the windlass and the ratchet frame fixed it.I wish I had known this before!All and all the kids (and some grown ups) are having a blast.
Trustpilot
1 week ago
2 months ago