🔑 Lock in Style and Security!
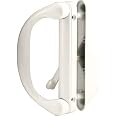
The Gordon Glass® Sliding Glass Patio Door Lock is a high-quality mortise lock designed for enhanced security and compatibility with various sliding door manufacturers. Featuring a 2-point locking mechanism, a sleek white finish, and innovative Zerust rust prevention technology, this lock not only protects your home but also adds a modern touch to your patio. Installation is straightforward with included screws, making it a perfect choice for homeowners seeking both style and safety.
Brand | Gordon Glass Co. |
Special Feature | Use by Roto and a variety of other sliding patio door manufacturers |
Lock Type | Mortise Lock |
Item dimensions L x W x H | 8 x 1 x 1.5 inches |
Material | Metal |
Recommended Uses For Product | Glass patio door lock |
Style | Modern |
Color | White |
Number of Pieces | 2 |
Finish Type | Paint (White) |
Included Components | Mortise lock, 2 installation screws, Zerust Rust Prevention Plastabs |
Controller Type | Mechanical knob |
Shape | Square |
Control Method | App |
UPC | 785533099645 |
Model Name | Multi Point Mortise Latch |
Manufacturer | Gordon Glass |
Part Number | 1 |
Item Weight | 10.5 ounces |
Product Dimensions | 8 x 1 x 1.5 inches |
Item model number | 16-460 |
Is Discontinued By Manufacturer | No |
Finish | Paint (White) |
Item Package Quantity | 1 |
Head Style | Flat |
Measurement System | inch |
Special Features | Use by Roto and a variety of other sliding patio door manufacturers |
Batteries Included? | No |
Batteries Required? | No |
P**C
Works as Well as the Original
There are only 2-3 different "sizes" of these locks commonly used; so just compare the measurements on your old lock to the diagrams shown for replacements. There are different model numbers for different manufacturers, but no compatibility information online.Tip: When putting the inside lever or knob (the part that locks the door) back on, notice that the square rod on the lever can go into the square hole in the lock four ways. Experiment to identify which way yours should go before screwing the lever in place. If you guess wrong, your lever may smack into the door handle when you lock it. No harm though, just pull it out and change position in the square hole.Note: If a key operates the lock from the outside, it will still work if you check how the key works in the new lock before screwing it together. Same idea as the square hole, only this one can only go into its hole two ways.I hope this helps someone. You can DIY and save a wad of money.
T**S
perfect fit -- easy installation
The locking mechanism on my sliding glass door had been acting up for months. After pulling it out and looking at it, I matched it to this one and quickly ordered it. Oh my, I am so glad I did, and honestly I should have replaced it months ago. This lock took maybe 10 minutes total to install with a power screwdriver, and it worked perfectly.
D**.
Exact replacement, just what I needed
Exact replacement for the lock I had and that stopped functioning. I think the old lock was some other brand, but the necessary interfaces and the strike plate are the exact same shape and locations, so outside it doesn't look any different and works better than new.Good price, too
K**R
Perfect replacement for sliding door lock.
This was a perfect fit for our broken sliding glass door lock. It was easy to install.
M**A
Works great of the two similar locks
There’s another one that is similar to this, but is not the right one. The dead latch doesnt get engaged and we have to work around it. THIS ONE though is the right one and it works perfectly. The common issue is the dead latch tab breaking off, and you can longer lock it without using something to engage it. Not sure if any of that made sense or not. Anyway, this one is the one. And it didn’t cost an arm and leg to replace. Everything actually holds up fine, but over time the tab does commonly break, which is the only reason I gave it 4 stars in terms of sturdiness, but as a whole it holds up well.
T**S
Didn't fit returned for credit.
M**F
perfect except for the bent faceplate
We have a 20+ y.o. patio glass door slider and the latch finally broke. The locking mechanism (a "mortise," apparently) had an " ii " logo and a patent number, that's it. It turns out that ii stands for "interlock" (now owned by assa abloy, a door hardware company). Most of these (prime line, STB, swisco) use the same interlock piece (you'll notice the branding is never clear in the photos). Whatever, find the one you like the best and buy it.Unfortunately this one was packed loose in a poly bag (not sealed to a retail card), amazon shipped it in a bubble pack and the face plate was bent in shipment. I could probably have bent it back and used it, but that's not the point of buying something new, is it?Since you've read this far, you obviously need one of these, and you're probably going to buy this one or a similar one, so here are my "pro tips" for installation: (before installing the whole thing with the handle and tightening everything down, only to find that it doesn't lock quite right).* Pay attention when you take everything apart - lots of photos are good, you can always erase them later.* The inside handle and locking/latch lever are usually separate from a bracket - the bracket is screwed thru the door to the outside handle. They are attached to the bracket with set screws after everything is secure.* Before putting the mortise into the door - grab the locking/latch lever and insert it thru the hole in the mortise, push in the release "button" on the edge, then rotate the handle into the "locked" position. Notice the direction the handle goes from open to locked - it should be "up" when open, and "down" when locked. Flip the mortise, if needed, so that it goes into the door the right way. Don't worry about the inside handle and locking/latch lever yet, but keep them handy.* When you put the mortise in place, there are four main securing screws - two that go thru the door from the handle bracket thru the mortise/door to the outside handle, and two screws that hold the face plate to the mortise (the two towards the center). Lightly snug them all down, and close the door. Grab the locking/latch lever, stick it thru the hole in the door / mortise and rotate it into the locked (down) position. Now tighten the two screws that go thru the door.* Flip the lever to the unlocked position, slide the door open and tighten the two screws on the face plate. Test it a few times to check that it locks / unlocks OK, and reverse/repeat the same steps if you don't like the feel.* You can now put the lever & handle in place, tighten the set screws, and install the outer top & bottom screws on the face plate (My door cut out doesn't allow those two to be attached - I got over it)* cheers
A**A
Precisely what I needed!
I am so grateful that you offer this model. It is precisely what I needed. YouTube videos are very helpful with the installation. Some videos show this exact model.
Trustpilot
1 month ago
2 weeks ago