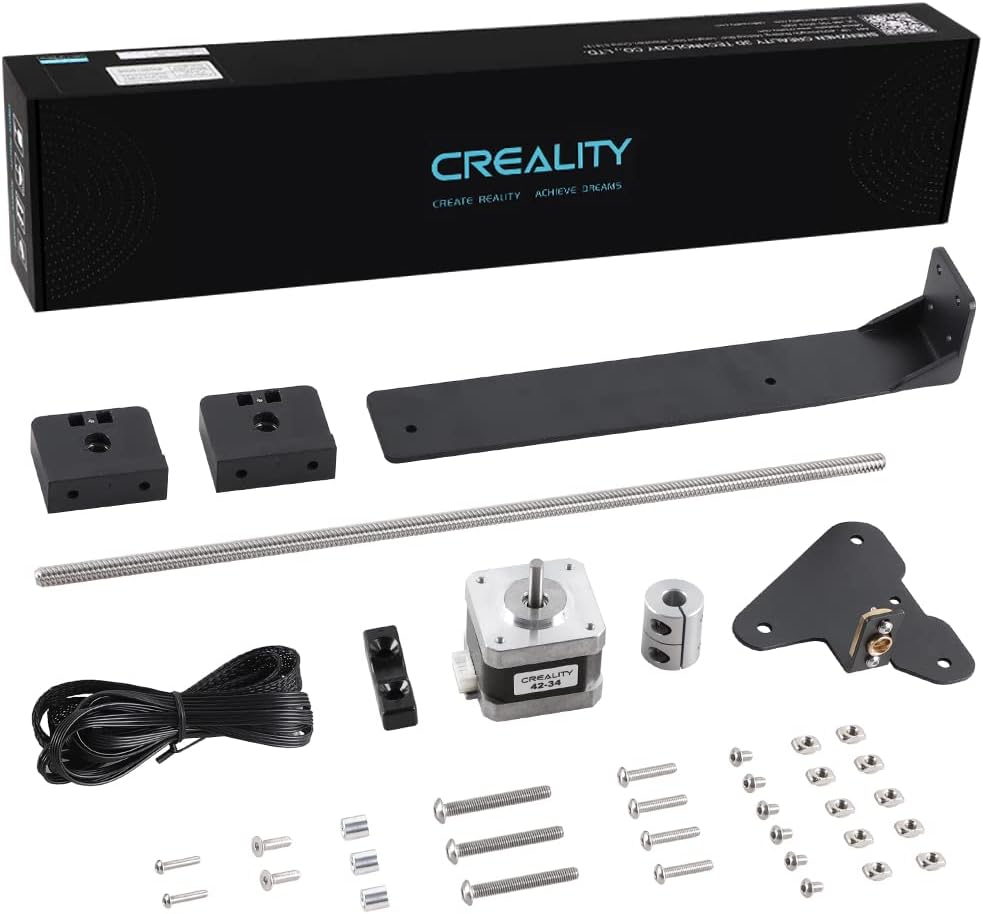

Buy anything from 5,000+ international stores. One checkout price. No surprise fees. Join 2M+ shoppers on Desertcart.
Desertcart purchases this item on your behalf and handles shipping, customs, and support to KUWAIT.
⚙️ Elevate your Ender 3 game — print like a pro, no sag, no compromise!
The Creality Official Ender 3 Dual Z-Axis Upgrade Kit includes a 42-34 stepper motor and aluminium hardware designed to stabilize the gantry and eliminate sagging on Ender 3 series printers. Compatible with all Ender 3 models including Pro, V2, and Neo, this plug-and-play kit enhances print accuracy and layer consistency. Backed by Creality’s official quality assurance and 24/7 expert support, it’s a must-have upgrade for serious 3D printing enthusiasts seeking flawless results.


| ASIN | B09RX4S2MF |
| Batteries Required? | No |
| Batteries included? | No |
| Best Sellers Rank | 38,950 in Business, Industry & Science ( See Top 100 in Business, Industry & Science ) 942 in 3D Printer Accessories |
| Colour | New Packaging |
| Customer Reviews | 4.6 4.6 out of 5 stars (692) |
| Date First Available | 7 Feb. 2022 |
| Item Weight | 830 g |
| Item model number | Ender 3 Neo |
| Manufacturer | Creality 3D |
| Material | Aluminium |
| Part number | CRGJX-P-SZZ |
| Product Dimensions | 36.5 x 4.2 x 0.1 cm; 830 g |
S**A
A really cool upgrade
I purchased this kit to add to my Ender 3 V2 and I have to say it's been a worthy investment. I often found with the Ender 3 and Ender 3 V2 that the far right hand side of the gantry would sometimes droop/sag slightly compared to the left side, no matter how many times you tighten it or adjust it the right side would always seem to end up progressively lower over time. This kit has corrected that issue and now every print has perfect layers with no imperfections. The dual Z screws ensure that the extruder is level at all times and prevents sag on the right side of the extruder arm. The kit is very easy to install and comes complete with everything you need. After mounting the new stepper motor on the right side of the printer it was just a case of attaching the z screw and collar, attaching the z screw alignment plates at the top of the z screws on both sides of the printer and then running the new cable from the stepper motors to the control board in the base. The cable provided is a split lead allowing you to plug both steppers (existing on the left and new on the right) in to the one socket that the left hand stepper motor was plugged in to. After running many prints with this kit installed I can honestly say that print quality has improved and layer consistency is now very accurate. I would highly recommend this upgrade to anyone who suffers with banding or a slant to their prints. A very nice kit that is very easy to install.
K**S
Makes prints so much better
I'd say this was easy and quick to install but firstly it was not overall cause I wanted this to be perfect, In total including leveling the bed and testing and tweaking I personally spent about 2 hours getting this absolutely perfect, I did not rush and did watch a video to assist to install. It has been so worth it putting this on my ender 3 v2 it has made print quality so much better overall and since pairing with an auto level and modifying the bed plate knobs to adjust the height Ive not needed to level my bed since. I can now also use my custom slicer settings which means printing miles faster and still getting quality results Id highly recommend this for an upgrade well worth the money.
M**M
Ender 3 Pro upgrade !
If you find your Ender 3 Pro X-axis droops, then fitting a second Z-axis lead screw will help dramatically. I will assume your are confident enough to work on your Ender and access the PLC control PCB. The actual kit is includes all necessary parts and is straight forward to instal. You will need some type of gauge block so that the x-axis is at the same height on the left and right hand side. A 3-2-1 gauge is ideal. You will almost certainly need release the mounting acreage on the existing left hand z-axis screw in order to set the height on the new z-axis. Using the gauge blocks on each side and with the x-axis in contact m. Just retighten the mounting screws. Once done the x-axis will move up and down and be level. Once installed and setup. The results are very impressive. Noticeable on bigger 3D models in the fact that there is no droop and things just look correct. If I would anything it would be to gear the left and right z-axis screws with a tooth drive belt running between them. As is you me in the hands of the stepper motors.
M**K
A leap forward in print quality
A great upgrade for my Ender 3 V2 and an absolute must-have if you want to use a direct drive extruder without suffering from the dreaded x-axis droop. I’ve only knocked off a star because the instructions are pretty useless. Fortunately it’s not hard to get everything screwed into place but it’s vital to get both sides properly synced and levelled, something which really should be in the installation instructions.
S**T
A good upgrade to consider if you are looking at direct drive.
I have bought this to upgrade an Ender 3 Max. I know the lead screw supplied with this is too short but until the tight wads at Creality bring out a kit for it you have to buy one and buy longer lead screws to fit. Come on Creality, you sell your printers as upgradable then don't sell the proper parts - get your act together! This upgrade gives you a 2nd driver for you Z axis which means that both sides of the x axis bar stay level when going up and down. This is not such a problem on stock smaller bed printers but if you install a direct drive or have a larger print bed it can become a problem that really affects print quality. Once the head gets further away from the left hand side where the Z axis mechanism is the X axis bar can droop and play about with the printed layers. Its a little bit of a faff to install and I would strongly recommend you print a couple of Z axis calibration struts so to can be sure that the x axis is level with the frame. Once all fitted and set up the difference is pretty obvious in print quality. I already had one on an Ender 3 pro that has a direct drive and it made a massive difference. Once I had the Ender 3 Max I immediate saw the X axis dip on the right as it moved upwards and knew I had to fit dual Zs to get any sort of decent print quality. Once I fitted it the prints were much better so it was worth the outlay.
C**R
More solid
Some work needed to fit, and some attention needed to get pieces in the correct orientation, but this adds solid stability to an already brilliant printer. Make sure you have a compatible main board. Take your time fitting, and re-level.
D**N
Really useful upgrade
I wanted to make my Z axis a bit more stable on my Ender 3v2 and this is just the ticket. There are cheaper ones out there but the OEM kit is much better. I found a really helpful video on YouTube showing how to install and square everything up and it has been great ever since. The only downside, and it is the same with all Creality upgrades for this machine, is that you have to access the control board to plug in the new cable.
M**E
Excellent product
The manufacturers upgrade kit works a dream, everything you need is included and the step by step instructions are easy to follow. If you are looking to upgrade your ender 3 buy this, don't be fooled by cheeper versions on AliExpress. The quality of the parts is far superior
J**B
Makkelijk te installeren. Zorg wel dat je als je alles weer in elkaar zet de x-as waterpas vast zet, dit voorkomt problemen met het bed.
P**R
Ich hab die zweite z achse mit z spindel in meinen Ender 3 v2 Eingebaut , der Aufbau war nicht unbedingt sehr schwer und die teile fühlen sich sehr hochwertig an . Jedoch kommt die z spindel nicht geschmiert an .
J**R
Note la mejora de impresión con este doble eje , va genial y los materiales son bastante buenos , el montaje se me dio bien pero hay videos en internet para ver algunas posibles dudas
N**D
Bra grejer
D**N
tout parfait, livraison rapide et soignée, conforme à la description 10/10 pour le vendeur
Trustpilot
2 weeks ago
1 week ago