We remain fully operational. Our teams are working around the clock to ensure your deliveries continue safely.

DOWNLOAD THE APP


Copyright © 2025 Desertcart Holdings Limited
DOWNLOAD THE APP


Buy anything from 5,000+ international stores. One checkout price. No surprise fees. Join 2M+ shoppers on Desertcart.
Desertcart purchases this item on your behalf and handles shipping, customs, and support to KUWAIT.
🚀 Upgrade your 3D printing game with precision, safety, and smart expandability!
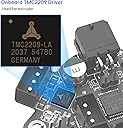
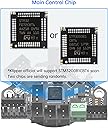
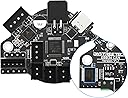
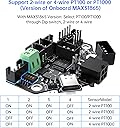
The BIGTREETECH EBB36 CAN Bus Adapter Board is a cutting-edge extruder control solution designed for BLV Ender 3 and similar 3D printers. Featuring a 36-step motor driver, onboard MAX31865 temperature sensor support for PT100/PT1000, and flexible CAN/USB communication, it simplifies wiring while enhancing performance. Its robust safety features protect your printer’s electronics, and reserved expansion ports enable advanced filament monitoring and lighting customization, making it a must-have for professional-grade 3D printing upgrades.


| Customer Reviews | 4.5 out of 5 stars 67 Reviews |
J**G
Well made CAN board toolhead
Performs like you would expect from the board. I had no issues with the EBB36.
C**.
Complete CAN Bus solution for my 3D printer build
This CAN board was easy to setup following online CAN install guides online. It has all the connections needed for my printer's toolhead. I am also happy that with the board comes all the hardware and crimp connectors needed.
R**Y
Great product
Great CAN board and you don't have to wait for it. Just follow the online instructions and you be all set.
C**W
Excellent way to build a fully integrated print head - but difficult/confusing setup process
For my Zero G Mercury One CoreXY build it was my ambition to run CANBUS to my print head, primarily to avoid having to install a thick umbilical to provide the discrete sensor and control data. This solution by BigTreeTech pairs nicely with my Manta M8P mainboard which already has CANBUS IO. In addition, I selected the EBB36 version as I was running a pancake Nema 14 stepper motor. The difficulties I had included flashing the right Klipper firmware to both boards, and then the power-up sequence to get them to recognize one another on the CANBUS and "shake hands". KB3D Wiki is a great resource in getting this working. Ultimately, it took several attempts before I got a stable and consistent connection between the two boards, but it now works. Many argue that the accelerometer data generated by input shaping needs high bandwidth to calculate a good result, but I have noticed that running your CANBUS on 500k bus speed is sufficient for all your needs. I would also caution you to provide proper strain relief for the umbilical so that you don't pull the connector from the solder pads on the board. Still highly recommended! But setup is not for the faint of heart!
C**.
Great board for CAN support
I would give this board 5 stars if I didn't have to crimp JST-PH 2.0 connectors to use the MAX sensor or the 5 pin homing sensor. I understand there are very tight restraints on a board this small, although it would be nice if JST-XH could be used for those connectors instead. Getting CAN set up on this board was a breeze.
E**8
There are better options, go with anything else
I have been through so many of these boards, either from them failing in incredibly short order or showing up DOA. Its incredibly frustrating to try and print something, only to get random failures for no reason. Losses in connection with the MCU, random overload issues, loss in heating, fan MOSFETs burning out, you name it and it'll happen. I think my record for keeping one of these alive is something like 4 months, that is absolutely unacceptable
T**A
Inexpensive way to get CAN on your Stealthburner, but expect Issues...
First off, I'm running this on an Anycubic Vyper conversion with a Stealthburner and a CW2 extruder. I've rewired my entire printer to accommodate CAN, and I'm running this in addition to an SKR Mini V3 3.0 a RasPi 4 8 GB, and a Waveshare RP485 Can Hat. I've purchased two of these boards, which we'll talk about shortly. The EBB36 board comes with everything you need to get set up, including two Molex Microfit 3.0 connectors and pins, a few JST connectors and pins, and some jumpers for initialization and termination. Like most of these DIY boards, you'll need to crimp your own connectors to get things running. But, if you're adding CAN to your printer, you're probably already familiar with how to do this. Flashing Klipper was easy, you just pop on a jumper and plug into your RasPi. I used Canboot, and there is plenty of info on how to do the same on the internet/Reddit. Software and support is outstanding via the BIGTREETECH github pages. You do, however, have to be careful with the polarity of your components. I accidentally reversed the polarity on my part cooling fan, and ended up frying the mosfets on the first one of these I bought. In a manner of seconds, I saw the magic smoke and realized my mistake. But things were already cooked. So, make sure you have the pinout for the board in front of you, and you double-check all your connections before powering the board on. Also, if you use ferrules on your heater wires, it may be helpful to swap the heater connection block around, so the terminal entry points face the USB connector. Those connectors have never been reliable for me, so I removed the block altogether and soldered my heater wires directly to the board. On the plus side, I will say I really like the fact that the EBB36 comes with a 120 ohm resistor built in, as it eliminates the need for additional resistors on the CanBus controller. I also like the fact that this board is built to fit around a Nema 14 stepper motor. It makes the whole Stealthburner setup look very clean. That said, there is one more pain point that deserves your consideration if you're going to buy the EBB36: that is the abundance of communication errors. Even after checking all my wiring and software settings and replacing my CAN hat, I will still occasionally get BLTouch communication errors when homing. Trying to chase this issue has been absolutely maddening. Though it's pretty sporadic. I've tried changing settings in the mcu.py file, adjusting jumpers, and resetting baud and TX rates, but nothing seems to help. Even now, I still haven't figured out why these errors are occurring. Many of the forums seem to think this is a common issue with this tool head setup, though I don't have enough experience to validate that claim. If I do get to the bottom of it, I'll amend this review to help those who might have the same problem. Overall, the EBB36 is a cheap way to get CAN working on your 3D printer. Just understand that getting it set up correctly might require a significant amount of time and troubleshooting. But if you're anything like me, you got into the 3D printing hobby because you enjoy that stuff anyway.
J**E
Warning: Surface mount components very close to standoff!
I've used BTT CAN boards before, and they're really nice, but the EBB36 has three tiny surface mount components very close to the standoff holes. I was using standoffs that were already installed on the printer and while attaching the board I heard a tiny snap, and upon inspection noticed that a surface mount resistor had been snapped off the board by the standoff. I'm sure that if you used the included standoffs this would not be a problem, but be aware of these components, in my case, I ended up having to buy a new board.
Trustpilot
5 days ago
2 weeks ago