Desert Online General Trading LLC
Dubai, United Arab Emirates
Desert Online General Trading LLC
Dubai, United Arab Emirates


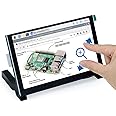
🚀 Elevate your Raspberry Pi projects with touch—because your ideas deserve the best screen!
The FREENOVE 5 Inch Touchscreen Monitor is a compact, driver-free IPS display designed exclusively for Raspberry Pi models 5 through 1A+. Featuring an 800x480 resolution and 5-point capacitive touch, it offers wide viewing angles and effortless plug-and-play setup via the MIPI DSI port, making it the perfect upgrade for professional makers and developers seeking responsive, vibrant interaction.
| Standing screen display size | 5 Inches |
| Screen Resolution | 800 x 480 |
| Max Screen Resolution | 800 x 480 Pixels |
| Brand | FREENOVE |
| Item model number | FNK0078A |
| Operating System | Embedded |
| Item Weight | 6.7 ounces |
| Product Dimensions | 8.35 x 5.51 x 1.5 inches |
| Item Dimensions LxWxH | 8.35 x 5.51 x 1.5 inches |
| Color | 5 inch IPS touchscreen |
| Processor Brand | Freenove |
| Computer Memory Type | SRAM |
| Voltage | 3 Volts |
| Manufacturer | Freenove |
| ASIN | B0B455LDKH |
| Date First Available | June 15, 2022 |
Trustpilot
2 months ago
2 weeks ago