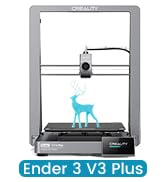
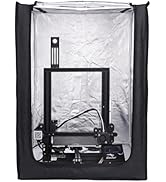


Elaborate craft, good sealing performance, good dust-proof smooth sliding and maximum mute in high-speed operation. Review: Ho acquistato il **Kit di aggiornamento Dual Z ufficiale Creality per Ender 3** con mandrino perché volevo migliorare la stabilità della mia stampante, e devo dire che l’investimento è valso ogni euro. L’installazione non è complicata: con un po’ di pazienza e seguendo i tutorial (anche quelli video che si trovano facilmente) si monta senza grosse difficoltà. La differenza rispetto al singolo asse Z è subito evidente: il movimento è molto più fluido, il piatto rimane stabile anche in stampe più alte e non ci sono più quelle piccole vibrazioni o inclinazioni che rovinavano i layer. Anche la qualità finale dei pezzi è migliorata, soprattutto nei dettagli più fini. Il kit è ben realizzato, con componenti solidi e mandrino preciso, e dà una sensazione di robustezza generale alla macchina. Da quando l’ho installato non ho avuto problemi di disallineamento, e il livellamento resta costante per diverse stampe consecutive. ### Pro - Migliora notevolmente la stabilità dell’asse Z - Qualità di stampa più uniforme, soprattutto nei modelli alti - Componenti solidi e ben rifiniti - Installazione accessibile con un minimo di manualità - Evita ri-livellamenti continui del piatto ### Contro - Serve un po’ di tempo e pazienza per montarlo correttamente - Aggiunge peso e ingombro alla struttura (ma ne vale la pena) In sintesi, il **Dual Z Kit Creality** è uno degli upgrade più utili e concreti per l’Ender 3: migliora la qualità delle stampe e rende la stampante più affidabile. Consigliato a chi vuole fare un salto di livello senza stravolgere la macchina. Review: Passt gut für den Ender 3V2 (2021). Einbau etwas knifflig. Ich wurde empfehlen zur Synchronisation beider Achsen etwas zum stabilisieren Drucken damit man die Spiralstangen richtig einstellen kann.


| ASIN | B07VJG4ZCG |
| Country of Origin | USA |
| Item Weight | 830 g |
| Item model number | Lead Screw Kit for Ender 3/3 Pro/3 V2 |
| Manufacturer | Creality 3D |
| Package Dimensions | 39.7 x 10.1 x 6.7 cm; 830 g |
M**O
Ho acquistato il **Kit di aggiornamento Dual Z ufficiale Creality per Ender 3** con mandrino perché volevo migliorare la stabilità della mia stampante, e devo dire che l’investimento è valso ogni euro. L’installazione non è complicata: con un po’ di pazienza e seguendo i tutorial (anche quelli video che si trovano facilmente) si monta senza grosse difficoltà. La differenza rispetto al singolo asse Z è subito evidente: il movimento è molto più fluido, il piatto rimane stabile anche in stampe più alte e non ci sono più quelle piccole vibrazioni o inclinazioni che rovinavano i layer. Anche la qualità finale dei pezzi è migliorata, soprattutto nei dettagli più fini. Il kit è ben realizzato, con componenti solidi e mandrino preciso, e dà una sensazione di robustezza generale alla macchina. Da quando l’ho installato non ho avuto problemi di disallineamento, e il livellamento resta costante per diverse stampe consecutive. ### Pro - Migliora notevolmente la stabilità dell’asse Z - Qualità di stampa più uniforme, soprattutto nei modelli alti - Componenti solidi e ben rifiniti - Installazione accessibile con un minimo di manualità - Evita ri-livellamenti continui del piatto ### Contro - Serve un po’ di tempo e pazienza per montarlo correttamente - Aggiunge peso e ingombro alla struttura (ma ne vale la pena) In sintesi, il **Dual Z Kit Creality** è uno degli upgrade più utili e concreti per l’Ender 3: migliora la qualità delle stampe e rende la stampante più affidabile. Consigliato a chi vuole fare un salto di livello senza stravolgere la macchina.
A**E
Passt gut für den Ender 3V2 (2021). Einbau etwas knifflig. Ich wurde empfehlen zur Synchronisation beider Achsen etwas zum stabilisieren Drucken damit man die Spiralstangen richtig einstellen kann.
N**A
Perfecto, montado y funcionando. No requiere grandes conocimientos para su montaje, mejora notablemente la impresión y hace que el nivelador de la cama sea más preciso y no requiera demasiada atención.
M**S
Excelente producto y sobre todo el precio. El kit viene perfectamente empaquetado y contiene todo lo necesario para instalarse, no se necesita nada mas. Recomiendo que primero instales el motor, lo dejes un poco flojo, luego instales los soportes de arriba igual dejandolos un poco flojos y luego ya que instalaste la pieza con las llantas, introduzcas la varilla para evitar doblarla. Ya que caigay gire bien, ahora si a apretar todos los tornillos.
L**N
This kit works great and definitely will tighten up the z axis of your Ender 3. The installation was quite easy once I was able to figure out how it all goes together. There are however a couple things that I have seen about this kit in many You Tube videos, etc that are just dead wrong, and may cause you a lot of frustration if you follow poor advice. The main issue is that machine frames are never perfect, and it is okay- and normal for your z axis to be unlevel by a mm or two in one direction or another. When the installation is finished, Do NOT try to align the z axis to the top bar by wedging some object in there. This is terrible advice. it will create unequal stresses on the steppers and they ultimately will work itself back to balanced forces, causing poor print quality. What you actually want to do to align it is to turn both z screws in opposite directions by hand and you will feel it begin to bind as the forces become uneven. Set it in the middle of the range on both side so that the forces are balanced across both leadscrews/stepper motors. It will stay right there and not move alignment. Forcing it to a different alignment, will only cause it to miss steps at some point and fall back into balanced position during the middle of your print. Once the forces are balanced and you have run the axis up and down a few times, it will stay there. Now tram your bed to this alignment and you will not have to touch it again. I have printed at least a dozen prints since installation using this method and cr-touch bed leveling repeatedly shows .01-.03 max variance without ever adjusting the z axis. Installation Notes: The first thing you should do is remove the original leadscrew and check and adjust the eccentric nuts on both sides of the z axis. The whole axis should roll up and down with no resistance, but be snug enough to stay straight and not wobble. Put something on your printer bed to keep the nozzle from hitting the bed while you are doing this. During the installation process, be certain to loosen the two small hex bolts that hold the brass follower nut to the arm. the nut can move aa few mm in any direction and will alleviate any alignment stress on the leadscrew. Leave all the attachment screws slightly loose, and only tighten the leadscrew into the stepper coupler. Move the z axis to the top to align the stepper/leadscrew to the frame and then snug up the stepper attachments. Bring z back down and make sure it moves smoothly and then snug the brass follower nuts. The top bearings actually slide back and forth to accommodate any forward or backward tilt of the stepper, so your main concern here is right/left alignment.
Trustpilot
1 month ago
5 days ago