


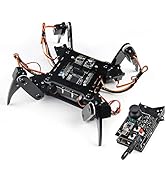
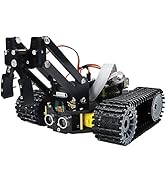
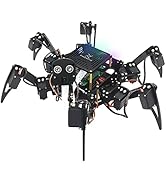
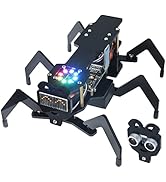
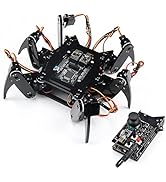
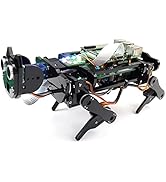
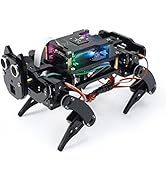
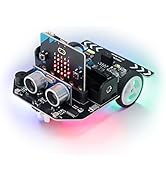
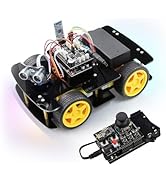
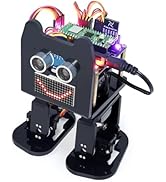
FREENOVE Hexapod Robot Kit with Remote (Compatible with Arduino IDE), Walking Crawling Twisting, App Remote Control, Servo STEM Project
Product ID: 81850222
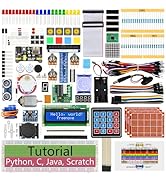
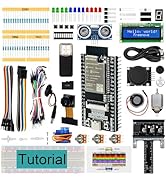
📚Step-by-step digital tutorial
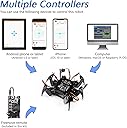
📱Multi-platform wireless control
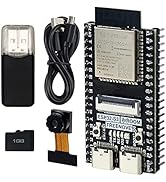
🦾18 independent servo motors
Buy anything from 5,000+ international stores. One checkout price. No surprise fees. Join 2M+ shoppers on Desertcart.
Desertcart purchases this item on your behalf and handles shipping, customs, and support to KUWAIT.
🤖 Own the future of robotics—build, code, and control your personal hexapod marvel!
The FREENOVE Hexapod Robot Kit is a medium-sized, programmable six-legged robot featuring 18 independent servo motors for dynamic movement. Compatible with Arduino IDE, it offers multi-platform wireless control via remote, smartphone app, or computer. Designed for STEM enthusiasts and professionals alike, it includes a comprehensive digital tutorial and prewritten code to simplify assembly and programming. Battery not included.


| ASIN | B07FLVZ2DN |
| Age Range Description | Kid |
| Battery Description | Lithium |
| Best Sellers Rank | #370,605 in Toys & Games ( See Top 100 in Toys & Games ) #3,324 in Educational Science Kits |
| Brand Name | FREENOVE |
| Customer Reviews | 4.1 out of 5 stars 392 Reviews |
| Educational Objective | Learning programming skills |
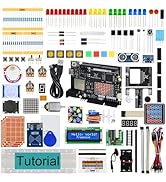
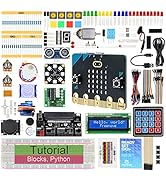
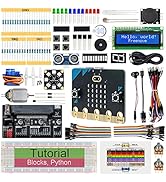
| Included Components | Product Parts |
| Is Assembly Required | Yes |
| Item Dimensions | 10.62 x 6.49 x 2.36 inches |
| Item Weight | 0.82 Kilograms |
| Manufacturer | Freenove |
| Manufacturer Part Number | FNK0031 |
| Manufacturer Warranty Description | Limited warranty |
| Material Type | Acrylic, Paper |
| Model Number | FNK0031 |
| Size | Medium |
| Theme | Robotics |
C**H
Nice little kit
This is a nice kit and I highly recommend it. First the limitations. Hey! It's small. It's all plastic and small weak servos. They did a good job with the kit design and the assembled robot worked very well for me on smooth flat surfaces. This robot is not for walking on tile, inclines or anything that will stress the joints or servos because this won't take much nor carry much. However the kit looks impressive assembled and the directions are decent. Everyone who I show it to is impressed with the kit and the motion of the legs, the way it walks, shifts and dances. Scared my landlord though but she hates spiders and kept calling it a giant spider. She actually screamed when it powered on and the servos zipped the robot in a standing position. (Poor sweet woman!) I made a video of the calibration on a glass table top so it made a funky scraping noise with the plastic feet described as erry. Hey! Most people were so impressed and said they can't believe I made that. (Huh? What is that supposed to mean? Am I not smart enough?) Seriously though the directions are a little confusing at times and describe sections very well but assume you know (or leave it up to you to search for some of the arduino stuff.) Those 144 little screws that hold every joint together are not your friends! I recommend laying back in a chair with a baggy shirt and force those little self-threading annoying tiny screws in there. They are so small and impossible to find if dropped to the floor hence forth the baggy shirt to catch them when you will drop them. There are allot of small screws in the kit. Thankfully there are a few extras of each. The instructions weren't very good on the calibration but by the time you get to that point you pretty much know what needs to be done. Fortunately the design of the kit is very forgiving. The legs of my kit aren't completely at 90 degrees but I was able to the angles close enough in the "X" pattern. My robot walks fast and looks great when it is walking and moving around. No one notices it is not exactly 90 degree perfect but I know. ;-P Ok so I could unthread the screws and reline it up but after all it is plastic. I am happy with the way my hexapod went together and how it looks and acts. I plan on purchasing at least one or two more of these hexapod kits to possibly make a "how to" tutorial video to cover the places where the instructions could have given more detail, how to program it, control it with controller and android device, etc... What is great about the kit is they have everything you need to get started on git including all the calibration software environment. The next step is limited on your creativity and programming skills. I have some other concepts for the kit as well including fpv and inductive charging from a pad the hexapod can just go stand on to charge. I think this kit is very reasonably priced. It comes with 18 servos, an arduino with servo controller and all the pieces and everything cleanly cut. I recommend this kit for anyone ages 8 to 60 years in age however an 8 year old and a 60 year old will both say allot of nasty expletives trying to put in those 144 tiny screws. They are NOT your friend... HA!
J**E
High quality kit with clear instructions
Very clear instructions, easy to assemble, works perfectly! I couldn't be happier. As expected there are many small screws and the wires are a bit messy, but that will be the case with any hexapod. The software that comes along with it is very nice, installation/calibration/control are all very user friendly. As another reviewer suggested, I went with batteries/charger from Nitecore's website (2x NITECORE IMR 14500 Battery 650mAh 3.7V - Rechargeable, 1x NiteCore NEW Intellicharger i2 2016 2-Channel Charger). Unfortunately I couldn't find something equivalent on amazon prime so I had to wait a few days, but it was worth it! I ended up containing all of the wires by taping the extra portions of wire (which there was a lot of, only the 3rd servo on each leg actually needs a bit of slack) into a small bunch with electrical tape, and then carefully lodging it somewhere in the body. It worked pretty well, just be careful that you are not obstructing the range of motion of any of the servos.
A**R
Do Not Buy
Seemed like a great kit to build with grand kids. After hours of fighting with the software downloads, finally gave up and trashed. Hours of calibrating makes it completely impractical. Do not buy!
M**E
Retrospect pretty cool project for my family to build together.
Freenove Hexapod This was a project I had purchased for my daughters (teenagers) and I to do together. Ideally we were shooting for Halloween to have the project complete. This didn’t happen do to a few bumps along the way. All in all it was a good experience and experienced the “joy” of Arduino and Processing with a couple cuss words along the way...lol I had downloaded the manuals first and looked at it before deciding to purchase this Hexapod. If you’ve never built a project like this before I found it helpful in determining the skills needed to complete the project. The manual was pretty well laid out. First let me say I’m a novice and this was my first Arduino experience using the Arduino IDE software and Processing PDE software. It was installed on a Raspberry Pi. I had zero experience with either program before doing this project. I had wanted to mess around with the Arduino boards for sometime. Construction: Thanks to the well laid out manual. Construction of the hexapode went smoothly for the most part. My daughters and I had fun sitting around the table as they assembled the servos onto the legs and various parts to connect it all together. Software: The small examples of connecting the Ardiuno and getting the LED to flash and was pretty straight forward. I had a little trouble with the Processing PDE software but finally got that going after a few tries. Batteries: This part really sucked big time and I didn’t realize how hard these batteries were going to be to get. Amazon carries about everything you could think of but these batteries. I don’t use Ebay and that’s one of the sources that Freenove directed me too. I also had to invest in another battery charger after finding a source for the batteries. Which are expensive also. Servo assembly and calibration: Once assembled I wasn’t able to connect via wifi but used the USB cable to complete the process. I had to do this step over a couple times to get it right also. I had to replace one of the servos also. That was on me because I had difficulty during my first attempt to calibrate. Remote control instructions: Assembly was easy enough on the remote and was able to put together quickly. I did find the instructions for the remote confusing though when I downloaded the instructions and building a circuit for uploading the software? Come to find out it wasn’t really needed. WiFi: One bump we did hit was using the ESP8266 ESP-01 supplied with the hexapod. It was dead and never showed up on our wifi list to select to control the hexapod. I went out to Amazon and purchase another one. They are really cheap so figured this was faster than contacting customer support. The replacement arrived and the wifi signal came up immediately ones I connected the new ESP8266 ESP-01 to the board. I was then able to control the hexapod from the computer and my Android phone once I installed the new wifi card. Retrospect: Overall this was a fun project with a couple pain points along the way. My daughters, and I had a good time putting this together. They are teens and usually hang out in their rooms on their phones so the time spent together was great. Completing this project and watching them control it was the highlight of the day. They’ve had fun with it and showing it to their friends what they made. Pros: The parts were well laid out in bags labeled and came with extras in the event you drop and lose a screw or nut because they are really tiny. Instructions on assembling are very good. Loading the software and calibration were good. Remote was confusing for me. But that could be me? Overall it’s a well designed kit. Cons: Points off for the batteries. Freenove really need to rethink this part and change construction to a 7.2V battery which is apparently available on Amazon per other customers. The batteries Freenove currently use add a lot of expense to this project. In retrospect I might not have invested in realizing the cost after ordering this kit. Final thoughts: Looking back we were able to build and get this kit up and running. I did take a dive into the deep end of the pool with jumping into a hexapod. But we made it and it works as advertised. I wouldn’t classify this kit as a kit for beginners. Download the manual and take a look at it. Assembling was easy. Software and calibration were a bit of a struggle. Troubleshooting I had to replace a couple parts and that solved the problems I had. Overall I’m very satisfied with this project. Freenove: Think about upgrading the batteries and it would be nice to have a schematic of the board layout since my girls asked if we could add a camera to the hexapod. Can you provide a schematic since it’s a modified arduino board? Thanks Mike
B**A
Impressively engineered kit that is relatively easy to assemble and works as advertised
I purchased the hexapod kit that includes the RC remote. The box includes everything you need to assemble and run the hexapod except for batteries and a charger for the lithium ion batteries. Be aware that you will need the batteries charged up and installed before you can complete the assembly, as the servos must be correctly positioned (using the supplied software while they are powered up) before being secured in place. Also, do not order the Nitecore NL1475SR batteries for this project; they do not have the necessary current capacity. I ordered the recommended Nitecore Nl14500A 650 mAh batteries direct from Nitecore and these work well. You should also purchase a charger that has protections against overcharging etc., made specifically for this type of battery. The kit comes with no software or instructions in the box; you must download these from the Freenove site. The kit went together with no hitches and I had no trouble installing the required software. The hexapod's processor is a Freenove design based on the Arduino Mega 2560 but incorporating the necessary electronics to drive the 18 servos (three for each leg). After installing the Freenove hexapod library in the Arduino IDE, you download a supplied sketch to the board via the supplied USB cable connected to your computer. For operating the hexapod from your computer, you download the Processing IDE to your computer, install the required library supplied by Freenove, and compile a supplied sketch that produces the user interface you use to control the robot. This app lets you choose between operating the hexapod via the USB connection or via WiFi. For WiFi the heapod acts as a WiFi "hot spot"; you connect to it via your computer as you would to your WiFi router, using the supplied default password. You can also operate the hexapod via the RC remote. The remote uses Freenove's version of the Arduino Uno R3, plus a shield that provides a joystick, switches, and a couple of potentiometers. After uploading the supplied sketch to the Uno, you are ready to go. The switches allow you to select different control modes for the joystick, and one of the potentiometers provides control over the height of the hexapod's body above the floor. I found control via the RC remote more fluid than via the Processing App as the former allows you to do things like move forward and turn at the same time, whereas the latter does not. I was impressed with the sophistication of the control algorithms --you can make the hexapod lean and twist in place as well as move and turn in any direction. Furthermore, all modes of control worked properly the first time I tried them (USB, WiFi, RC remote). I was not able to test the WiFi app with my cell phone (an iPhone) as Freenove only supplies an app for Android phones, but given the other successes, I would anticipate that it would work as advertised as well. All in all, it's a well-engineered kit that exceeded my expectations. However, I do have couple of recommendations to Freenove. First, it would be nice if they would develop an app for the iPhone. Second, although the tutorial for assembling the kit and installing the software is clear, the value of the kit as an educational tool would be greatly enhanced if it included a detailed tutorial describing how the software that operates the hexapod actually accomplishes what it does. As one with some experience in coding, I will eventually be able to figure it out by studying the supplied library, but it would be so much easier if there were an accompanying tutorial that takes the reader through it step by step.
C**T
Power Option is terrible
Ok, Let me first say that I am well versed in Arduino, Raspberry Pi, RC Cars/trucks, and I've build many quadcopters from parts on Amazon. So simple to say not my first rodeo. Design and fit/finish of this product is very good. So far haven't found a bad servo but I am not completed (See Below) The controller is a proprietary Arduino board based on a Arduino 2560 Mega. (According to the documentation) It has the servo outputs for 18 servos. Sweet. Right? Well sorta. Most of the IO pins are not present so you are kinda limited on options. The biggest gripe is that the power required is IMR 14500 batteries. Basically they are 3.6v AA's. You need two of them. Not included... why? Because the industry realized that most people don't pay attention to voltages on the side of batteries. They are discontinuing them. You can find a few non rechargeable versions here and two... yep. Two rechargeable options. So after $130 I have to buy a proprietary battery for another $30-40 and a charger. Batteries that aren't interchangeable with anything else I have. I have a few dozen battery packs that would fit the bill easily. Why put a battery holder on this thing at all? Why not have a terminal I can plug something into and figure it out on my own. Well I thought about that but the company that provides this does not provide specs or schematics for the board. No pinouts other than some shoddy silkscreening on the board. At this point I would not recommend this to anyone because it's SOOO close to being a 5 star product. Very cool if you don't include power. Edit 10/22/19: Support provided me with a schematic. Given the high current likely I fear there may not be an easy solution that won't involve rework of the board.
G**R
Works great with 2s Lipo easy mod
I really liked the clear instructions, but even so I skipped ahead in them and forgot to push the flash up to the controller. I liked also the software loaded on my Linux laptop and also my windows machine with no problems. Overall an easy build and really a well thought out kit that looks nice when put together. I didn't like the stock battery setup and unsoldering the battery connectors and just using a 550Mah 2s Lipo with a XT30 connector works perfectly. I didn't want to worry about getting a new charger and have other things the use standard lipos. I tried the phone app which is my favorite and also the computer control but I believe I fried my NRF24L modules by plugging them into the wrong socket. Therefore I haven't gotten my remote to work yet. So I ordered a couple more modules they are very cheap and I'm waiting on them to come in. I didn't feel right complaining about them, since it was my fault for getting in a hurry and they can only handle a max of 3 volts. The hexapod moves a bit slow but for 9g servos it's about what I expected. Battery life with the 550Mah battery seems to be about 17-20 min. I was using a 1600Mah battery at first because I was waiting on Amazon to deliver the smaller ones and the battery life was crazy long, 35 min or more at least. I look forward to more time playing with the code and adding some leds etc.
A**S
Entretenido
Muy entretenido, si quieres que tus hijos desarrollen gustos por la tecnologia es el producto correcto
K**B
Fun but not great
Its a cool design and its well thought out. The software works great out of the box and the tutorial is mostly well put together. Theres one very big flaw: the servo’s are being held by a tiny screw which you cannot tighten fast enough. Once powered on and calibrated - the crab walks two steps and then it descends on its belly. This is caused by the screws being unfastened by the rotation of the servo’s. This makes it unusable which is a big shame. I cannot tighten the screws any tighter. It was fun to put together but after assembly its kinda useless to me due to this problem.
T**T
サポートが素晴らしい
判らないことが沢山有りその都度メールにて質問すると1日以内に必ず回答がありました。特にプログラムに関しては説明が丁寧で初心者の自分でも理解できました。ロボットの組み立て自体はビデオを参考にすれば問題なく組み立てられます。プログラミングに自信の無い方はリモコン付きのセットを選びましょう。本体の電池は18650の凸無しの67mmを購入します。これより長いと電池ケースに入りません。アマゾンでは1品しか出ていません。兎に角素晴らしい出品者です。
M**L
Stunning, easy-to-start, affordable robot
This is my first ever programmable robot an I am super satisfied with it. It came in a surprisingly small box with a tidily arranged interior. The assembling itself took good two hours. The manual text is concise with a sufficient supplement of pictures so the process went smooth. Unfirtunately, the remote control was broken, not connecting to PC. After a day on e-mail with suport, they concluded that it is unrecoverable and sent a replacement. Their first response was less than in 3 hours. The remote is much more fun to control the robot than a computer. One should go for it if intends to play with a robot. For programming, the software is well commented and pretty straightforward. I have some experience, so may be biased. The attached video shows actions according to the first self-made script.
E**E
Geiles Spielzeug für Bastler/Maker
Super für das Geld. Hatte mir zuerst den Quadruped-Prod geholt und damit rumgespielt. Da ich aber doch etwas mehr Platz brauchte, habe ich mir dann auch noch den Hexapod bestellt. Funktioniert prima, die Anleitung ist MEINER Meinung nach sehr gut erklärt. Eventuell sollte man ein paar Arduino-Kentnisse mitbringen.
Z**D
Don’t recommend
The wires kept breaking during setup and the whole thing feels very unstable. The screwdriver they included doesn’t even work properly. When I turned it on, it started overheating quickly and there was a strong burning smell, which honestly felt unsafe. The tutorial wasn’t helpful either and made the setup more confusing than it needed to be. Definitely disappointed
Trustpilot
1 month ago
1 week ago