💡 Light Up Your Life, Automatically!
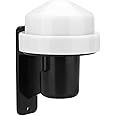
The Zerodis AC 230V Dusk to Dawn Sensor is a cutting-edge photocell switch designed to automatically control outdoor lighting. With its durable, weatherproof construction and energy-efficient operation, this sensor ensures your lights are only on when needed, making it ideal for various applications like street lamps and gardens. Backed by a 1-year warranty and 24/7 support, it's the smart choice for modern lighting solutions.
| Manufacturer | Zerodis |
| Part number | Zerodisa9ewc1i8zx |
| Item Weight | 180 g |
| Item model number | AK3-AT1-GL-M-X |
| Colour | black |
| Voltage | 230 Volts |
| Wattage | 1E+2 |
| Item Package Quantity | 1 |
| Switch Type | 1-way |
| Batteries included? | No |
| Batteries Required? | No |
D**R
Perfect for switching on IR lighting for security
The media could not be loaded. Bought to turn on IR LED's for my garden security camera to eliminate black spots. Works perfectly and even allows me to record the nocturnal wildlife coming to the garden.
P**J
Check box
Easy to install, works perfectly, missing a seal? Good value for money
D**D
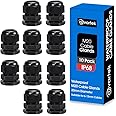
Works well, pricey as no cable gland included, instructions could be improved,
It's well enough made on the whole. Crosshead screws are not ideal, but they can be operated with a flat-blade electrical screwdriver. At this price, which is quite steep, a cable gland really should be included,, even if it was as an add-on. It works well, so it did the job I bought it for.The instructions should be clearer. It's not enough just to provide diagrams - more words would be good, especially with regard to the Lo and Li terminals. OK for experienced electricians, but not necessarily for everyone else.
M**Y
Cool
Cool
J**E
Faulty out of the box
When the electrician installed it (to replace an identical unit that had gotten intermittent) on switching it on it blew the main earth trip!I simply returned it. Luckily the electrician was able to obtain and supply one (albeit slightly more expensive) which works fine.
S**S
Works a treat
I bought this to replace a similar product that was starting to fail. This was easy to install and fixed the problem
L**.
Works but could do with more assembly information.
Firstly, the box looked like it was previously opened and then resealed as there was a lot of tape on the box but the box seemed undamaged so went with it. With the above in mind, the mounting screws did not seem to be original as they were short and the the head would not fit into the recess in the mounting point.Also, the cork gasket mentioned on the box was not included. However, the base itself had not been used before as the mounting holes had to be drilled out. I made a gasket from sealed cell plastic sheet.I proved the item worked before fitting to the wall. It basically works correctly so I fitted it.Nice point is that a small black plastic bag is provided to make the sensor work.There are some omissions from the information on the outside of the box and some, what I would call design problems.1 There is no sealing gland or even a disk infill. I was aware of this from other reviews. For information, this is 20mm. In fact, there is a recessed hexagon that does help with tightening the gland.2 To remove the actual sensor head, you have to twist the head as it is locked in place. The diagram implies that you just prise it off but you twist to disengage the plug legs from the socket and then just pull out. To be honest, a good design but a little embossing with an arrow lock and unlock would make it so much better. I could have kept pulling and broke it.3 You cannot screw the mounting part into wall whilst either the the sensor head or the cable is fitted. Therefore you have to assemble the device on the wall which means potentially from a ladder. The only thing you can pre-assemble the cable into the socket.So the safest assembly process has to be:1 Assemble the cable onto the device socket on a table.2 Mount the base to the wall.3 Put the internal gland nut into the base, hexagon down if one side of the nut is plane, and use your finger to hold whilst then screwing the gland body into the nut until it engages into the hexagonal recess and you can just tighten the gland body.4 Put the gasket into the base.5 Feed the cable through the base from the top and the gland body.6 Fix the socket to the base by screwing from the top.7 Fit the sensor head by pushing down and twisting.8 Thread the gland external nut onto the cable and tighten.9 Now you can wire the cable into your junction box.This is not too difficult but having to have to partially disassemble because of doing it out of order.This could easily be printed on the box.
A**R
Great
Perfect quality.
Trustpilot
1 month ago
3 weeks ago