


⚡ Blast away the old, reveal the bold — your ultimate metal makeover station!
The T-Mech 220L Sandblasting Cabinet is a heavy-duty, portable workstation designed for efficient metal restoration. Featuring a large tempered glass window with LED lighting for enhanced visibility, it supports versatile abrasive blasting on various metal parts. Its secure side door and comprehensive accessory kit—including airtight gloves and multiple nozzles—make it ideal for both beginners and experienced users seeking professional-grade results at home or on the go.


| ASIN | B07N93ZW45 |
| Best Sellers Rank | 222,765 in DIY & Tools ( See Top 100 in DIY & Tools ) 55 in Sand Blasters |
| Brand | MAXBLAST |
| Brand Name | MAXBLAST |
| Colour | Blue |
| Customer Reviews | 4.4 out of 5 stars 206 Reviews |
| Door Material Type | Tempered Glass |
| Door Orientation | Front |
| Door material type | Tempered Glass |
| InstallationType | Freestanding |
| Item Dimensions D x W x H | 56D x 89W x 138H centimetres |
| Item Weight | 41 Kilograms |
| Item weight | 41 Kilograms |
| Manufacturer | Monster Shop |
| Model Name | Industrie 220 L |
| Model name | Industrie 220 L |
| Product dimensions | 56D x 89W x 138H centimetres |
| Voltage | 240 Volts |
| Wattage | 1000 watts |
M**N
Excellent, especially for the price.
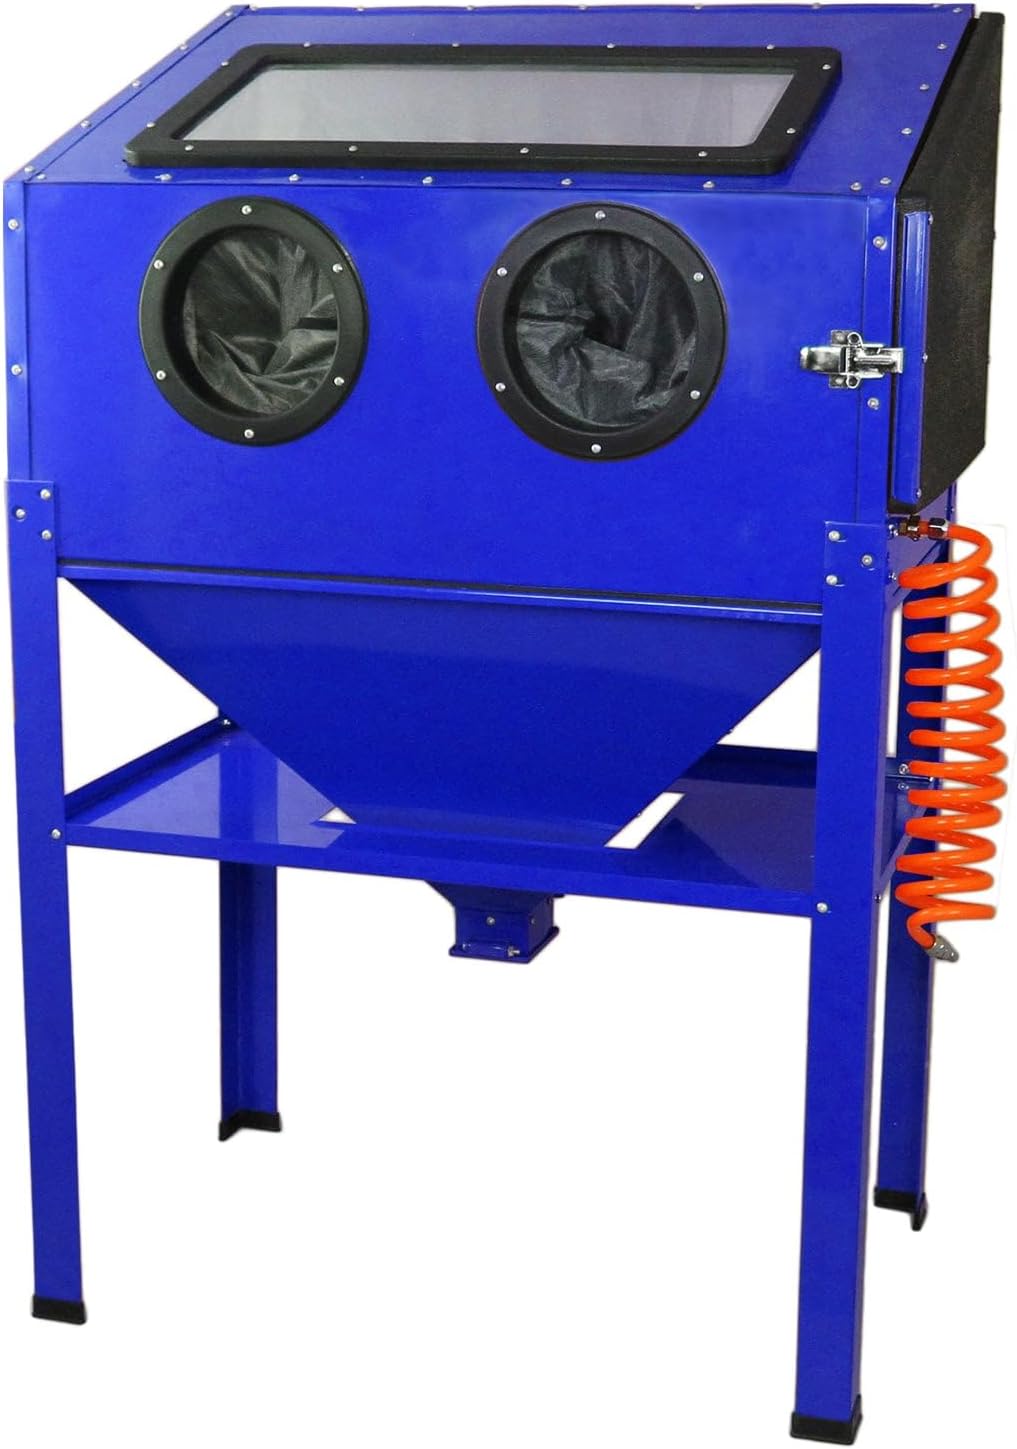
I am normally fairly good at putting ‘flat pack’ stuff together without reading the instructions. In this case the instructions were not much help, as it was not always obvious if Item A went on top of B, or vice-versa. But it all became obvious during assembly, time taken about 4 hours with gaps. Note: you will almost certainly need two people as some of the screws and nuts would need your arms to be 3 feet long to do up. Also, the flex in the panels makes it hard to hold two panels in place while also inserting a screw and putting a nut on the end. Once the unit is assembled it is sturdy, and I would say of good materials/construction. I did have one problem, the screw holes for the blasting media pick-up pipe in the media hopper were absent. I had to work out where the pipe was supposed to screw on, and then drill the holes. It has one design flaw. The blasting media is stored in a hoper under than main cabinet, so that as you blast the media returns into the hopper through a removable mesh frame inside the cabinet on the bottom to be sucked back up out of the hopper for re-use through a plastics tube that passes through the mesh frame. As a result the (in theory easily removable) frame is not easy to remove, as it has a pipe pass thought it hose clipped to the gun at one end and the pick-up pipe at the other end. I will soon disconnect the pick-up pipe, remove the frame, cut a small gap in the back of it and weld a 25mm Exhaust clamp on, giving a cut-out for the pipe to pass through, so that in future the mesh frame simple lifts out. So.. . . Is it any good? I have access to a large compressor, so I dialled the pressure control valve down to just under 100Psi, the recommend max, and gave it a go. I have never sand-blasted before, so,I do not have anything to compare to, but I am more than happy with the results. A friend cleaned the paint off a maintain bike rear frame in under 30 minutes, it took him 5 days to get the paint off by hand with sandpaper, and even then some of the tighter corners could not be cleaned. I cleaned up a slightly rusty motorcycle bottom yolk in about 20 minutes. A job that would have been impossible with sand-paper given the shape of the casting. I have wanted access to a blasting cabinet for years, and now wish I had bought one years ago. Edit: After a few uses I bough a cheap vacuum cleaner. Without it the cabinet quickly fills with a fine mist of dust making it impossible to see what you are doing while at the same time venting large amounts of the same fine dust everywhere. I plumbed the vacuum into hole on the left side, and removed the blanking panel from the rear. Now it’s 5 seconds of use, it gets a bit foggy, wait 1 second and the fog gets sucked out. You might want to buy a pressure regulator, that way you can have the compressor running from 100Psi to 140, and the regulator set to 90, ensuring that the pressure at the cabinet remains constant. I got one from Amazon. https://smile.amazon.co.uk/gp/product/B01LXI1G7T/ref=ppx_yo_dt_b_asin_title_o05_s00?ie=UTF8&psc=1 Also, one might think the bigger the hole in the nozzle in the gun, the more effective it is. ( The cabinet comes with a selection. ) It’s the reverse. The smaller the orifice, the faster the media comes out and so,the more aggressive the blasting.. obvious in retrospect.
R**Y
Has a few issues that need remediating but good value for money
As many have said, the instructions are poor. However if you examine the assembly pictures carefully mapping the part numbers in the parts list table then you can work it out yourself. Indeed I would do this before reading the instructions so you know what to expect in terms of the order bits need assembling. Some parts were bent by the shipping process but easily straitened and in my view we needed some larger washers for assembling the legs securely and a few bits and bobs like that to make the build better. The instructions say fit the gloves very early but in my view I would fit them last as the holes enable access to nuts that are difficult to reach as others have said. In summary, the kit is not in my view perfect and needs a little DIY finessing which likely not an issue for anybody wanting this sort of tool but overall I think its good value for money and also a really good size.
M**S
good for the job, instructions usless.
Before I got this I used tarps making a tent like den I did as a child. It worked, but was a lot of hassle for the smaller jobs that needed blasting as and when. I have only used it briefly at the time of writing this. So I may have to update. It's a pretty stable box, size is great for most things. It does contain most of the mess. But it does seem to leak shot in a few places where you suspected it would. (can see gaps where draft seal does not meet the frame properly, so will probably use some gaffa tape on those. Another reviewer suggested grip fix, but not sure that I want to go there just yet.) Before you start, please ensure all small children are out of earshot. You don't need them hearing the words you will use when putting this together. You will also need: patience of a saint, the common sense the author did not have and available "well-being" space to sit and fume at how rubbish the instructions are. You will also need to straighten the panels. Most people who will buy this won't care or can deal with the few dents, folds and scratches. Typos in the instructions are one thing you can work out what is meant, however they name something in an instruction, yet call it something else in the index. Annoying! But they also rename things. Fastening clamps = jubilee clips, air vent dust collection = hole for vacuum. Where it uses the words "pre-assembled screws" don't think for any time that actually means what it says. It may mean "provided". But you will only find this out once done and note the spares you have left over. The provided screws are labelled differently to how they are described. So you may think it's missing, so use others you have in a tub somewhere, and carry on. Instructions will tell you to fasten something, but won't say where or how on many areas. Nor will it say which way round or facing parts should be. You will pull it apart a few times and redo. There are also bits that are not described. The large hole at the back panel, covered on the inside by metal panel. This is for an industrial vacuum pipe. You will need to remove the rubber seal to make the pipe fit. The one on the left is described as dust vent (for collector) which can also be used for a vacuum and smaller pipe. However, you will need to remove the cover of the one not being used for the vacuum. The vacuum suction is too great, the gloves will go erect and not so easy to use that way. But you will get a taste of being an astronaut on a space walk. Pros and cons I guess. In summary, good bit of kit, shame it has poorly written instructions. What I have written above is my take on it. I am no expert, just someone having a midlife crisis renovating some motorcycles. Someone with greater experience could correct them. Good luck. It is worth it in the end.
J**T
Great bit of kit at a bargain price - unbeatable!
It's a two man job or an octopus to build it. Expect to spend 6 to 8 hours on assembly. But it's really worth the effort. It seals properly and accepts quite large items. I built a Frost Restorations DIY one in plywood years back and sold it on eBay for £170 when I thought I'd finished restoring classics. This is way better - and cheaper. I'm putting it on wheels to move it around the workshop. The screws are a bit soft but do the job. Typical Far East fixings, expect a couple of cross threads.. The instructions and assembly diagrams are rudimentary and need creative interpretation, but if you want one of these you're going to be handy and this won't put you off. The finished article looks good and easily rivals the big name offerings at 3 times the price. You'll need 8 - 10 Bar to run it.
C**E
Recommended!
This thing is a monster to build. I saw another review where a customer stated it took 6 hours to build, and I'll be honest, I laughed at the time. I thought maybe 2 hours and I'd be done with it. 4-5 hours it took me. This thing has an incredible amount of bolts/washers/nuts to assemble, it is very time consuming and you would definitely benefit from having an extra pair of hands - and in some cases, this is the only way to get certain bolts in and tight. Don't forget to thread lock everything! Metal on metal, if you don't do it now, you'll regret it. I left out a very think sheet metal piece which is mean to sit between the hopper and upper cabinet, but it seems fine without. I also added some silicone on the outside of the upper cabinet, to avoid any leaks, but overall it was packaged really well, and it looks amazing once built. Really would recommend, it's super solid and sturdy, the LED light is "OK" But I will be adding more to improve visibility. Recommended!
J**N
Excellent product
The instructions are not the easiest to follow, which contributed to me taking 4 hrs to erect. However, once built it is fantastic quality. I went around the outside with clear silicone as i wanted to make sure it contained all the dust. You do need a hoover of some sort to keep the viewing glass clear. I changed the way thd viewing glass is installed with wing nuts, so i can easily remove the glass in future. i run a 100ltre compressor and the sifon pole works great. I am 100% satisfied with this product. The light is great, but i have up graded to LED, just my preference but the original is perfectly usuable.
M**.
Kinda good but it has flaws.
Great idea and affordable but there are some issues to take into consideration before purchasing. This unit comes in a million bits and will take sometime to build don't expect to knock it out in 40mins as it took me 3 days. The panels are very thin and very flimsy they warp wobble and bend quite easy. The instructions are not horrific but bad enough as it doesn't explain things and tells you to use pre assembled screws on parts that have no pre assembled screws leaving you in complete doubt and confusion. But also the manual tells you to put parts on after that should of went on before i.e the base and the window fitting shield. This really is one of those flat packs where you have to be experienced or think outside the box at all times. Is this a good unit? Yea its very good once built but just be warned it ain't an easy build. Oh yea btw my unit come in two different colours as they clearly ran out of dark blue so i have sky blue and dark blue panels and top. That's really bad quality control and care. For that reason i rate this 3💫💫💫
J**G
As described
As described
Trustpilot
1 week ago
1 month ago