Some deliveries may take a little longer than usual due to regional shipping conditions.

DOWNLOAD THE APP


Customer Services
Copyright © 2025 Desertcart Holdings Limited
DOWNLOAD THE APP


Brew it your way! ☕
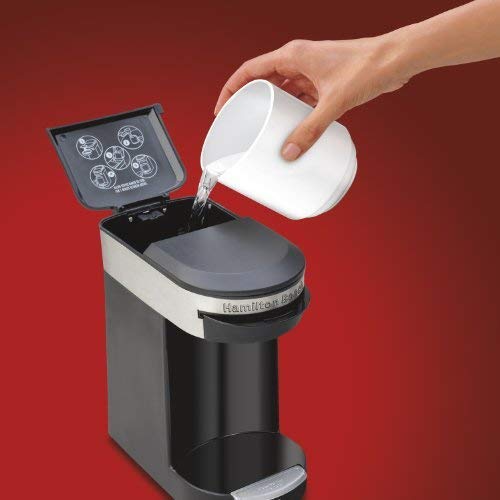
The Hamilton Beach Personal Cup One Cup Pod Brewer is a compact and efficient coffee maker designed for personal use. It brews up to a 12-ounce cup with a simple one-touch operation, allowing you to enjoy your favorite coffee quickly and easily. With customizable options for soft pods or ground coffee, this brewer is perfect for busy professionals seeking convenience without compromising on flavor. Its dishwasher-safe components and auto shut-off feature make it a practical choice for any setting.


| Material | Plastic |
| Item Weight | 2 Pounds |
| Number of Items | 1 |
| Capacity | 12 ounces |
| Style | Pod Brewer |
| Color | Black/SS |
| Recommended Uses For Product | Quick and Easy Coffee Preparation |
| Operation Mode | Manual |
| Human Interface Input | Touchscreen |
| Wattage | 800 watts |
| Filter Type | CoffeeMaker |
| Specific Uses For Product | Personal use, office settings, quick coffee |
| Special Features | Auto Shut-Off |
| Coffee Maker Type | Drip Coffee Machine |
J**K
Excellent, eminently affordable, single cup coffee maker
Executive Summary:==================Inexpensive, trivially easy to use, reliable (so far..) single cup coffee maker. I've used this now for the past several weeks and have really come to love it. I would highly recommend it to anyone looking for a single cup coffee maker.Long Review:============I purchased this for my office at work after the institutional food service came under new management and decided to drop the "coffee club". What I was looking for was an unobtrusive, easy to use single cup coffee maker. I looked at Keurig K-cup type coffee makers, but it boils my Scot-Irish blood to pay $100 for a starter unit and then cough up good money for $30 to $40 per pound coffee in little plastic cups. At $20 for this pod type brewer, I figured I wouldn't be out much it it didn't meet my needs.In the box, you'll find the coffee maker itself, a plastic basket to hold the coffee pods, and an complementary 18-pod bag of medium roast Senseo coffee. The plastic basket has a swing out and detachable upper ring that allows you to use two coffee pods if you want a stronger cup of coffee. I've made a few dozen cups of coffee now and here are my thoughts. First to the coffee pod users...Using Pods:===========Using coffee pods couldn't be easier. Pop one or two in the basket, depending on how strong you want your coffee to be, fill the reservoir with water to the fill line, stick you mug under the basket and hit the button. Give it about 3 minutes and you'll have a hot cup of coffee. Flip the pod into the waste basket and you've cleaned up. Couldn't be easier. My only qualms with this approach are cost and flexibility.The cost: A four-pack of 18-count Senseo medium roast pods (Senseo Coffee Pods, Medium Roast, 18 Count (Pack of 4)) runs about $40 on Amazon. In toto, this amounts to 17.64 oz of coffee, which comes out to about $36 per pound. Ouch! That's pretty steep.Secondly, if you go with pods, you'll need to find a mix / flavor that you like. Senseo offers a basic set from which to chose, but in the universe of coffees, it is fairly limited.Still, if you don't mind paying for the convenience, pods can't be beat for ease of use.The rest of my comments are for the coffee lover / DIY'er.DIY'er / Coffee Lovers:=======================At this point, let me admit to the fact that I love coffee. I like my coffee fairly bold and rich. I'm partial to flavored coffee, but also enjoy the darker unflavored roasts, such as Starbucks Sumatra or Verona. My secret hope when I purchased this unit was that I could figure out how to make my own pods so I could use any coffee that I wanted. Having recently gone vegan, I started to shop at the local natural food store and came across a terrific dark roast from a Vermont group that ran around $12 a pound. I was a biology major / chem minor in college and got used to tinkering in the lab. I figured that I could probably come up with a way to use my own coffee with this unit, and I've mostly succeeded. Here's what I've discovered. YMMV:- remove the inner plastic ring from the coffee basket. You won't need it and it'll get in the way. Put it some place safe so that you don't lose it. If you're OCD like me, you'll carefully wrap it back in plastic and store it in the box with the instructions- use small basket-type paper filters. You'll likely need to fold one edge so that the paper fits snugly in the bottom of the coffee basket and hugs the sides- add coffee. Here's where you'll want to experiment (THIS IS IMPORTANT!): if you put in too little coffee, it'll come out on the weak side, but if you put in too much coffee, then there won't be enough space for the hot water to slowly seep through the grounds and instead it will shoot out around the top like a geyser and make a mess. Keep in mind that the coffee maker will only let you put a short cup underneath the drip basket - nothing taller than about 3 1/2" to 4", so you'll be making an 8 oz to maybe 12 oz cup max. This is where you'll want to experiment to get the strength that you want. Also, keep in mind that drip grind is recommended - anything finer will tend to hold the hot water too long and you'll end up with a geyser for a different reason. I've been using drip grinds, and these seem to work well- here's the secret to making this work - once you've carefully placed the paper filter in the basket and add coffee, take a pair of scissors and trim the top of the paper flush with the top of the basket. Don't be tempted to fold the paper over on top of the coffee to make a "pod" - the results aren't what you'd hope for. I tried that - repeatedly - and just kept getting a very tepid cup of coffee, no matter how bold the roast was or how much coffee I added. I nearly got to the point where I was going to try one of this pod-making-machines, when it suddenly occurred to me that with the large coffee maker I use at home, the grounds are open at the top of the basket. I figured I'd give this a try, and voila! A great cup of rich, full bodied coffee.Now that I've worked this out, I'm truly in love with this coffee maker. I can use any coffee that I want as long as it is drip grind. I suppose I could bring a grinder in from home and process whole beans, but that seems a bit much. Clean up is still very easy. And at $20 investment, I couldn't be happier with this coffee maker.In terms of longevity, only time will tell. The unit is very simply made, so there appears to be very few parts that could break or wear out. We'll see. At about 2 months with this, I'm giving it an unqualified 5 stars.cheers.
S**N
BEST LITTLE COFFEE/TEA MAKER
Don't listen to the naysayers against this little coffee maker. Take the time to teach yourself how to use it to brew a good cup of coffee. I love it a lot! This personal one cup coffee maker is just the ticket to getting a satisfying and speedy cup of coffee, any time day or night or even when everyone else is sleeping. No fuss no muss. I love it! I love it because I can make my own coffee pods of choice. Finding the coffee pods with the ground coffee in them are not all that easy locally unless you buy them online because the K-cup style is all the rage. My recommendation is to make your own filter pod of coffee grounds for the filter basket, and here's how you do it: Choose your favorite finely ground coffee, whether it be a mild or gourmet blend. Purchase the 1-4 cup size of paper coffee filters. Take one of those filters, place 1 Tablespoon PLUS 1 teaspoon of finely ground coffee of your choice into center of that coffee filter and then spread grounds out evenly across the coffee filter. (The reason I give you those measurements for grounds of coffee is because I took the name-brand coffee pod that comes with this coffee maker, disassembled it, and measured the grounds). Fold over the coffee filter into itself by quarters until you have made a nice little coffee pod making sure the coffee grounds are centered in the middle of the pod and not laying/left out into any of the folded-over quarters of the coffee filter. You don't want coffee grounds coming out all over! Take out the plastic brew basket from your coffee maker, and then flip up the top of the brew basket. Set your homemade coffee pod straight down into the brew basket. Take the coffee pod and center and shape it to fit nicely into brew basket (flatten it around with your fingers to shape and position it), and then close the lid of the brew basket back on top of itself. Insert the plastic brew basket back into the coffee maker slot. Place your coffee cup/mug onto the cup rest underneath the brew nozzle. Add chosen amount of water into the water reservoir. Then, press the start button to begin brewing the coffee. I use 8 oz of water myself and 1 1/2 T ground coffee. Or, you can use 1 Tablespoon per 6 oz or 8 oz water. Customize flavor by adjusting proportion of water and grounds to your taste. Voila! Now, doing this yourself does not take a lot of time and is well worth the extra one minute to make the coffee pod yourself. And, it is fun to do it yourself because you make it just the way you want the flavor to taste!UPDATE: 1/6/13. You can also make great tea with this coffee maker. Use any tea bag or a tea pod like Celestial Seasonings. No need to use a coffee filter--just drop tea bag/tea pod in brew basket, place your coffee cup underneath spout, add one cup of water as directed, and set to brew. Or, adjust amount of water to your liking instead. I used the same tea bag and re-run water through and got more tea, almost as strong as the first run through of water.ALSO: The 16 oz. foam cup will sit nicely underneath the brew nozzle.
Trustpilot
1 month ago
1 month ago