Desert Online General Trading LLC
Dubai, United Arab Emirates
Desert Online General Trading LLC
Dubai, United Arab Emirates


🏡 Shed the clutter, embrace the order!
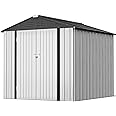
The Greesum Metal Outdoor Storage Shed is a robust 6FT x 4FT utility shed made from thick galvanized steel, designed for outdoor use in backyards, gardens, and patios. It features a sloped roof to prevent water accumulation, a lockable door for enhanced security, and is resistant to rust and UV damage, making it a reliable choice for all weather conditions.
P**E
Great shed & a ONE-person build (w/patience)
I read tons of reviews before purchase, but at a cost of $219 this shed is an excellent value. I bought and built it myself (I am a 5’ 6” female). I saved HUNDREDS of dollars and took my time to construct it . Several reviews discussed the ways that they built this shed, but if you search for “Greesum Metal Storage Shed” online there is a 40 minute and 54 second video by UTECHPIA (building the smaller 5’ x 3’ shed solo) that I found extremely helpful. The shed isn’t EASY to build if you are inexperienced, but it is absolutely possible if you are patient, have the correct tools, and have the time and determination to devote to building. For a builder with experience, this shed build would be a piece of cake though. The build is completely logical.TIPS:1) FWIW, I did use an electric drill w screwdriver attachment instead of a ratcheting screwdriver and it saved a ton of time and strength. (TBH I started w/ a ratchet and changed after my arm got sore - so save time and start that way!). I was just VERY careful to set the torque low on my drill and to be careful not to strip the screws on tightening.2) I inventoried each piece of the build before I started, to make sure I had all the pieces, which I did. I read the instructions (e.g., looked at all the pictures) before starting. I did not inventory the screws/ fasteners because for the most part I could tell there were plenty.3) When installing the wall panels, I put a starter screw at the top, then attached the bottom screws first, which was more difficult to do since that part was close to the ground and were therefore harder to screw in (I lifted the very light shed frame up onto an incline to allow my drill to get low enough to reach each screw). FWIW, if you assemble the structure correctly which is not hard to do, ALL the holes match up. HOWEVER, it is important to stretch or push the metal slightly to fit, as it can get a bit shrunk and bent during packaging. None of the materials in my packaging were damaged. Because it’s thin sheet metal, it is easy to shape so all the holes line up. Take your time and wear the gloves so you don’t get cut by the metal.4) the instructions are sometimes tricky, so pay close attention to the holes that DO & which DO NOT get screwed in (at first) on the corner panels for the walls and roof. Otherwise you’ll have to undo and redo them, which I did the first time. Didn’t make that mistake twice.5) there is one error on the roof build instructions, or at least I THINK it was pictured backwards. The number 17 and number 18 front and back roof edge finishing pieces (which screw into the middle roof panel and are both around 3 to 4 feet long) appeared as reversed in the photo instructions I had. (The 18 piece is shorter, 17 slightly longer. ) Consequently, when I tried to put the roof supports around the edge of the roof panels, they appeared to be too long and jutted out too far past the corners of the roof. Just reverse 17 and 18 pieces, and then the side roof structure finishing pieces and corners will match.If you have ever built Ikea stuff you will be able to build this shed. Just pay CLOSE attention to the tiny holes pictured on the page and figure out what is top, bottom, front and back before you permanently affix each piece. And there’s nothing you can’t undo and redo, generally, if you must.The HARD part of this build was creating a level surface for my shed because my yard is on an incline (and I had no experience with a patio-making task). However, the finished product is a success. The shed withstood last night’s rain, and everything inside is water free. In the picture, you will see an IKEA Omar shelf, which fits well in this shed with room to spare. (See pics). I put a large piece of plastic for flooring inside, and it too was dry. I am very pleased with this shed.UPDATE - after several days of hard blowing rains, there was some water infiltration from (I believe) gaps at the roofline underneath the roof’s drip edge, which is short (the edge comes down only about an inch beneath the gaps. To cover the gap better, I purchased a $10 10-foot length 2.25” by 1.25” galvanized steel bent roof drip edge and two $0.72 pieces of 8” long, 4” by 4” folded galvanized flashing (because the drip edge piece wasn’t quite deep or long enough to cover front and back of the roofline) to act as a water diverter. If that solves the issue, great. If not, I will report back. :)Good luck!
B**S
great product for the cost
The only reason for 4 stars is the plastic coating. You can't see it mostly, and I think it's great benefit, but there are areas where it's messed up and looks really bad. It would be a 3 day project just to remove it. The edge pieces for the roof don't seem to line up. Other than that, assembly was easy and the directions are very good. I use these to keep storage items (like camping gear) organized and clean inside my shop. They are perfect for my purpose.
K**G
You get what you pay for
I am not necessarily one to write reviews, but I did want to mention some things to hopefully help a potential buyer. As the title states, you get what you pay for. After the build process, I can say that it is a seemingly sturdy shed, decently sized to fit a good amount of yard tools (things like a wheel barrow and seed spreader, gardening pots, brooms, rakes, shovels, etc.), and it appears to shelter well enough against wind a rain. Once it was built, I was overall happy with it.On to the issues. with building..The process starts easy with the base (really just a frame, not a full base. Spent an extra $40 at the hardware store on pavers and wood slats to make a floor) and the walls going up without any issue. Once we got to the roof installation, issues arose. Holes were not lining up at all, the instructions failed to show as much detail as the beginning did, and things didn't make sense. We had to drill our own holes in both the roof panels and the pieces to attach the roof to the shed all because none of the holes lined up. Then, once we got past all of that and started working on the door, the lock mechanism was not aligning. Again, we had to drill our own holes and make it work.This really wasn't the end of the world if you had the right tools and patience/know how, but it was frustrating nonetheless, that it required more than what the directions suggested regarding time, tools, people, and extra reinforcement for the base. At the end of the day, we got it up and it is functioning well. You just have to be prepared to spend a bit more time/money to balance out the low cost of the Amazon shed itself.
C**.
This is an amazing shed for the price.
This is an amazing shed for the price. You need to choose and build your own base. Everything goes together perfectly but because the directions don’t have word I got a number of pieces backward or upside down. If you get to a point where the holes are not lining up you probably just need to check if you have the part the wrong way or on the wrong side. They maybe give you one or two extra screws per type so if you are going to build on the grass like I did you may want to make sure you do t drop any! Also if you use a drill, which makes it so much easier, make sure you don’t strip out the screws. Great shed. I might buy another to make a playhouse for my daughter! Oh, also don’t build on a windy day!
B**A
Esta como se ve
Está perfecto con el instructivo, solo hay que saber ver las perspectivas en ocasiones. Lo arme yo solo, sin prisas, y si se van como 4-5h. Por lo demás, no necesitas hacer agujeros extra o así como algunos dicen
V**S
No es perfecto, pero por el precio no está mal
Si sigues las instrucciones al pie de la letra, te avientan de 4 a 5 horas armandolo, esto si usas un desarmador eléctrico... a mano, te vas a tardar 2 días, son demasiados tornillos...La parte del techo, no cuadra, así que tuve que hacer un par de perforaciones...
A**L
Pésima calidad
No compren este producto. Carísimo, pésima calidad, quién lo armó se cortó pues de muy mala calidad la lámina. Lamentable.Ni se puede poner en el exterior pues se va a oxidar.
E**C
No hubo sorpresas es lo que se ofreció.
Es un gabinete con muy buena relación calidad/precio. Hay que armarlo y si se hace con cuidado es fácil aunque laborioso. Se requieren necesariamente dos personas para el armado y todas las piezas coincidieron sin necesidad de hacer nuevos agujeros. Algunas láminas llegaron un poco golpeadas pero para el uso que se les va a dar no representan ningún problema. Se pueden enderezar fácilmente.
D**S
Bueno con pequeños detalles
El precio es accesible, el cobertizo realiza su función. Doy cuatro estrellas porque varios orificios de las piezas no coincidían y tuve que realizarlos con un taladro para hacerlos coincidir. Cabe señalar que seguí el manual al pie de la letra.
Trustpilot
2 weeks ago
4 days ago