
DOWNLOAD THE APP


Customer Services
Copyright © 2025 Desertcart Holdings Limited
DOWNLOAD THE APP
🌬️ Elevate your comfort game — smart, silent, and seriously efficient.
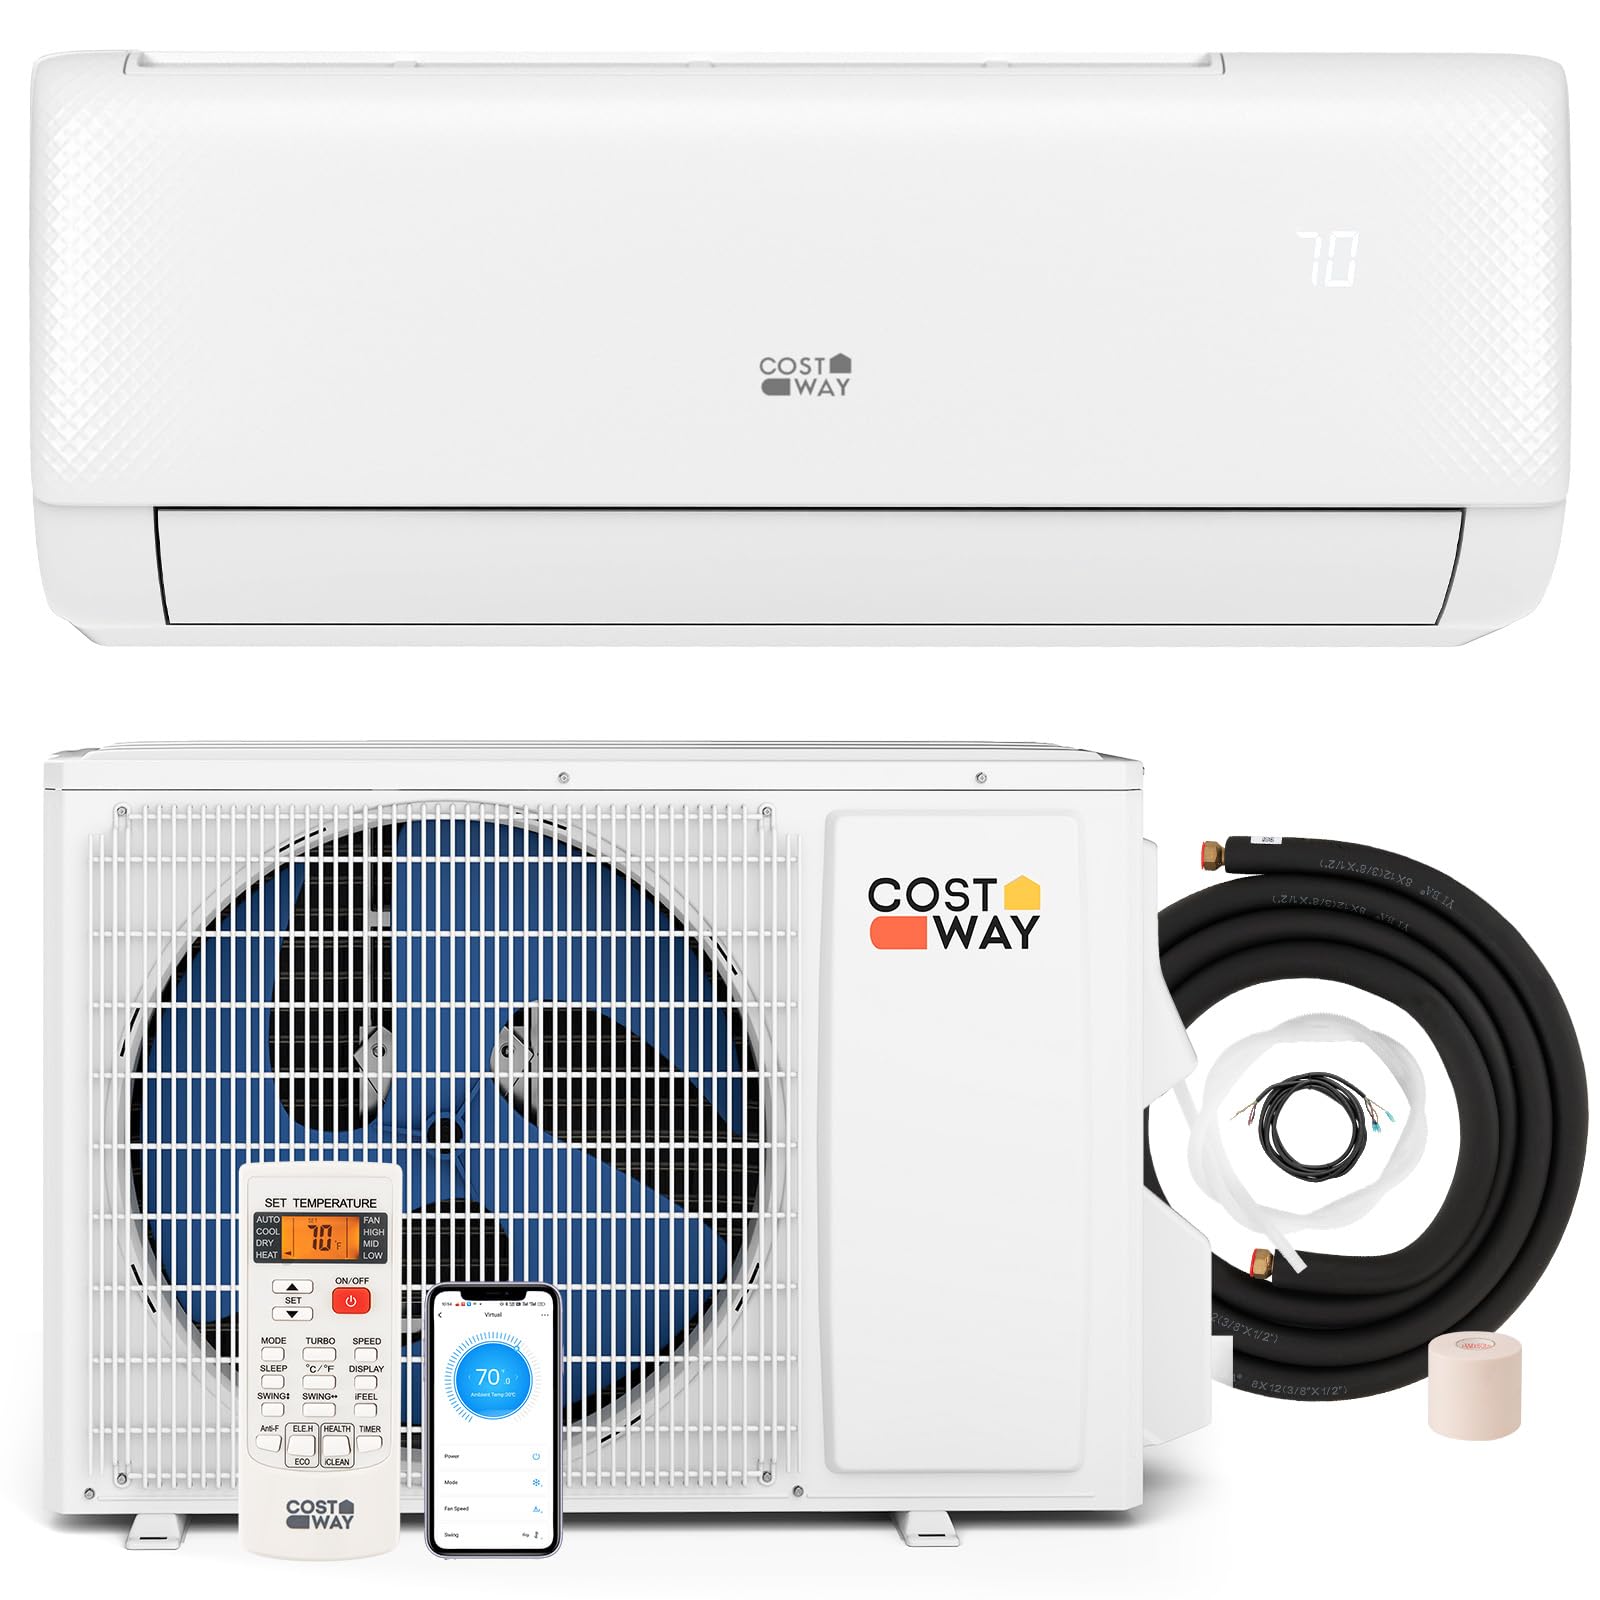
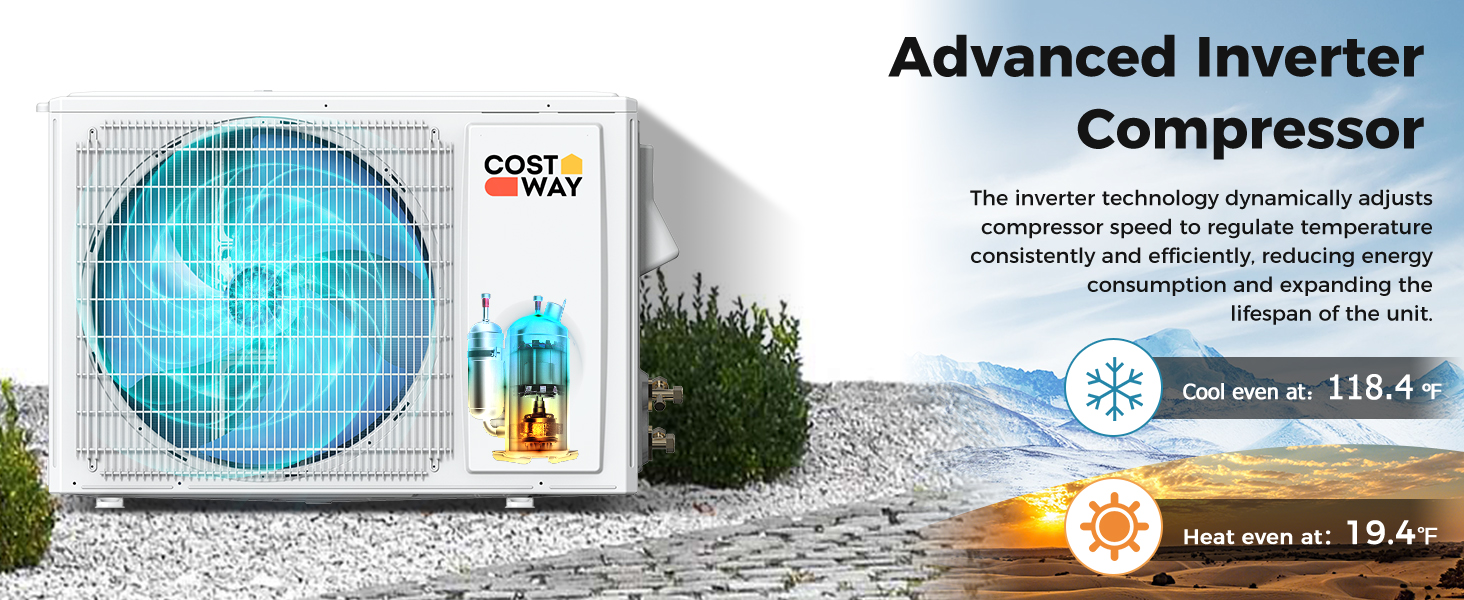
The COSTWAY 9000 BTU Mini Split Air Conditioner with Heat Pump combines high-efficiency 20.5 SEER2 inverter technology and whisper-quiet operation to cool or heat rooms up to 450 sq.ft. Featuring smart app and voice control, 4D auto swing, and advanced self-cleaning functions, it offers year-round comfort with minimal maintenance. Certified for quality and backed by an 8-year compressor warranty, this sleek, energy-saving unit is ideal for modern living and working spaces.


| ASIN | B0F38HY98Z |
| Annual Energy Consumption | 1970 Watts |
| Best Sellers Rank | #44,666 in Home & Kitchen ( See Top 100 in Home & Kitchen ) #3 in Split-System Air Conditioners |
| Brand Name | COSTWAY |
| Capacity | 0.76 Tons |
| Color | White |
| Customer Reviews | 4.4 4.4 out of 5 stars (1,761) |
| Date First Available | April 1, 2025 |
| Efficiency | High |
| Floor Area | 450 Square Feet |
| Form Factor | Mini-Split |
| Included Components | Mini split |
| Installation Type | Split System |
| Item Weight | 23.5 pounds |
| Item model number | 10153-CYJV |
| Material Type | Metal, Aluminum, Copper, AS |
| Model Info | 10153-CYJV |
| Noise | 23 Decibels |
| Part Number | 10153-CYJV |
| Product Dimensions | 30 x 8 x 11.5 inches |
| Special Features | 4 Way Swing, Fast Cooling, Heating & Cooling Function, Inverter Compressor, Remote Controlled |
| Voltage | 115 Volts (AC) |
| Wattage | 1300 watts |
P**S
Impressive performance and reasonably priced; very quiet and efficient
After I finished installing and running it, I must say that I'm very satisfied with the purchase and the quality and results achieved from this item. Using only 120 volts the system runs nearly silently, while the amount of air discharged by the vent is very significant. It took watching a few different videos to fully comprehend the task at hand, but I took my time and went step by step, making one significant exception that I thought could be helpful in colder months, so I routed the condensate drain line on the inside of our garage, and at the bottom I coupled it with some CPVC parts and ran it through the exterior wall so the drain is outside. I did this because in my experience, drain lines can freeze up solid in very cold temps, and shut down a system.....it's happened to me more than once. This way the drain is only really exposed just a few inches outside the fully insulated exterior wall, and should be able to resist freezing.......we'll see how that works out. I used a solid stainless steel support bracket which was tricky to install, since the side to side dimension is inflexible and related to the width between the legs of the outside unit with a very small margin of error allowed. It worked out fine and I was able to give it 10 inches of air space in the back to the wall, enough for proper efficiency of the unit, and also to provide a hidden "alcove" for the coil of lineset that I left intact as it came from the factory. It looks fine, especially since I ordered a "cover kit" for the exterior line set for a neater appearance. I also ordered a sleeve through the wall which I cut to length and caulked in place prior to passing the line set and communication wire through. (As I mentioned, I did not include the drain hose in that bundle) The most apprehensive part was the installation of a new 20 amp circuit at the panel box, which was quite easy after I digested the videos online that clearly depict a safe method of doing that. Using 12-2 copper wire, I fed the circuit partly through the wall, then out and down the inner wall surface before exiting outside to a non-fused quick-connect box that I picked up at Home Depot. The final challenge was to acquire a vacuum pump and manifold gauge set for just over $100.00 to fully evacuate the low pressure side to vent any moisture or unwanted gases, prior to firing up the system. It allowed for a one hour leak-check after shutting the valve at the manifold and turning off the pump after it was given 25 minutes to do it's thing. I feel that I learned quite a bit about some tools and techniques that I was unfamiliar with, but was willing to digest and understand through careful selection of "how-to" videos readily available online. Installed yesterday, it runs great and I love the way it silently moves the air flow up and down as well as from side to side with motorized vanes in the blower compartment. Finally, I can work in my fully insulated garage in comfort year round. I hope the heating is adequate, but in the last year, I found a single small space heater was sufficient to raise the temperature in my garage by enough degrees to make it warm enough to work in comfortably, so if the Split unit isn't very good at heating, as I suspect it will be, I can easily supplement the warming by a simple space heater to easily make it comfortable in winter. I would add that build quality was very good, and was surprised by the amount of pressure released from the smaller high pressure copper line tube when I readied it for connecting with the longer line set to take the line down the exterior to the condenser unit. That indicated that the interior unit's plumbing was air tight from manufacture to my installation, which shows the build quality of that piece. Similarly, the charged condenser was also airtight and with simply using hand wrenching without torque-indicator tools, the system proved easy to connect and insure proper leak free system. I would say that the only possible addition to the system that I would recommend would be to have a simple "on-board" control pad at the inside unit as a failsafe if the remote failed to work properly. But the remote works perfectly so far, so maybe that would just be a waste of resources and just raise the price. For clarity, my unit offered 12,000 BTU's and runs on a 120 Volt 20 Amp circuit. I spent about 595.00 on the Split A/C unit (incl. shipping), and 36.00 on the triangular stainless support bracket, 33.00 on the line cover kit, 23.00 on the thru wall sleeve kit, 10.00 on a 2.5" hole saw, 54.00 for the manifold gauge set, 55.00 on the vacuum pump, for a total of 806.00 (not incl sales tax)......I wasn't thrilled that shipping for the Costway unit was 99.00, but I guess it's a fairly large and somewhat heavy item to ship. (came in two pieces over 2 days apart) So, that's the story, and I'm 'stickin' to it', as they say.
S**S
The customer service is top notch.
I bought the 18,000 BTU (220V) mini split for my shop. The shop is 1,000 square feet, has insulated walls, but no drywall or insulation on the ceiling. It is open to the attic, so I don’t have the most efficient insulation in the shop. That being said, this unit works very well and keeps my shop comfortable on even the hottest days. It routinely gets into the high 90’s where I live and this little unit seems to be up to the task of cooling my shop. It is so quiet that I can’t hear it running from the other side of the shop. It’s quiet, but it also puts out a lot of air flow. The build quality is better than expected and so is the performance. I was able to DIY this project having very little experience with home HVAC systems. First was the electrical. I located the units as close as I could to the breaker panel in my shop so I didn’t have to run a lot of wires. I used 14/3 romex and installed a disconnect box outside that feeds power to the outside unit. Here is the disconnect box I used. It was about $25- https://www.amazon.com/dp/B000H5YAD6?ref=ppx_yo2ov_dt_b_fed_asin_title Mounting the inside unit is easy with the included cardboard template for marking the holes/drilling. The bracket for hanging the inside unit is included, but you do not get a bracket for the outside unit so if you want to hang it on a wall you will need to buy a bracket or make one yourself. I used this bracket that cost about $35- https://www.amazon.com/dp/B07B77C8T6?ref=ppx_yo2ov_dt_b_fed_asin_title&th=1 You will need a holesaw to make a pass-through in the wall for the refrigerant and between unit electrical wires, as well as the drain. I did my drain separately for a number of reasons that aren’t important here. Once both units are mounted you have to run the wiring and the refrigerant pipes between the two units. Be careful when bending the larger copper refrigerant line because it will kink fairly easily when you are not being careful. I ended up removing the insulation and using a bender that would normally be used for bending steel electrical conduit. I already had that and you might not need it if you are patient and work slow. Bends in the larger copper tubing need about at least 6’-7” radius to avoid kinking. Once you are happy with the large line, the smaller line will easily conform to the same shape because it is less prone to kinking on bends of the same radius. Probably the most intimidating aspect of the install was the need to evacuate the air from the system after completing all of the plumbing. I thought I could rent a vacuum pump and gauge set from Autozone, but I wasn’t able to make that work because the fittings are incorrect. Not finding anything that would work for rent locally, I just bought a vacuum pump and gauges from Amazon for about $120 - https://www.amazon.com/dp/B079JJSFQW?ref=ppx_yo2ov_dt_b_fed_asin_title&th=1 With the correct vacuum pump and gauges, I was able to easily apply a vacuum for 15 minutes until it was completely evacuated. Then I buttoned everything up, flipped on the breaker and hit the power button on the included remote control. The unit hummed to life and started blowing cold air in seconds. I did have a small issue with one of the plastic components that was included in the system. I called the support telephone number on a Sunday afternoon and was able to speak to someone right away. Even being hard of hearing, I had no trouble understanding the nice lady with a faint accent. She asked for my order number and told me they would be in touch within 24 hours. Later that day I got an email from them asking me for a photo of the problem. I sent the picture and then the next day they emailed me again saying that the part is on the way to my address and it should be there in 12-15 days. The part actually arrived in 6 days and everything is fixed and operating smoothly. I don’t give out 5 star reviews unless I feel the company really deserves 5 stars. In this case, the customer service after the sale was so good, they earned more than 5 stars. Great company, and they stand behind their products.
A**R
Best mini splits I've installed so far at 1/3 the price.
Amazing units! I purchased two of these 12000BTU 22SEER units in August. They performed very well at !00*F and are performing great today at -3*F. I cant believe this is producing heat at this temperature and using only about 1000W to do it. The electric radiant heater this replaced uses 1500W and couldn't keep up. This mini split has no problems at sub zero temperatures. I've had other brands of mini splits that were triple the price and didn't perform nearly as well.
L**E
Installed 2 units in the last couple weeks. With minimal planning each one took about 4 hours. Very simple and they work great so far
D**E
I'm speaking on two units I just installed over the past two weeks so this isn't a full "reliability over time" review. As described, the units arrived in two boxes each (the indoor unit with it's bits in one box and the other bits in the outdoor box). Since the units are economically priced and the performance ratings seem quite good, and I only need heat in the shoulder seasons before I switch to full on wood heat (vs the $$$ electric forced air), they seemed to fit the bill. The heating comment is based on the notes that these will work down to -10C (14F). I don't know if that means the units will cease to work or if they will lose efficiency, time will tell. With all that, I decided to do the install myself. Here is where you learn about vacuum pumps, gauges and oil (another ~$200), electrical cutoffs, codes, etc. Did my research before I ordered and the work involved seemed to be straight forward, including running 12/2 wire and conduit (and a new breaker / etc). Following various install videos and a chat with an HVAC buddy of mine, I quickly determined the best approach and took it, and here's what I learned: - the 2" hole required is going to be a tight fit, so when wrapping with the vinyl, make it tight. If one goes larger than 2", note that the wall cap cover isn't going to fit (as it's 2") and the larger hole will require more filling. - the drain hole in the bottom of the outdoor unit is 25 mm, and if you cannot drain directly out, you will need some extras for it (note the size). I installed my units onto a wood deck so I didn't want the water just running wherever so I did this bit of extra, and here is where you need to know the size, which is in the manual - One has to remove all the plastic protective shipping covering from the indoor head to get the tape off, which has to be done to install the com wire. Make sure to take care when handling afterwards to not mark up the plastic. Once the connections were made, line sets torqued to spec, vacuumed for 15 minutes and vacuum leak checked via gauge, everything in place and electrics connected, only then I opened the valves to release the R32 gas and pressure checked all the fittings again for leaks ( with a 50/50 soapy water solution). Verifying no leaks, time to throw the power. LEDs lit up and with some batteries in the remote, I had the unit pumping out heat within minutes of turning on the main power. The units so far work as planned. The heat stability in the house is better than ever (haven't had to cool with them yet, may update after next summer). They are very quiet, even the outdoor units are near impossible to hear inside, and outside it's mostly a whirring fan sound. Now, why the support comment? One outdoor unit arrived in a damaged box, which I didn't notice until after the delivery guy was long gone. When I opened the box, I noticed that the unit had a considerable dent on the business end (connectors / electrics / control unit). I contacted Costway via the Amazon contact process, complete with explanation and photos of the box and the unit, and in less than 24 hours they had a new outdoor unit on it's way. If I could complain about anything it would be the nearly two weeks to wait for the new unit (same time to get the original one). However as I was not intending to install them right away (and I had one good unit to install currently) and Costway DID CHECK to see if the time to receive it was OK, and it was so I'm not faulting anyone. So far so good, and time will tell. At this stage I'm recommending my friends and family to consider these units as I now know what is involved for the install, and they work well (they are quiet and throws heat, cooling shouldn't be an issue, and reasonable to install with what's provided).
L**T
The 12000BTU Mini Split Air Conditioner & Heater is a versatile solution for cooling and heating spaces up to 750 sq. ft. With a 17 SEER2 rating, it ensures energy efficiency, saving on utility bills. Its inverter AC with a heat pump provides both cooling and heating capabilities, offering year-round comfort. The wall-mounted ductless design is convenient and space-saving, ideal for various room setups. The included installation kit streamlines setup, ensuring a hassle-free experience. Users praise its efficient performance, rapid cooling/heating, and relatively quiet operation. However, some note that installation may require professional assistance due to its complexity. Overall, it's a reliable option for maintaining comfortable indoor temperatures efficiently.
D**G
It is great heat pump,
R**N
Easy to install, great price, heats quickly
Trustpilot
3 weeks ago
2 weeks ago