
DOWNLOAD THE APP


Customer Services
Copyright © 2025 Desertcart Holdings Limited
DOWNLOAD THE APP
🌤️ Own your microclimate — be the neighborhood weather guru!
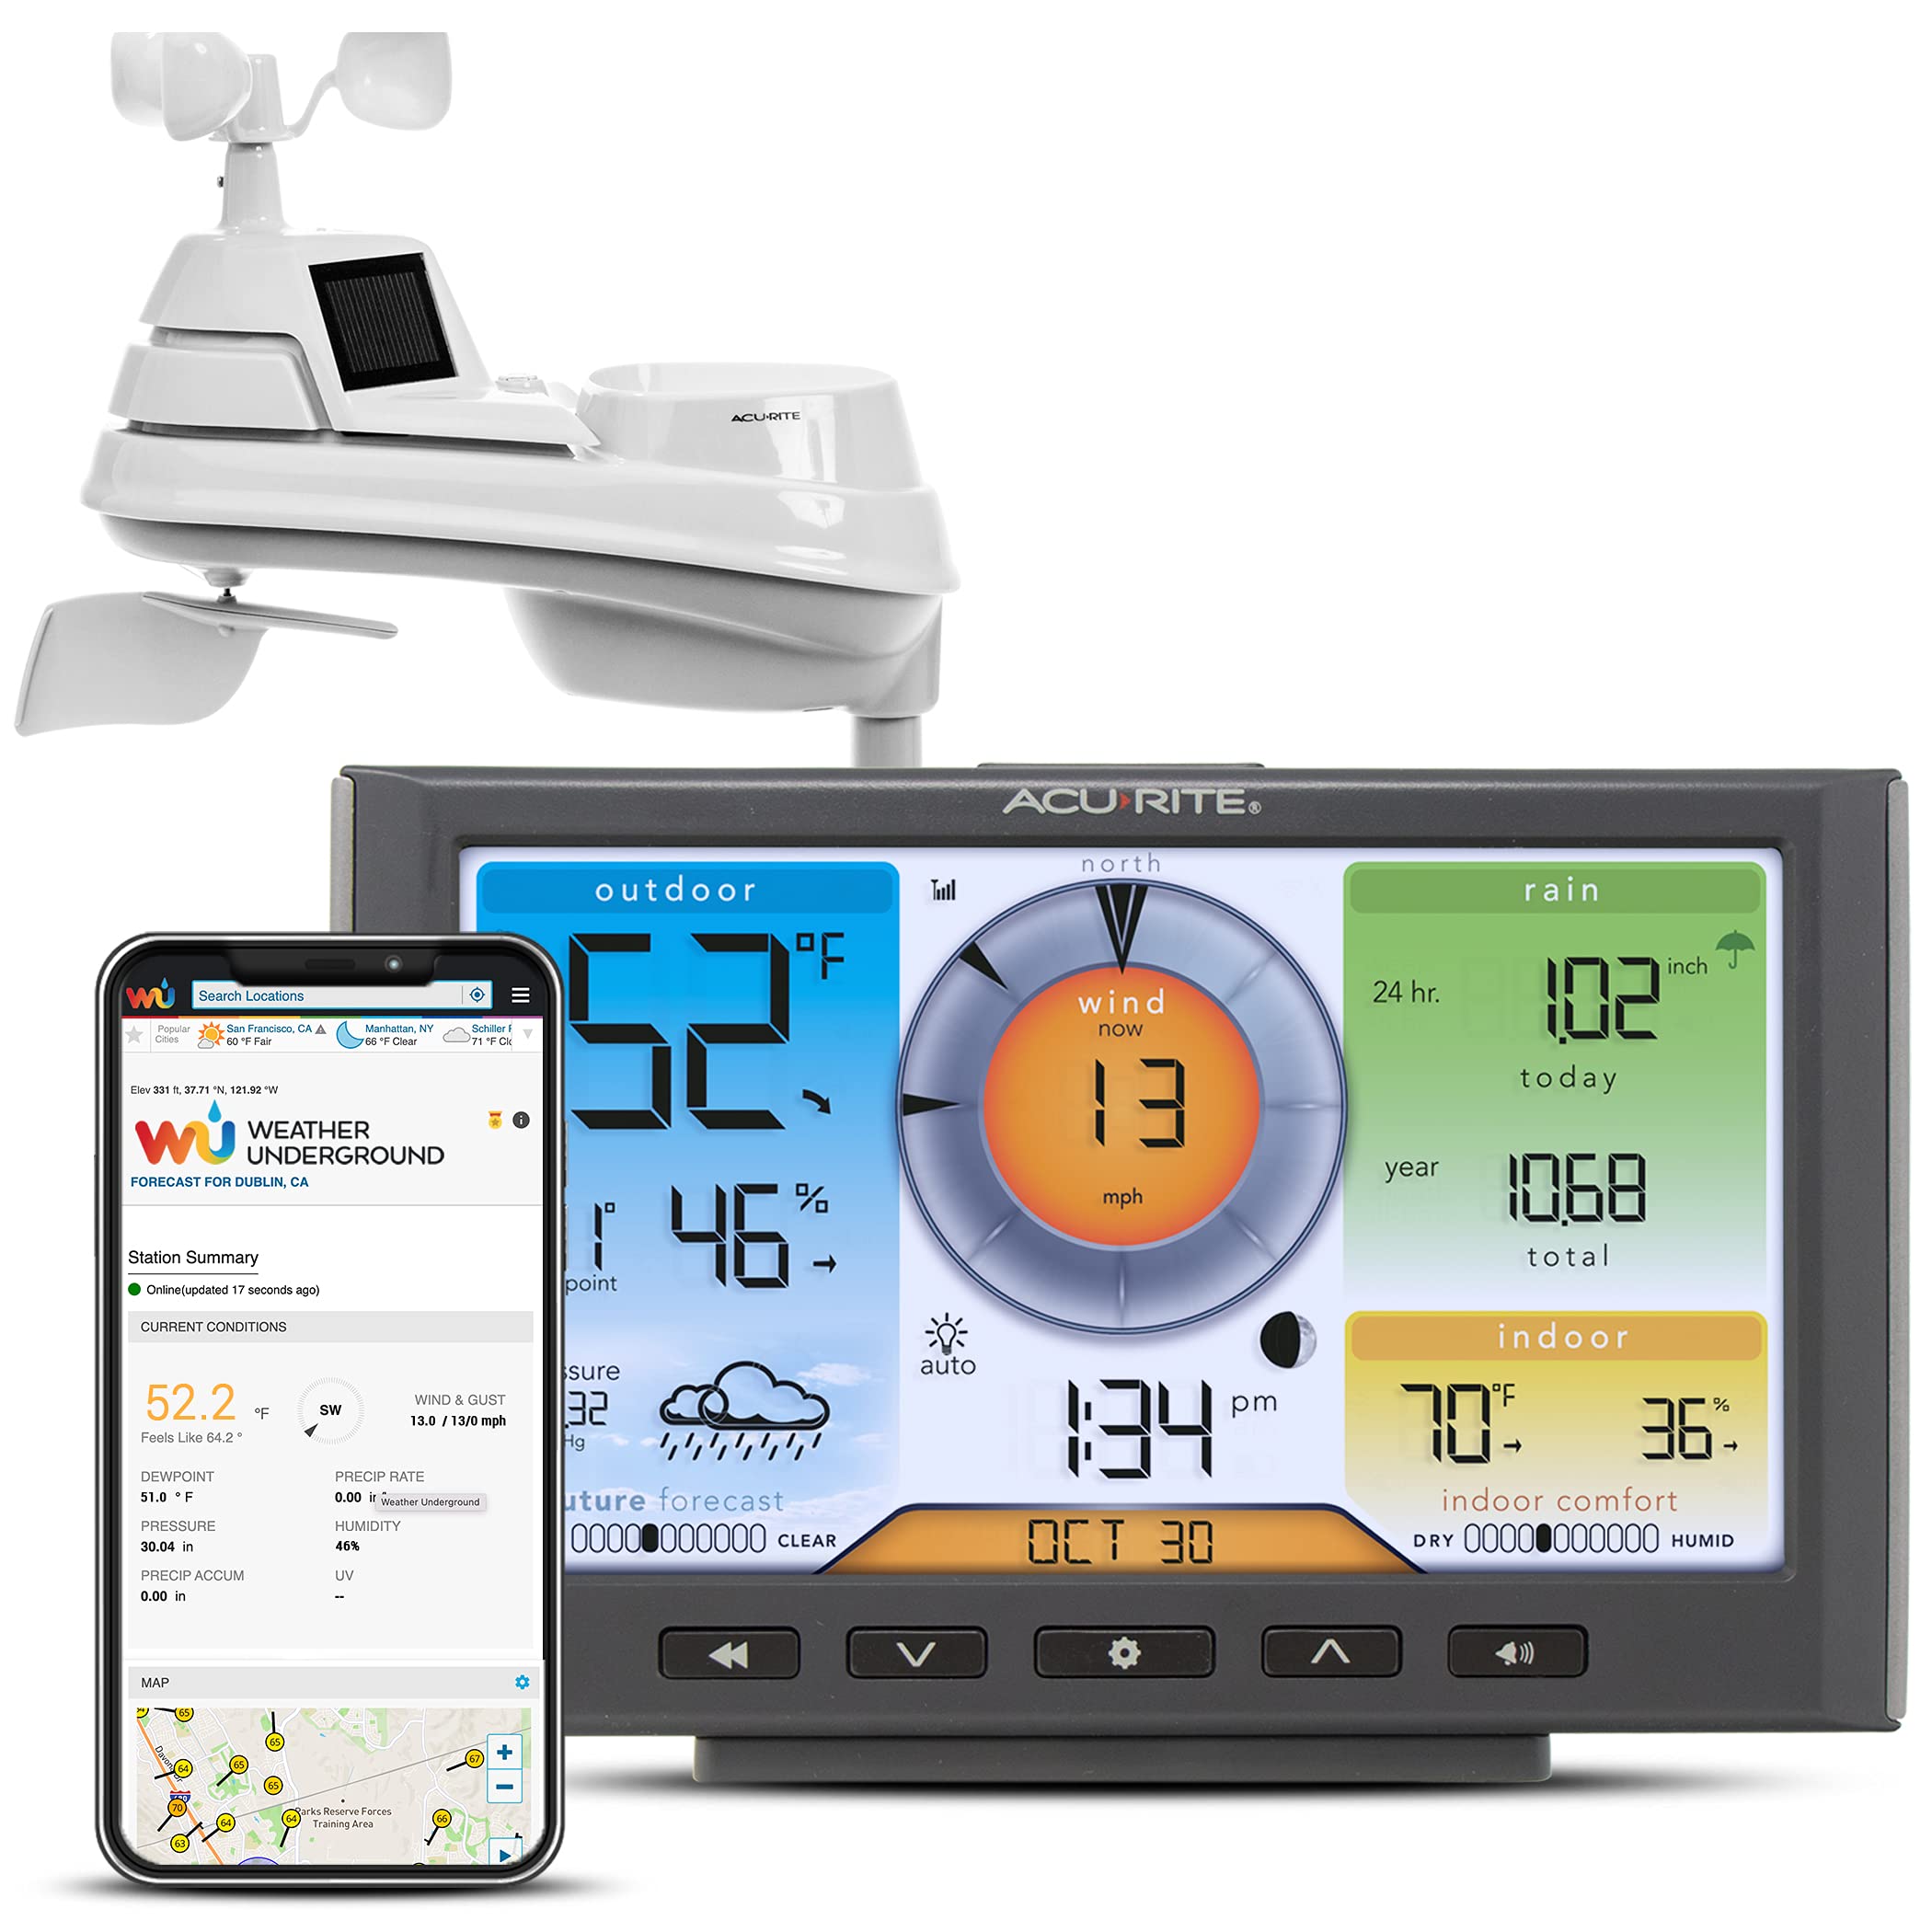
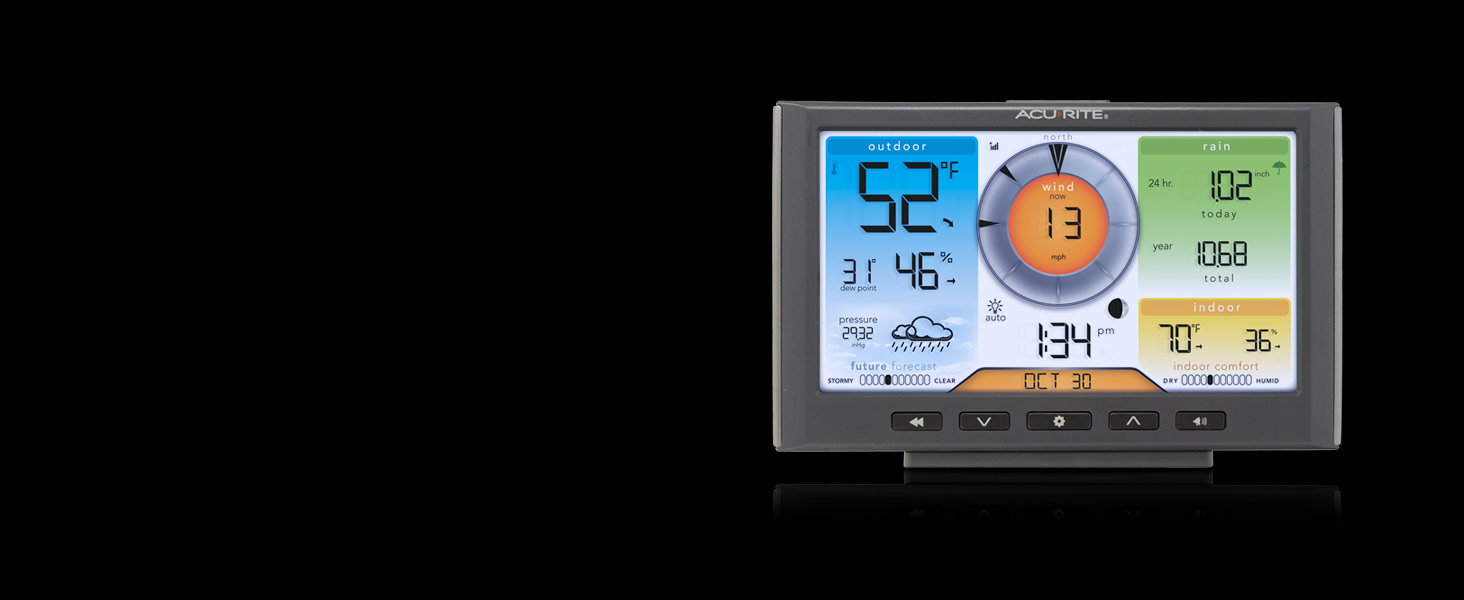
The AcuRite Iris 5-in-1 Home Weather Station delivers hyperlocal, real-time weather data including temperature, humidity, wind speed/direction, barometric pressure, and rainfall. Featuring a vivid color LCD display with adjustable brightness and Wi-Fi connectivity to Weather Underground, it enables remote monitoring and data sharing with a global community. With over 25 weather metrics, customizable alerts, and a personalized 12-hour forecast, this wireless, battery-powered station offers professional-grade insights in a sleek, easy-to-install design trusted by experts and enthusiasts alike.


| ASIN | B07D9D6CXW |
| Are Batteries Included | No |
| Batteries required | Yes |
| Best Sellers Rank | #8,550 in Patio, Lawn & Garden ( See Top 100 in Patio, Lawn & Garden ) #21 in Weather Stations |
| Brand | AcuRite |
| Color | Wi-fi Connection to Weather Underground |
| Connectivity Technology | Wi-Fi, 433 MHz |
| Customer Reviews | 4.0 4.0 out of 5 stars (3,592) |
| Display Type | LCD |
| Finish Type | Matte |
| Finish types | Matte |
| Global Trade Identification Number | 50072397015405 |
| Included Components | Power Cord |
| Item Weight | 0.01 ounces |
| Item model number | 01540M |
| Lower Temperature Rating | 32 Degrees Fahrenheit |
| Manufacturer | AcuRite |
| Material | Plastic |
| Power Source | Battery Powered |
| Product Dimensions | 0.6"D x 7.6"W x 5.5"H |
| Recommended Uses For Product | Home |
| Sensor Technology | Wireless |
| Shape | Rectangular |
| Special Feature | Adjustable Brightness, Clock, Pre-Calibrated, Weather Resistant, Wireless |
| Specific Uses For Product | Heat Index |
| Style | Wi-Fi Connection to Weather Underground |
| Temperature Accuracy | +/- 2 degrees_fahrenheit |
| Temperature Reading Accuracy | plus_minus_2_degrees_fahrenheit |
| Upper Temperature Rating | 122 Degrees Fahrenheit |
| Warranty Description | 1-year limited manufacturer warranty. |
R**A
Step by Step instruction to setup the WiFi connection With Update
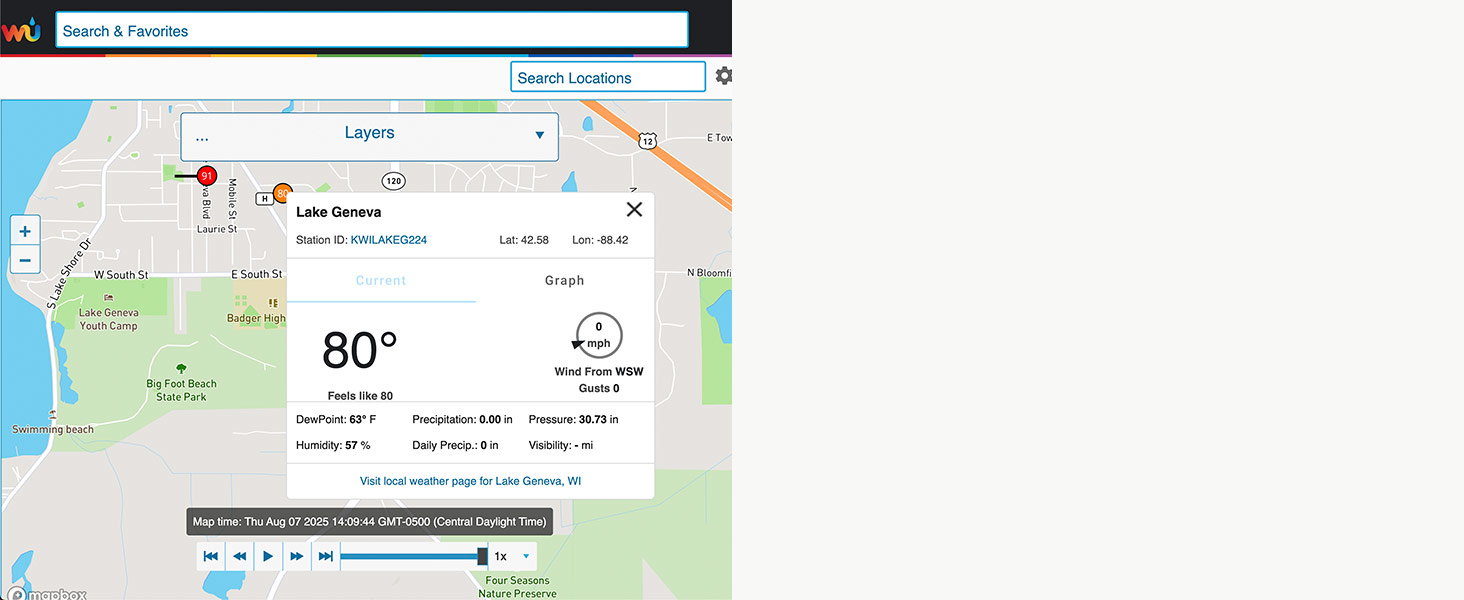
It appears a lot of people are having difficulty connecting the Display unit to their WiFi. Just follow these instructions and it should work for you. Setting up this weather station is not that difficult. Just READ THE DIRECTIONS! Connecting to the WiFi just requires a gathering some information before you start the WiFi setup. First go to Wunderground.com and either login or create a new account. Go to 'My Profile' you will see a Tab labeled 'MY DEVICES', click on that Tab. Then click on the 'Add New Device' Button. Select 'AcuRite 5-in-1 Weather Station with WiFi' from the drop-down list. Then click on the 'Next' button. The next screen will display your Station ID and Station Key. Copy down this information, you will need this information BEFORE you start your WiFi setup Use these two values for the Wunderground Station ID and Wunderground Key when you have connected to the AcuRite WiFi. WiFi Setup Press the Gear button on the display. This will turn on the AcuRite Wifi for a few minutes. The instructions state it will be on for 30 minutes, but actually it's a much shorter time. Connect to that WiFi, go to a browser and enter in the IP Address 192.168.4.1 A webpage will display, enter in your WiFi name and password. Then below that enter in the Wunderground Station ID and Wunderground Key that was generated from Wunderground.com Now on the same page, near the bottom, click on the 'Save' button. The screen will change with a message stating to wait a few minutes. After a short time, the screen will change stating you have successfully connected to your WiFi. At any time you need to start the AcuRite WiFi, just press the 'Gear' button on the display. Don't forget to reconnect to your WiFi once you have completed the above. AcuRite App From the menu go to Setting, Manage Devices. Click on the 'Add Device' button. Enter the name for this device (i.e. Home). Enter the Device ID. The Device ID is found on a white label in the battery compartment when you remove the battery cover on the Display unit. Select your Country and add your Zip Code. Now follow the 'Next' button a few more times to setup that device. Your done. ************************************************************************************************************************ Update: I've had this PWS for a month. It's performance has been flawless. The connection to my WiFi has been rock solid. The only time it was not sending data was when my internet provider performed service on our connection. We were without internet a few hours. As soon as the our internet connection was reestablished this unit reconnect to our WiFi and begin transmitting data again. Within a few days of installing this, Weather Underground attached a Gold Star to the account for consistent reporting and consistent data. We've already had high winds here. The unit has set me numerous high wind warnings to me. I have the high wind warning set to 25 mph. So far our highest recorded wind speed has been 32 mph. I'm very pleased with the performance of this unit.
J**H
Great weather station
I am pleased with the new unit. I had a previous Iris 5-in-1 from about 2019 which I loved, but it was starting to have problems. With the new unit, the wind speed on the sensor was not working. AcuRite took care of it and sent me a new sensor via overnight, which was much appreciated. Everything now working. I really like the wifi connection and the app on my phone. For future improvements, it would be great to also have access to the inside temperature on the app when we are traveling, although I have a new "smart" thermostat that should do it, but have not yet installed it. The new unit also shows the strength of the signal from the sensor, which is great.
A**H
Very satisfied so far... although set up to the wifi can be a PAIN!!! (instructions below)
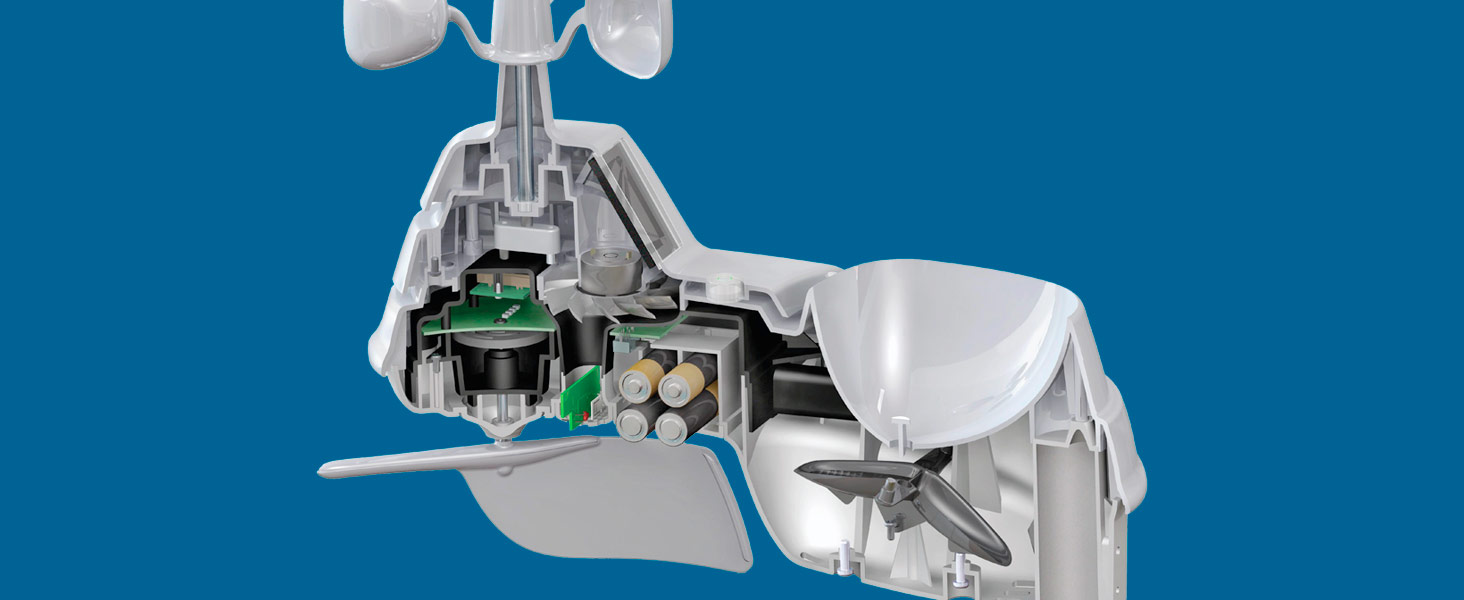
Display has all the good information needed. Scrolling thru the history is simple also. The multi-lighted screen is a nice option. Keeping the temperature is good (but we needed to calibrate it!) What is a pain is getting it all setup. It is not PLUG IN PLAY! I had to adjust the temperature to be accurate (which can be tricky if you do not have something with the correct) . Waiting for it to rain to see how it tracks. Also, if the rain gauge is bumped, it may not register rain correctly. I suggest getting it all set up in its spot before adjusting any settings. Unfortunately, I have had to do a "reset" (button by batteries) many times going through the setup process and troubleshooting things. Wish I could just reset the daily rain totals and not the whole thing. I believe you can reset the week/ month/ yearly total but not the daily. LOL TO ADJUST TEMPERATURE - Hold the arrow up/ down and gear icon at the same time. Hold for about 8-10 seconds and release. - Only the temperature will show. - Use the up/ down arrows to adjust accordingly. - Push the gear to go to the next temp or precipitation that you want to adjust. - Once done leave it alone and it will go back to standard display screen TO CONNECT YOUR DISPLAY TO YOUR WI-FI: -From a smartphone (recommended), tablet, or Wi-Fi-enabled computer, open an internet browser and type 192.168.4.1 in the URL - DO NOT PRESS ENTER NOTE: Please make sure that you are near your AcuRite display unit for the strongest connection during the following steps. -Open the network tab and click on the AcuRite Wi-Fi Display Model Number. NOTE: The network tab is located in the bottom right corner of your computer screen on the taskbar, as shown below. If using a smartphone or tablet, you will need to access the Wi-Fi settings to view the list of available Wi-Fi networks. NOTE: If you do not see the display model under your network tab, please reset the display by pressing and holding the RESET button for 10 seconds, located in the battery compartment of the display. The date and time will need to be entered after a reset. -Press the connect button for the network that includes the Display Model Number. NOTE: This will disconnect your computer/device from your internet and the display's network may also say No Internet, as shown below. -After 20 seconds, go back to that prepared browser that has 192.168.4.1 typed in the URL and press enter. -Once the AcuRite Wi-Fi display settings website (splash page) is open, select your Wi-Fi network's SSID from the dropdown (if you have a 2.4 GHz and a 5 GHz, be sure to select the 2.4 GHz), enter your Password, Station ID, and Station Key, then click save. NOTE: If you are unable to open the AcuRite Wi-Fi display settings website after connecting to the display, disconnect from the display under the network tab, open a different internet browser, enter The IP address 192.168.4.1 into the URL but DO NOT PRESS ENTER. Connect to the display under the network tab and wait 20 seconds before clicking enter on the internet browser with the IP address entered. NOTE: If you receive an error stating that "This site can't be reached", please make sure that you are still connected to the AcuRite network and not your home Wi-Fi network. If your device automatically reconnected to your home Wi-Fi network before you were able to reach the AcuRite Wi-Fi display settings website, please have your device forget your home Wi-Fi network so that it will stay connected to the AcuRite network. -Your Wi-Fi Display unit is now connected to your Wi-Fi network! -First, reconnect your device back to your home Wi-Fi network if you are still connected to the display's Wi-Fi. Often times your device will automatically reconnect to your home Wi-Fi after completing the setup. Your station should come online on Weather Underground within a few minutes. (We recommend allowing at least 20 minutes for the station to show as online if it doesn't show up right away.) ACURITE IRIS® (5-IN-1) TEMPERATURE READING TOO HIGH (CHECK THE FAN IS WORKING) -Remove the four outer screws on the bottom of the sensor. Keep the screws for re-assembly. Note: Be careful not to remove or adjust the rain calibration screws located beneath the rain gauge. -Separate the upper and lower halves of the sensor. -Check the fan for debris, such as insects or spider webs. A gentle puff of air can clear most obstructions safely. -If no debris appears to be blocking the fan, position the top white portion of the sensor (that has the solar panel) in direct, bright sunlight. The fan should power on immediately without any assistance (such as a nudge). Note: Artificial light, such as flashlights, cannot be used as a substitute for actual sunlight. Also, overcast days may not be sunny enough to power on the fan. To reassemble the sensor, bring the two halves of the sensor back together. Reinstall the four outer screws to join the upper and lower portions of the sensor together.
E**N
Lots of good info! Easy set up
I’ve been wanting one of these for a while. Easy to set up and connect to Weather underground. Cross checked it with an older weather station and it was accurate. It took a little bit to calibrate the rain gauge but only had to make minor adjustments. Going strong for a month so far! The display is nice and bright and easy to read.
K**R
Solid product with many mounting options. The only thing I would have liked to have seen is rechargeable batteries in the unit (using the solar panels to keep it charged). Wi-Fi connectivity is fiddly but it works.
A**Z
Es sumamente sencillo de instalar y usar, lo utilizo a bordo y en casa para lo q fué creado.
J**E
Funciona bien
B**Y
Adjusting the wind direction "vane" involves lots of force, luckily i didnt break it. Wifipasword lengh is limited to 31 characters by setup program to configure monitor to send info to WU.
Trustpilot
1 week ago
3 weeks ago