Stay Cool, Stay Connected! 🌟
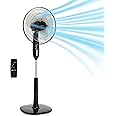
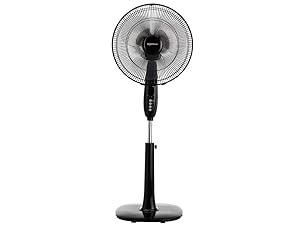
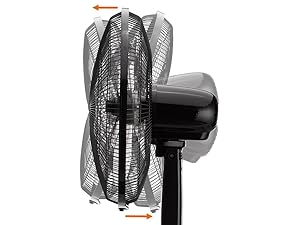
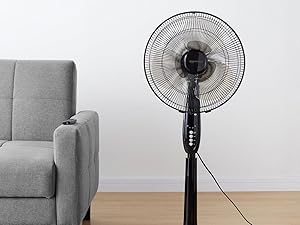
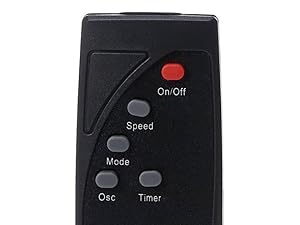
The Amazon Basics 16" Pedestal Fan is designed for medium to large rooms, featuring a powerful yet energy-efficient 60W motor. With 3 speed settings and 3 breeze modes, this fan ensures personalized comfort. Its adjustable height and tilt head allow for customized airflow, while the remote control offers convenience from anywhere in the room.


| Item Weight | 12.3 Pounds |
| Item Dimensions D x W x H | 15.75"D x 17.72"W x 53.15"H |
| Voltage | 120 Volts |
| Switch Type | Pull Chain |
| Indoor Outdoor Usage | Indoor |
| Control Method | Remote |
| Efficiency | energy-efficient |
| Is Electric | Yes |
| Number of Power Levels | 3 |
| Number of Speeds | 3 |
| Wattage | 60 watts |
| Number of Blades | 3 |
| Power Source | Corded Electric |
| Room Type | Bedroom |
| Additional Features | Oscillating, Remote Controlled, Adjustable Height, Adjustable Tilt, Timer |
| Recommended Uses For Product | Cooling, Air Circulation |
| Mounting Type | Pedestal Fan |
| Controller Type | Remote Control |
| Finish Types | Powder Coated |
| Electric Fan Design | Floor Fan |
| Style Name | 3-Speed AC Motor Fan |
| Color | Black |
| Blade Material | Plastic |
| Material Type | Metal |
G**L
Review after 18 months
I've been using this fan for over a year, and it's been excellent the entire time. The airflow is great while also keeping itself relatively quiet at the same time. The fan doesn't take too much space, and the base of the fan has a slightly smaller footprint than most other fans. The plastic for the fan is of nice quality and I can comfortably adjust the fan's height/tilt without it feeling like it's about to break, unlike some other pedestal fans I've used in the past. The assembly for this was easy and straightforward, and the front grille is easily detachable for cleaning. I've used this fan in different rooms of varying sizes, and it always performed well when cooling, even in large rooms. The fan isn't exactly low wattage, with a peak of 50–60 watts, but it's lower than most other 16" fans with AC motors, which typically peak at a range from 60–100 watts.For an Amazon Basics item being under $50, this really is an exceptional fan. I'd recommend it to anyone who is looking for a reliable and budget-friendly fan.
M**S
Excellent choice
Only had it for one day, but very impressed. It was easy to assemble; can probably do it without reading the instructions. The fan is quiet even on the fastest speed. It doesn’t appear cheaply made, like some other Amazon basic items. I also appreciate the remote considering how basic the fan is. I rarely give 5 stars for anything, but ease of use, the design, the remote and quick assembly, it’s worth it.
A**L
Best fan I’ve ever had, super strong and cooling!
I’ve had several fans in this style before but this one is the most strong, cooling fan I’ve ever used! It must be because it has the extra little fan blade in addition to the regular big fan blade. I have body temperature regulation issues and overheat very easily so this fan has been a huge game changer in my life! It’s especially been a life saver for when I work out because I tend to overheat so much when exercising. There has also been a heat wave for the past week with temps in the high 90s and low 100s, and I’m SO thankful I got this fan a few weeks ago because it’s keeping me so cool! My air conditioning was having trouble keeping up with the outside heat the other day when it was 105° and inside temp was 80°, I had this fan pointing directly at me on full blast and it kept me very cool.I love that there are different settings for the fan as well as the speed and oscillation. And I LOVE that it comes with a remote as I’m disabled and mostly bedbound so it’s very helpful to be able to change the settings from bed and not have to get up.Assembling it together wasn’t too difficult, the directions could use a bit more detail but I figured things out still. Also love the black color because white gets so much more dirty over time. The noise of the fan is pretty quiet which honestly I kind of like it when fans are loud because of the white noise effect, but I already have a white noise machine so it’s fine that the fan is pretty quiet compared to others I’ve had in the past.All in all I’m obsessed with this fan and it’s the best I’ve ever had!
C**W
Excellent fan for the money
Great fan for a normal sized living room. I have it 15 ft from me and on low it keeps my plenty cool. Low is super quiet. Medium and high do make some noise, but nothing like a box fan.Quality is just ok. No problems, but it's definitely not a heavy duty fan.Looks good too.
D**Y
Great value
With summer quickly approaching, I knew it was time to invest in a new fan. I had just relocated from out of state and was essentially starting from scratch when it came to household essentials. Knowing how hot it can get, I wanted to make sure I picked a fan that was reliable, efficient, and would hold up well through the season.I began researching various brands and models, comparing features, prices, and user reviews. Over the years, I’ve had consistently positive experiences with Amazon Basics and other Amazon-branded products, so I naturally gravitated toward them during my search. This particular fan quickly stood out and remained in my top three choices for nearly a month as I weighed my options. Ultimately, it was the overwhelmingly positive reviews combined with my past satisfaction with Amazon products that gave me the confidence to make the purchase.When the fan arrived, it did require some assembly, which I expected—especially since that's fairly common with furniture and appliances these days. Fortunately, the setup process was straightforward. The instructions were clear and easy to follow, and with only a few parts to connect, I had it fully assembled and ready to use in no time with minimal effort.Now that the warmer weather is in full swing, this fan has become an essential part of my daily routine. It’s on almost constantly and has done a fantastic job keeping my space cool and comfortable. The fan offers three speed settings, and I typically stick to the low or medium settings for everyday use. However, on those particularly hot and humid days, the high setting provides the extra airflow I need.In terms of noise, it’s impressively quiet. While the high speed does produce a bit more sound, it's nothing intrusive—it easily fades into the background. In fact, the medium setting creates a gentle white noise that I’ve found surprisingly helpful for sleeping at night.Overall, I’m extremely satisfied with this purchase. It’s well-made, performs exactly as promised, and has made a noticeable difference in my comfort during the hotter months. I would absolutely recommend it to anyone in need of a reliable, affordable fan.
Trustpilot
5 days ago
1 day ago