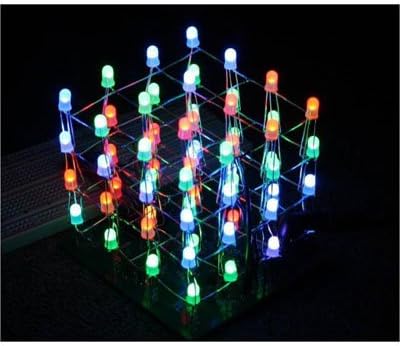
RGB LED Cube Kit 4x4x4
Product ID: 43103919
💡16 million colors
📦DIY assembly
🔌USB powered
✨ Light Up Your Life with Style!
The RGB LED Cube Kit 4x4x4 is a customizable lighting solution that offers 16 million color options and dynamic effects, powered conveniently via USB. Perfect for DIY enthusiasts, this kit allows you to create a stunning visual centerpiece in any space.
G**.
Great project! Very rewarding.
The media could not be loaded. I put this RGB LED cube kit on my wish list, and received it as a gift for Christmas. I am very pleased with the overall quality of this kit. This is the first LED kit that I have built- it is an ambitious project if you've never built one before. I have a lot of good hobby experience with soldering, so I was up for the challenge. Check out my video so you can see the cube in action.A few thoughts/comments that may be helpful for someone thinking about this kit:1) This kit is based on the work done by Asher Glick and Kevin Baker, and uses a technique called "CharliePixeling" which is a very cool way of controlling the individual LED's without adding too much complexity. The instructions explain some of the theory behind how it works.2) You can completely program your LED cube- as the kit comes with an Arduino Nano. 16 of the pins are used to control the LED's, but you will still have a few open/ available. I am planning to add a few switches to allow me to switch out to different programs or do things like change the color of the LED's.3) Be prepared to do A LOT of soldering, and very fine work at that. You have to make 16 "spires" of 4 LED's each. There are 4 solder points per LED. Then you have to solder it to the proto board to keep it in place. After that you have to run wires to each of the 16 spires, and connect them to the Arduino (it also comes with a socket, which the Arduino sits in so you can easily remove the Arduino if needed). If you aren't comfortable with soldering, get a lot of practice before taking on this project.4) You will need some additional components (about 40 feet of 24 gauge wire, 20 grit sandpaper, and I recommend extra LED's just in case. See below for more info.5) The instructions says it will take about 10 hours. I think that is a good ballpark, but it definitely took me a bit longer (I'm guessing around 14-16 hours). However, I was very careful with my soldering, and did some thorough testing as I went.Ways this kit could be better:1) It would be great to include the wire needed for this kit. Almost 40 ft of wire is needed- I didn't have enough laying around, so I had to get the wire that was listed in the instructions (24 gauge solid core hookup wire). I wanted my spires to be a little more solid, so I used a 20 gauge solid copper wire. It also gives the cube a nice "two tone" effect. 20 gauge wire is stiffer, but also more difficult to fit into the proto board.2) It would have been nice if the kit came with a 4 pack of extra LED's. I accidentally blew an LED out when testing one. I had to wait a few days for a replacement to ship out. If you are getting this kit, I'd recommend ordering some additional RGB LED's. Make sure they are 5mm and common cathode. I got another brand and they worked fine.3) Speaking of LED's- the instructions in the kit require you to diffuse each LED by sanding them down using 200 grit sand paper. This was probably the most time consuming part of the project, and was quite messy. (1-2 minutes per LED to sand, and there are 64 of those buggers...) It would have been better for the kit to have come with diffused LED's, which are only a few cents more per LED.4) The instructions with the kit are good, and I found the videos helpful. However, the links in the PDF for the source code did not work for me. I asked a question here, and the seller immediately answered with the link. If you google "Charliecube Asher Glick" you will find the code.
Trustpilot
4 days ago
2 months ago