🕒 Build it. Own it. Flaunt your tech savvy.
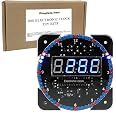
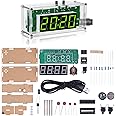
This DIY Electronic Clock Kit features a transparent case, digital display, and precise time and temperature measurement. It includes power-off memory, alarm, and light control functions, all designed for easy assembly with clear English instructions. Perfect for soldering practice and learning electronics fundamentals, it’s an ideal project for DIY enthusiasts and professionals alike.
| Item Dimensions W x H | 3.66"W x 3.66"H |
| Watch Movement | Automatic |
| Operation Mode | Electrical |
| Alarm Clock | Yes |
| Power Source | Corded Electric |
| Indoor Outdoor Usage | Indoor |
| Batteries are Included | No |
| Display Type | Digital |
| Special Features | Silent Clock |
| Theme | Funny |
| Shape | Rectangular |
| Dial Color | Blue |
| Style | English |
| Room Type | Usb |
| Color | Blue |
| Frame Material | Plastic |
| Material | Plastic |
J**E
A fun clock project
This is a great project to improve your soldering skills. The operating instructions need to be improves but assembly was easy.
A**Y
Nice kit
Good for the experienced builder. Would be challenging for a novice. Worked fine when completed. However, the temperature reading is low by 9 degrees. No way to calibrate the reading. Other than that everything is as it should be. Since I just completed the kit, no way to comment on clock time accuracy. Great value for the money spent.
D**E
It was a lot better than I thought at first glance.
At first the instructions seemed lacking. But the way the circuit board is labeled along with the instructions make it super easy. I have a modest level of experience with electronics and soldering and it wasn't difficult to understand the instructions. I think I spent about seven hours soldiering. But assembling the case was a challenge. Take your time and don't try to force the nuts into their slots, or you'll break the side piece like I did. Overall, a fun little project to work on my skills with a soldering iron.
M**.
Case parts dont fit
Nearly all aspects of this are great. The instructions are easy to follow. The PCB clearly identifies where things go and it works just as described. The down side is that the case doesn't fit and I think there was an error in the case parts sent because there should be side pieces that are tabbed and slotted but I only got 4 tabbed pieces and they did not interlock so while the clock is nice, the case just doesn't fit together.
K**N
Fun to build but doesn't work like its supposed to... don't buy
I am a tech nerd and thought this would be cool on my desk at work. I was disappointed. I soldered on the components and plugged it in, 4 leds didn't work. Replaced the leds and they still don't work. You can't program the time in because the firmware doesn't work like it is supposed to. If you want to solder 60 leds and a bunch of components just for the soldering sake, then this is for you. Otherwise POS
R**.
Great kit
Great kit
E**2
Good soldering practice, poor clock accuracy.
Gave numerous solder connections for practice. Clock chip, however, gained 1/2 hour in 2 months.
D**T
24 hour time
This might not be for first time builders. If you are comfy at soldering small things, this is a good afternoon project. You can change how the second hand lights work around the clock. In the USA we use 12 hr time. This clock uses 24 hour time. 13 is 1 PM. 14 is 2PM. I wish they could have given the choice of 12 or 24 hr time.
Trustpilot
1 month ago
1 month ago